How To Fix ‘Can’t Connect to this Network’ error in Windows 11

Herbalist Dr MziziMkavu

JF-Expert Member
Feb 3, 2009
42,316
33,125

How To Fix ‘Can’t Connect to this Network’ error in Windows 11​


‘Can’t Connect to this Network’ error in Windows 11. It’s a common issue that is faced by users across the world. Many consumers get confused by this circumstance, which leads to a lack of understanding about what is generating the network fault. There are various reasons why Windows 11 can’t connect to the selected network, and we’ll figure out who’s to blame so we can fix it.

Why Does Windows 11 displaying ‘Can’t Connect to this Network‘ Error?

  • Updating the program to the most recent Windows 11 in the machine, and it has the same flaws as the previous version. Of course, you can solve it without using any of the available third-party solutions. However, before moving on to advanced solutions, it’s worth pointing out some general solutions to network challenges. Even if you’ve already tried it a few minutes ago, don’t skip them.
  • Shut down and restart the Windows computer. LAN cable wear and tear can cause connection issues.
  • Remove the LAN cable and wipe it dry with a cotton cloth.
  • Remove the Wi-Fi router’s cord and clean it with a dry cloth.
  • Connect a smartphone or tablet to the same network as the computer and check the internet connection.
  • To connect to the internet and then use Wi-Fi rather than a LAN cable.
  • Confirm server uptime with your ISP.

Some initial tests

Before we get into a series of more complicated changes, it’s only natural to start with the easier ones.

1 Disabling Airplane mode

  1. Near the bottom-right corner of the desktop, click the Quick Settings icon.
explorer_m92D62PtbR-1024x655.jpg

2. Check to see if the Airplane mode is off. The tile will be dark grey in colour when the mode is disabled, similar to the other enabling Quick Settings describe above.
Untitled-design-36.jpg

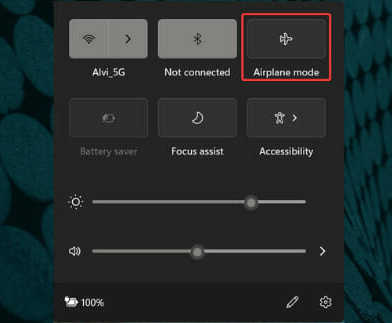
3. Airplane mode effectively disconnects you from all networks. If you enable the mode, you can get a Windows 11 can’t connect to this network error. Disable the mode and see if the problem goes away.

2 Turn the modem/router off.

  1. The modem/router, like any other machine, need rest in order to perform properly. The internal components may heat up and cause problems, even though they are design to function for days at a time.
  2. Unplug the router/modem from the source, wait at least 10 minutes, then connect it back in. Some modems/routers contain inbuilt batteries that keep them running even after they are being unplugged; in this case, you’ll need to remove the batteries as well to totally turn off the modem/router.

3 Check if you can connect to the network with other devices.

  1. Another key factor that is frequently overlooked is determining whether the problem is caused by the PC or the network. As a result, you should try connecting to the network with other devices.
  2. Because the problem is limited to your PC, you can proceed with the techniques indicated in the article if a connection is established on the other device.

What Should I Do If I Have a Network Connection Problem?

Walkthrough these steps in order, testing after each one to determine if the problem has been remedied, given all of the various causes for network troubles with Windows 11.
  1. Make sure it’s actually a Windows 11 issue. When it affects other devices on the network, there’s no reason to treat it as a computer problem.
If your phone, smart speakers, other laptops, and other devices can all connect to the internet normally, you can reasonably assume the problem is with your Windows 11 PC and proceed with these procedures. If nothing else works, go over these general internet troubleshooting techniques; you might need to call your ISP (or wait it out).
  1. Your computer should restart. Restarting is a common troubleshooting procedure for most electrical devices, and it may be all that’s required to resolve the Windows 11 network issue.
Restarting from the desktop is as simple as right-clicking the Start button and selecting Shut down or sign out > Restart.

Other options to try are :​

  1. Check that Wi-Fi is turned on or that the Ethernet wire between the computer and the modem/router is securely getting connected. This is critical, and if it is not resolved, you won’t be able to connect to the internet.
To enable Wi-Fi, certain laptops feature a physical switch that must be toggle. Others utilise FN+F5 or FN+F2 as a key combination. In Settings: Network & Internet > Wi-Fi, there’s also a Wi-Fi toggle.
2. Re-add the Wi-Fi network after forgetting it. This will restart the connection from scratch, similar to rebooting your computer. It’s possible that there was an issue with the way the Wi-Fi information was saved the first time, or that something on your computer corrupted the data. This also gives you the chance to re-enter your SSID and password if you are entering them wrong the first time.
Return to Settings and go to Network & Internet > Wi-Fi > Manage networks > Add a new network to re-create the connection.

Here are a few more tips

  • If you’re utilizing Wi-Fi, get closer to the gadget that’s giving the network connection. A network’s range is limited, and some devices are unable to receive a signal from a great distance.
  • The simplest method to eliminate distance as a reason for your inability to connect to the internet is to move closer to the access point, or move it closer to you if possible.
  • Manually select the wireless network. Even if you’re close enough and have everything set up perfectly, if Windows 11 isn’t informed to connect automatically, it could appear to be a network problem.
Navigate to Network & Internet > Wi-Fi. To locate a Wi-Fi network, display all accessible networks. Select it, then select Connect automatically, then Connect.
  • To join the network, open a web browser and follow the instructions. In most circumstances, this is required after selecting a public Wi-Fi network. This will not be seen on other networks, such as your home network.
You may need to double-check your information on that page, which normally includes your email address and name, but may also include other details such as your hotel room number if you’re staying there. You may have to pay for access in some instances, such as aboard an airline.

Some more issues

  • Turn off any other network-related technologies that might be interfering with Windows’ ability to access the network for the time being.
  • Look into the network driver. If a recent update broke, it should restore or update to the prior driver.
  • The simplest method for updating the driver is to download it from a computer with an active internet connection and then copy it to your Windows 11 computer. By rolling back the driver, you can undo a recent update.
  • Make sure Windows is up to date. If a driver update didn’t fix it or an update wasn’t required, Windows Update may have a network issue patch.
  • To diagnose and fix network problems, use the built-in Windows network trouble-shooter. Get there by way of Settings> Network & Internet > Network trouble-shooter.
  • By heading to, you can reset the network settings Settings> Network & Internet > Network reset > Reset now. This will reinstall network adapters and restore the default state of core network components.

Final Thoughts

I hope , now you how to fix “Windows can’t connect to this network” on Windows 11 and earlier versions of Windows. Although the visual instructions for Windows 10 users may appear to be different, the answers are the same for both operating systems. The network drivers can be uninstalled from a Windows PC. However, you must first obtain Windows 11 suitable drivers from the official website. In the comments box below, let us know which approach fixed the “Windows can’t connect to this network” bug.
 
Jinsi ya Kurekebisha hitilafu ya 'Haiwezi Kuunganishwa kwenye Mtandao huu' katika Windows 11

Hitilafu ya 'Haiwezi Kuunganisha kwenye Mtandao huu' katika Windows 11. Ni suala la kawaida ambalo watumiaji duniani kote hukabiliana nalo. Watumiaji wengi huchanganyikiwa na hali hii, ambayo inasababisha ukosefu wa ufahamu juu ya kile kinachozalisha kosa la mtandao. Kuna sababu mbalimbali kwa nini Windows 11 haiwezi kuunganisha kwenye mtandao uliochaguliwa, na tutatambua ni nani wa kulaumiwa ili tuweze kurekebisha.

Kwa nini Windows 11 ikionyesha Hitilafu ya 'Haiwezi Kuunganishwa na Mtandao Huu'?
Kusasisha programu kwa Windows 11 ya hivi karibuni kwenye mashine, na ina dosari sawa na toleo la awali. Bila shaka, unaweza kutatua bila kutumia yoyote ya ufumbuzi inapatikana wa tatu. Hata hivyo, kabla ya kuendelea na masuluhisho ya hali ya juu, inafaa kutaja baadhi ya masuluhisho ya jumla kwa changamoto za mtandao. Hata kama tayari umejaribu dakika chache zilizopita, usiwaruke.
Zima na uanze upya kompyuta ya Windows. Kuchakaa kwa kebo za LAN kunaweza kusababisha matatizo ya muunganisho.
Ondoa cable ya LAN na uifuta kavu na kitambaa cha pamba.
Ondoa kamba ya router ya Wi-Fi na kuitakasa kwa kitambaa kavu.
Unganisha simu mahiri au kompyuta kibao kwenye mtandao sawa na kompyuta na uangalie muunganisho wa intaneti.
Ili kuunganisha kwenye mtandao na kisha utumie Wi-Fi badala ya kebo ya LAN.
Thibitisha saa ya nyongeza ya seva na Mtoa huduma wako wa Intaneti.

Baadhi ya majaribio ya awali
Kabla hatujaingia katika mfululizo wa mabadiliko magumu zaidi, ni kawaida tu kuanza na yale rahisi zaidi.
1 Inalemaza hali ya ndege
Karibu na kona ya chini kulia ya eneo-kazi, bofya ikoni ya Mipangilio ya Haraka.

explorer_m92D62PtbR-1024x655.jpg

2. Angalia ili kuona ikiwa hali ya Ndege imezimwa. Kigae kitakuwa na rangi ya kijivu iliyokolea wakati modi imezimwa, sawa na maelezo mengine ya kuwezesha Mipangilio ya Haraka hapo juu.


Untitled-design-36.jpg

3. Hali ya ndegeni inakuondoa kwenye mitandao yote. Ukiwezesha modi, unaweza kupata Windows 11 haiwezi kuunganisha kwenye hitilafu hii ya mtandao. Lemaza modi na uone ikiwa shida itaondoka.
2 Zima modem/ruta
Modem/ruta, kama mashine nyingine yoyote, inahitaji kupumzika ili kufanya kazi vizuri. Vipengele vya ndani vinaweza kupata joto na kusababisha matatizo, ingawa vimeundwa kufanya kazi kwa siku kwa wakati mmoja.
Chomoa kipanga njia/modemu kutoka kwa chanzo, subiri angalau dakika 10, kisha uiunganishe tena. Baadhi ya modemu/ruta zina betri zilizojengewa ndani ambazo huzifanya zifanye kazi hata baada ya kuchomolewa; katika kesi hii, utahitaji kuondoa betri pia ili kuzima kabisa modem/ruta.
3 Angalia ikiwa unaweza kuunganisha kwenye mtandao na vifaa vingine
Jambo lingine muhimu ambalo mara nyingi hupuuzwa ni kuamua ikiwa tatizo linasababishwa na PC au mtandao. Matokeo yake, unapaswa kujaribu kuunganisha kwenye mtandao na vifaa vingine.
Kwa sababu tatizo ni mdogo kwa Kompyuta yako, unaweza kuendelea na mbinu zilizoonyeshwa katika makala ikiwa uunganisho umeanzishwa kwenye kifaa kingine.
Nifanye Nini Ikiwa Nina Tatizo la Muunganisho wa Mtandao?
Pitia hatua hizi kwa mpangilio, ukijaribu baada ya kila moja ili kubaini ikiwa tatizo limerekebishwa, kutokana na sababu mbalimbali za matatizo ya mtandao na Windows 11.
Hakikisha ni suala la Windows 11. Inapoathiri vifaa vingine kwenye mtandao, hakuna sababu ya kuichukulia kama shida ya kompyuta.
Ikiwa simu yako, spika mahiri, kompyuta ndogo ndogo na vifaa vingine vyote vinaweza kuunganishwa kwenye intaneti kwa kawaida, unaweza kudhani kuwa tatizo liko kwenye Kompyuta yako ya Windows 11 na uendelee na taratibu hizi. Ikiwa hakuna kitu kingine kinachofanya kazi, pitia mbinu hizi za jumla za utatuzi wa mtandao; unaweza kuhitaji kumpigia ISP wako (au kungojea).
Kompyuta yako inapaswa kuanza upya. Kuanzisha upya ni utaratibu wa kawaida wa utatuzi wa vifaa vingi vya umeme, na inaweza kuwa yote inahitajika kutatua suala la mtandao la Windows 11.
Kuanzisha upya kutoka kwa eneo-kazi ni rahisi kama kubofya kulia kitufe cha Anza na kuchagua Zima au ondoka > Anzisha upya.

Chaguzi zingine za kujaribu ni:
Hakikisha kuwa Wi-Fi imewashwa au kwamba waya wa Ethaneti kati ya kompyuta na modemu/ruta inaunganishwa kwa usalama. Hili ni muhimu, na ikiwa halijatatuliwa, hutaweza kuunganisha kwenye mtandao.
Ili kuwezesha Wi-Fi, kompyuta ndogo ndogo huangazia swichi halisi ambayo lazima igeuzwe. Wengine hutumia FN+F5 au FN+F2 kama mchanganyiko muhimu. Katika Mipangilio: Mtandao na Mtandao > Wi-Fi, pia kuna kigeuza Wi-Fi.
2. Ongeza tena mtandao wa Wi-Fi baada ya kuusahau. Hii itaanzisha upya muunganisho kutoka mwanzo, sawa na kuwasha upya kompyuta yako. Inawezekana kwamba kulikuwa na tatizo kuhusu jinsi maelezo ya Wi-Fi yalivyohifadhiwa mara ya kwanza, au kwamba kitu fulani kwenye kompyuta yako kiliharibu data. Hii pia hukupa fursa ya kuweka tena SSID na nenosiri lako ikiwa unaziingiza vibaya mara ya kwanza.
Rudi kwa Mipangilio na uende kwenye Mtandao na Mtandao > Wi-Fi > Dhibiti mitandao > Ongeza mtandao mpya ili kuunda tena muunganisho.

Hapa kuna vidokezo vichache zaidi
Ikiwa unatumia Wi-Fi, fika karibu na kifaa kinachotoa muunganisho wa mtandao. Masafa ya mtandao ni machache, na baadhi ya vifaa haviwezi kupokea mawimbi kutoka umbali mkubwa.
Njia rahisi zaidi ya kuondoa umbali kama sababu ya kutoweza kuunganishwa kwenye mtandao ni kusogea karibu na eneo la ufikiaji, au kuisogeza karibu nawe ikiwezekana.
Chagua mwenyewe mtandao wa wireless. Hata ikiwa uko karibu vya kutosha na kila kitu kimewekwa kikamilifu, ikiwa Windows 11 haijaarifiwa kuunganisha kiotomatiki, inaweza kuonekana kuwa tatizo la mtandao.
Nenda kwenye Mtandao na Mtandao > Wi-Fi. Ili kupata mtandao wa Wi-Fi, onyesha mitandao yote inayoweza kufikiwa. Ichague, kisha uchague Unganisha kiotomatiki, kisha Unganisha.
Ili kujiunga na mtandao, fungua kivinjari na ufuate maagizo. Katika hali nyingi, hii inahitajika baada ya kuchagua mtandao wa umma wa Wi-Fi. Hii haitaonekana kwenye mitandao mingine, kama vile mtandao wako wa nyumbani.
Huenda ukahitaji kuangalia mara mbili maelezo yako kwenye ukurasa huo, ambayo kwa kawaida hujumuisha anwani yako ya barua pepe na jina, lakini pia inaweza kujumuisha maelezo mengine kama vile nambari ya chumba chako cha hoteli ikiwa unaishi hapo. Huenda ukalazimika kulipia ufikiaji katika baadhi ya matukio, kama vile ndani ya shirika la ndege.
Masuala mengine zaidi
Zima teknolojia nyingine zozote zinazohusiana na mtandao ambazo zinaweza kuwa zinatatiza uwezo wa Windows kufikia mtandao kwa sasa.
Angalia dereva wa mtandao. Ikiwa sasisho la hivi majuzi lilivunjika, linapaswa kurejesha au kusasisha kwa kiendeshi kilichotangulia.
Njia rahisi zaidi ya kusasisha kiendeshi ni kuipakua kutoka kwa kompyuta iliyo na muunganisho amilifu wa mtandao na kisha kunakili kwenye kompyuta yako ya Windows 11. Kwa kurudisha kiendesha nyuma, unaweza kutendua sasisho la hivi majuzi.
Hakikisha Windows imesasishwa. Ikiwa sasisho la kiendeshi halikurekebisha au sasisho halikuhitajika, Usasishaji wa Windows unaweza kuwa na kiraka cha suala la mtandao.
Ili kutambua na kurekebisha matatizo ya mtandao, tumia kisuluhishi cha mtandao cha Windows kilichojengewa ndani. Fika huko kwa njia ya Mipangilio> Mtandao na Mtandao > Kitatuzi cha mtandao.
Kwa kuelekea, unaweza kuweka upya mipangilio ya mtandao Mipangilio> Mtandao na Mtandao > Weka upya mtandao > Weka upya sasa. Hii itasakinisha upya adapta za mtandao na kurejesha hali chaguo-msingi ya vipengee vya msingi vya mtandao.
Mawazo ya Mwisho
Natumaini, sasa wewe jinsi ya kurekebisha "Windows haiwezi kuunganisha kwenye mtandao huu" kwenye Windows 11 na matoleo ya awali ya Windows. Ingawa maagizo ya kuona ya Windows 10 watumiaji wanaweza kuonekana kuwa tofauti, majibu ni sawa kwa mifumo yote ya uendeshaji. Viendeshi vya mtandao vinaweza kufutwa kutoka kwa Windows PC. Walakini, lazima kwanza upate viendeshaji vinavyofaa vya Windows 11 kutoka kwa tovuti rasmi. Katika kisanduku cha maoni hapa chini, tujulishe ni mbinu gani iliyorekebisha hitilafu ya "Windows haiwezi kuunganisha kwenye mtandao huu".
 
Back
Top Bottom