Cause for high CPU usage??

jamadari

JF-Expert Member
Feb 13, 2010
295
92
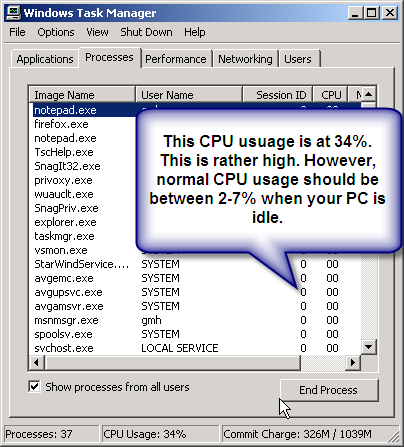
There are many legitimate programs on your computer that are the cause for high CPU usage. However, there are also illegitimate programs such as spyware and viruses that can bog your CPU down by creating multiple processes that requires your computer resources.You can view the process and CPU usuage on your computer by using Windows Task Manager. Open up task Manager by pressing Crtl-Alt-Delete at the same time.


WindowsTaskManger.png


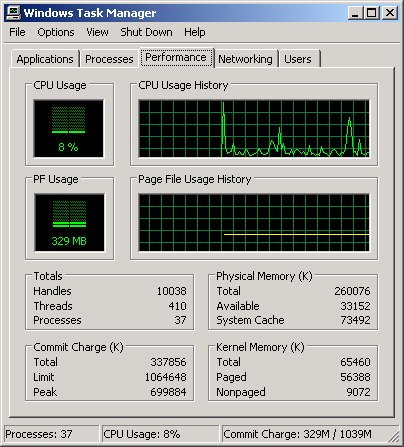
Its normal to have spikes in high CPU usage. However, if there is a constant trend of high CPU usage, this can indicate a problem. Windows Task Manger is a great tool to track CPU usage. In the Windows Task Manager, click the Performance tab. This will display your CPU Usage History.


WindowsTaskMangerPerformance.png


As you can see, there is a fluctuation in the graph. This shows that my CPU is being used for everything from opening applications to simply moving the mouse. Programs running in the background can be the cause for high CPU usage peaks also. However, if your CPU Usage History shows little variation and is high.

  • How to stop the cause for high CPU usage
  • Scan for Spyware or Adware--This is often the cause for high CPU usage. You should first scan your PC for these nasties.
  • Disable the amount of services running in the background-- You can do this by altering your computer configuration. Here is how:
    1. Open your Start menu.
    2. Click Run
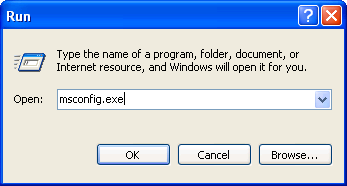
    3. In the command screen type "msconfig.exe"
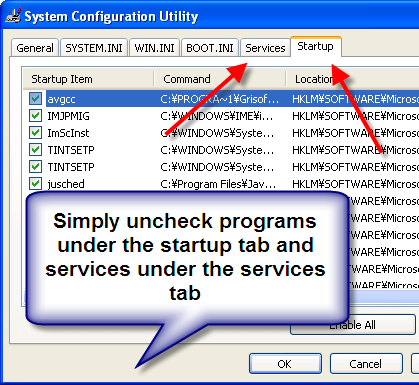
    4. In the "system configuration utility",click either "service" or "startup" tab
    5. Uncheck all programs that your are no longer using.
    6. Click "OK"
    Check out this link to find out which programs are necessary.
  • Cleaning your Registry-- You can free a massive amount of resources by repairing your registry. Often your computer uses processes to unsuccessfully repair your registry. Use a cleaner to repair it. This is a must!
  • Stop Svchost.exe-- This program acts as a host for many services on your computer. Its not a virus or spyware. It's necessary for your computer to function properly. However, you can stop the amount processes that are loaded. This will limit the need to for svchost server for loading. Here is one way to stop the svchost from loading:
    In Windows XP

    1. Click Start | Run (type) "services.msc" (no quotes)
    2. Scroll down to "DNS Client", Right-click and select: Properties
    3. Click the drop-down arrow for "Startup type"
    4. Select: Manual, click Apply/Ok and restart.
    (IF you are the only PC user, and not part of a domain.)

    This also eliminates one of SVCHOST process in Task Manager. Remember this is only one way to eliminate the processes in svchost. You need to disable a list of unnecessary programs to limit the need to use svchost server. Click this link for a list of you can eliminate from your startup configuration.
source: What is the cause for high CPU usage?
 
"Want to Speed Up Your PC ?"

Manage our Startup Programs.
Read on to find out how...


By simply managing your start up programs and services, you can speed up your PC performance considerably. This adjustment should affect boot your CPU access time and your internet speed. Following the steps below to speed up computer access time by micromanaging your start up programs and services.

If you want a defrag software tool. A registry cleaner is a great piece of software that will perform a defrag regularly and optimize your PC for performance and speed. Click here for a free scan.


However be careful to not uncheck any vital programs that could halt your PC startup. If this happens just simply restart your computer in "Safe Mode" and re-enable the program and services. Also remember to close all applications. Open applications are will not get defragmented.
1. Open your Start menu.
2. Click Run
3. In the command screen type "msconfig.exe"
4. In the "system configuration utility",
click either "service" or "startup" tab
5. Uncheck all programs that your are no longer using.
6. Click "OK"


msconfig1.png

msconfig2.1.png


Confused??

Dont know which process or program do what? To find out more about the what each process and program does on your PC. Visit the Processlibrary.com


Here is a list of programs and services you dont need unless your are running a network. They are safe to remove from your startup configuration. The removal of these features will speed up your PC during the startup
Unnecessary for Startup

Alerter
Clipbook
Computer Browser
Fast User Switching
Human Interface Access Devices
Indexing Service (Slows the hard drive down)
Messenger
Net Logon (unnecessary unless networked on a Domain)
Netmeeting Remote Desktop Sharing (disabled for extra security)
Remote Desktop Help Session Manager (disabled for extra security)
Remote Procedure Call Locater
Remote Registry (disabled for extra security)
Routing & Remote Access (disabled for extra security)
Server
SSDP Discovery Service (this is for the utterly pointless
"Universal P'n'P", & leaves TCP Port 5000 wide open)
TCP/IP NetBIOS Helper
Telnet (disabled for extra security)
Universal Plug and Play Device Host
Upload Manager
Windows Time
Wireless Zero Configuration (for wireless networks)
Workstation
 
Want more PC speed? Learn How to Speed Up PC Performance with 4 expert tips!


One of the biggest questions on the net is " How to speed up PC performance? ". Well we have compiled the best tips and tricks for a phenomenal boost in PC speed. If you follow these the for ways of how to increase PC speed, you should see a boost of anywhere between 35-52.5% in performance speed based on industry standards.


TOP 4 Ways to Speed Up PC Performance


1. Use a Registry Cleaner.
This will free up resources show you how to increase PC speed with a few clicks. This is one of the best answers to "how to speed up PC performance?". These easy point and click programs also defrag your hard drive and remove spyware. All that with the push of a button weekly will keep your computer running at it’s original PC speed specs. There are dozens of different registry cleaners software and registry cleaner tools available for use with the registry, However only about 5 have really proven themselves based on user support. One of the industry leaders is RegCure. It was last year's Most Popular PC Repair product. RegCure is the easiest and best. It’s easy to get scammed with inferior products so it’s best to choose a registry cleaner with an excellent record.For an in depth comparison of the best registry cleaner on the market, click this link.
2. Defrag your hard drive
Over time, the data on your hard drive gets scattered. De-fragmenting your hard drive puts your data back into sequential order, making it easier for Windows to access it. As a result, the performance of your computer will improve. An excellent registry cleaner will allow show you how to speed up your PC using defrag techniques. For Easy Steps to Defrag your PC Click Here!. Remember that the hard drive is the cornerstone of your system. If it is in trouble your system can collapse.
Tips to Speed Up Your Hard Drive Click Here! If you are interested in speed up your computer on the net. Click the image below. If not read on.

3. Scan for Adware/Spyware and VirusesThese nasty little worms can wreak havoc on your PC speed. Detecting and cleaning viruses is an excellent way to improve your system's performance and increase PC speed. Registry cleaners will help to remove these buggers also!To Learn more a about the best Spyware removal programs on the maket, Click this link
4. Adjust your computer’s Visual effects
Windows provides a number of resource hogging and interesting visual effects like animated windows and fading menus. These effects, however, can slow down your computer and kill your PC speed. By Altering your preferences and performance needs you can learn how to increase PC Speed in seconds. This is one of Microsoft's tips on how to increase PC speed and performance.Visit Adjust Visual Performance page for assistance.
A excellent registry cleaner can perform all but number 4. If you are serious about learning how to speed up PC performance. Get a registry cleaner and let it do most of the work. There are lot of registry cleaner choices on the market. Learn how to increase PC speed organically and don't get scammed into spending thousands for a new PC.


Bonus Tips
Use a Window's Optimization Tool
Using a Windows Optimization tool can give you a big boost in the the performance department. This takes the work out of your regular maintenance of organizing files, defragging your hard drive and other optimization task. For Windows Optimization Tools, Click Here!

Manage Your Startups

By managing your Windows startup programs and services you can free of vital CPU resources that can re-allocated your PC performance. This is a quick and easy tweak learn how to speed up PC CPU access time. Click Here to Learn how to speed up PC performance by managing your Startups.

Clean Windows Temp Files

Your Windows Temp files can swell to enormous sizes. This will eat up free space that could be allocated for applications you would like to use. Learn how to clean up your PC of useless files
 
Hi, this is so useful information, thanks. I just wanted to know, does what you have instructed here apply to later windows? (vista and windows7)? as I was reading through I had a feel that this apply to XP version of window. please let me know. Asante :help:
 
How to Speed Up Windows 7

Can You speed up Windows 7? Of course! Windows 7 is a great operating system. Its fast and light. But there are ways to make it better. You can make Windows 7 faster with just a few simple tweaks. Step 1: Enable Prefetcher


Prefetcher is a function that allows Windows 7 to preload data used to run in start application. With this option enabled, you will see a significant boost in performance of application.Here is how to use it:


1. Click Start
2. Click Run
3. Type Regedit into the command line and press enter. The registry should load for your review.
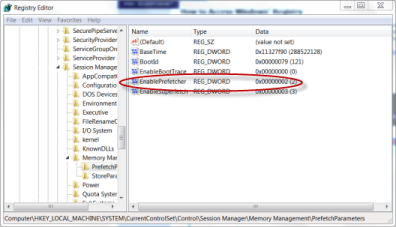
4.Locte registry key: HKEY_LOCAL_MACHINE\SYSTEM\CUrrentControlSet\\Control\SessionManager\MemoryManagement\PrefectParameters
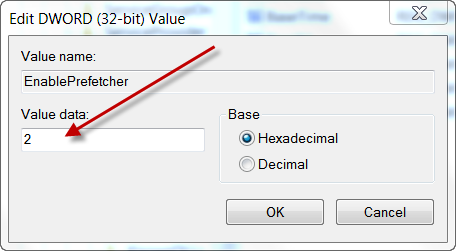
5. Double Click EnablePrefectrer on the right pane of the window
6. Change the Value to 2
7. Click Ok and Restart

prefectclick22.png


Step 2: Increase CPU Cores

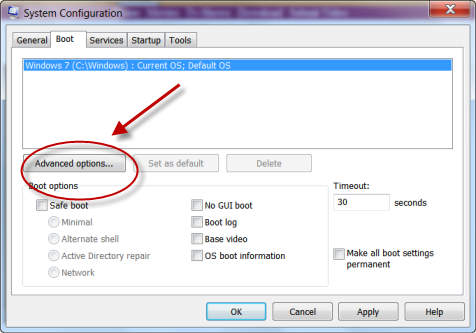
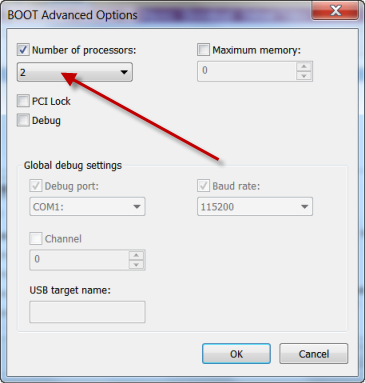
You can improve Windows 7 speed by increases the amount of CPU cores that are used during boot time and other functions.This will significantly cut down on the boot time.Here is how:


1. Open your Start menu.
2. Click Run
3. In the command screen type mscofig
4. Hit Enter
5. Click the Boot Tab and Choose Advance options..6. Under Number of Processor, enter the number of processor your computer has: 2 for dual core and 4 for quad core.
7. Restart.
cpucore2.png


cpucore3.png
There are a few more traditional ways to speed up Windows. Such as eliminate excess resources and startups for more ways to speed up
 
Stopping Windows Services


There are a literally scores of windows services running on your PC. Some of these task are necessary. However, many eat away at you system resources and memory. There are many reason you should be actively managing windows these task. The main reason is that these services will download and install program without your permission. This additional software adds to your CPU use workload and will eventually lead to a sluggish PC, slow start up and shutdown. You can use a registry cleaner to speed up your PC startup and limit needless services.

How to Stop Windows Services

Step 1: Open the Service Console

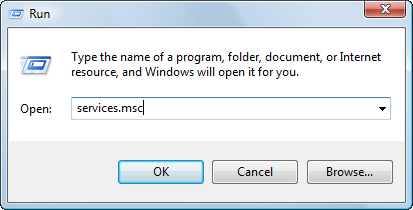
The service console is an application that allows you to define, manage windows services. The easiest way to activate this console is by using the command services.msc. Here is how to pull up your service console.

1. Open the Run console
2. Type services.msc.


servicesruncommand.png


In VistaYou can call enter the services.msc command in your Quick Search bar. Simply press the start button and enter the the command.


sevicesentervista.png
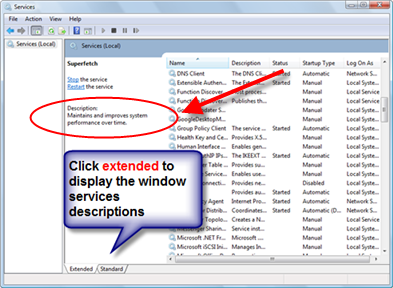
Once the service console appears, you will be able to a list of all the services that are set up on your computer. By click the name of the service you will be able to see a detailed description of the task. You need to hit the extended option at the bottom of the page to display the full description after selecting the service.

windowservicesderscriptionsmaller.png
Step 2: Check the Dependencies

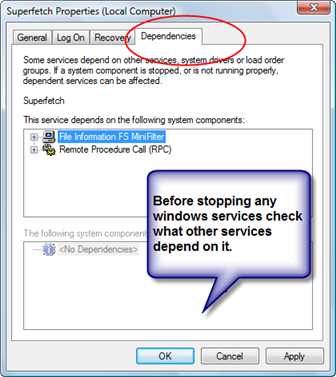
Before stopping any services, its important to see what other services depended on the particular services. Sometimes by deactivating a services you can cause a change reaction to occur and disrupt other services and application.
1. Right Click the service
2. Click Properties
3. In the service properties menu, click Dependencies tab


windowservicesdependencies.png
Step 3: Deactivate the Service

All these services are programmed to load when the application that depends on it is loaded. However, windows loads most of these task at startup. Therefore you need to change the status of the services. There are three status options in the startup type: Automatic, Manual, and Disable. Automatic starts when the computer loads windows. Manual startup occurs when and application is loaded. To stop a services you must choose Disable.

1. Right Click the service
2. Click Properties
3. In the service properties menu, Under Startup Type, click Disable tab


Remember that you should be careful what services you disable. Three unnecessary services that you can easily disable are:Indexing servies
Superfetch
Remote Deskstop
 
How to Enable Task Manager


If you enable task manager features, you will rewarded with the ability to access your system resources, manage all processes and control your start-up programs
How to Start Task Manager

You can enable task manager features by simply pressing CTRL-ALT-DEL and selecting the task manager from the options.


taskmangerinfo3.png


Using the Task Manager Window to End a Process

The Windows Task Manager will give you the ability to review the processes. After clicking the processes tabs, you will have a comprehensive view of all the the services that are running on your PC. This will also gives you a list of RAM usage for each program.For more detail on stopping Windows Services, check out this tutorial.The Windows Task Manager will give you the ability to break and shutdown programs that are caused Windows to bottleneck.

1. Press CTRL-ALT-DELETE
2. Click the Processes
2. Evaluate the programs in the task manager.
3. Click the process and then double click End Process.


endprocess.png


Using the Task Manager to Monitor Resources

After you load task manager window, you can monitor your system's health. Windows has a great tool called Reliability and Performance Monitor. It records the interrupts in processing, spikes in memory usage, and hard disk failure. If you think that your problem is high CPU usage, check out this tutorial.1. Press CTRL-ALT-DELETE
2. Click the Resource Monitor in Task Manager
2. Click the tabs under Disk, Memory, CPU and Memory.
4. Search for any irregularities, spikes or interruptions.


resourcemonitor.png


Using the Task Manager to Memory Leakage


if you enable task manager features you can easily see which programs are hogging up most of your memory, RAM. You can access the memory monitor features by following the directions below:
1. Start the Task Manager
2. Click the Resource Monitor in Task Manager
2. Click the tabs under Disk, Memory, CPU and Memory.
4. Click Performance.
5. Click Resource Monitor
6. Chose the Memory tab.
7. Evaluate which programs are hogging up the memory.

To Solve Memory Problems, check out this tutorial.

memorymonitor.png


This gives you a detailed breakdown of your memory usage. You should be able to evaluate the memory usage by viewing the colored bar. Windows requires a lot of RAM to run. But other programs shouldn't stretch your memory capacity. After you enable task manager features, try to speed up your PC by speeding up your boot time.
 
Fix an Insufficient Memory Error

When your computer runs out of workable memory, you will get an insufficient memory error. Before we begin, lets look at the different kinds of memory in your computer. Memory refers to short-term data storage on your computer, other wise known as RAM. A lot of information is loaded into your RAM. When you load a program, the program files will be dumped into the computer's memory. Therefore, shutting the program down will cause the majority of it's data to flushed out of the memory. Shutting your PC down for the most part causes the files loaded into RAM to be 'forgotten' by the computer.
Increasing RAM, increases the amount of data your computer can remember, making it faster. You computer also has Virtual Memory RAM.


Step 1: Check Your Memory


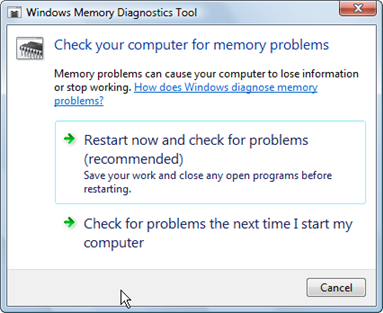
If you have an insufficient memory error, the root cause may be faulty memory. So, its best to run a memory test to ensure that your memory is functioning properly. Windows has a Memory Diagnostic tool to check for problems in your RAM.
1. Click Start
2. Type memory into the search bar.
3. Choose Memory Diagnostic Tool.
4. Choose the option to check your memory.


memorytestwindow.png


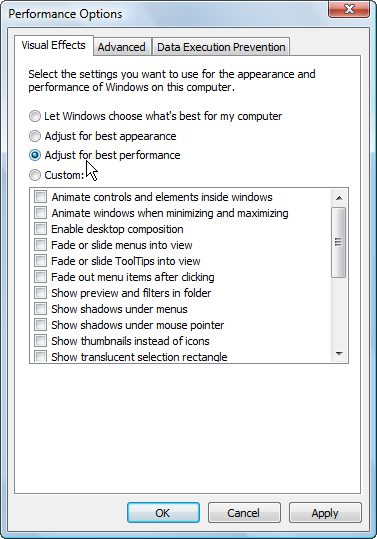
Step 2: Adjust Visual Performance

Windows has a lovely interface. Fading icons, translucency, drop down shadows, animated windows are just a few of the fancy features. However, these features are completely unnecessary to your computer performance. All these features are poured into your RAM. So, if you would like to avoid insufficient memory error and speed up your PC, adjust your visual options. Here is how:
1.Click Start, and then click Control Panel.
2.Click System.
3.Click Advanced System Settings
4.Under Performance, Click Settings.
5.Under Visuals Effects, you may choose from a list of options such as Adjust for best performance or custom. If you choose Adjust for best performance all the features will be unchecked.


perfomanceoptions.png


Step 3: Activate Virtual Memory

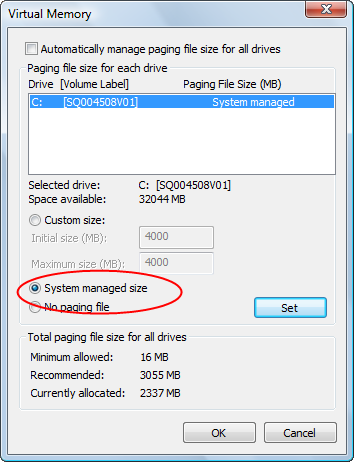
You can free up memory by accessing your paging file. Virtual Memory can stop an insufficient memory error by reserving free space on your hard drive to act like RAM. Information can dumped there instead of clogging up your RAM. Here is how:
1. Go to your System Properties in the Control Panel.
2. Under the Advance tab under Performance, click Settings.
3. Select Advanced
4. Choose change under Virtual Memory.
5. Select your Hard Disk.
6. Click System Manage Size.

You can customize your Virtual Memory Settings to any size you prefer. Click Customize Virtual Memory RAM to see how.


vistavirtualmemory.png


Step 4: Use ReadyBoost

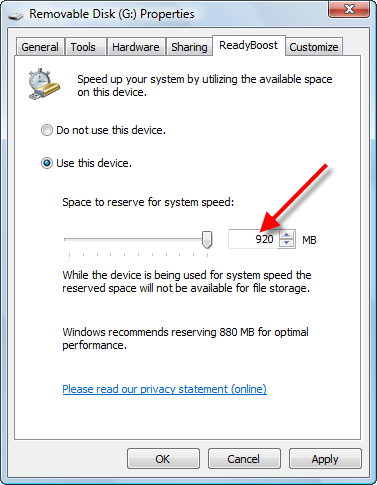
ReadyBoost is a feature offered in Windows Vista that allows you to use a USB storage device as a secondary memory device. This acts very similar to Virtual Memory RAM. Often using ReadyBoost can be faster than your paging file memory. Using the ReadyBoost feature is an excellent way to avoid an insufficient memory error. Here is how to use ReadyBoost.
1. Plug in a USB device.
2. Click Start
3. Choose Computer
4. Right Click your USB device
5. Select Properties
6. Choose ReadyBoost
7. Adjust the "Space to reserve for system speed" by sliding the bar


readyboost.png


Step 5: Limit Programs In Memory

By simply closing programs and stopping unnecessary tasks, you can free up RAM. This is a simple procedure. But, make sure you don't prevent essential programs from loading
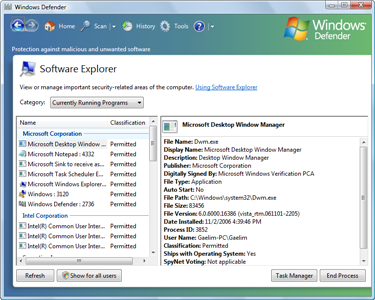
1.Click Start button and load the Control Panel.
2. Under the Control Panel menu, click Programs.
3. Under the Windows Defender heading choose View currently running programs.
4. Choose Startup Programs from the Category option.
5. Remove Programs that you feel unnecessary for startup.


For Window XP, you can use the msconfig option. Just type msconfig in your RUN command box. For details on how to Speed Up your Start up in XP and Vista, click Remove Unnecessary Startups.
windowsdefender.png
 
my laptop was installed window 7, then i formated it with window xp, but during the forwating i forgot to delete the previous window(window 7), now i want to remove window 7 without performing another format. plz help me.
 
my laptop was installed window 7, then i formated it with window xp, but during the forwating i forgot to delete the previous window(window 7), now i want to remove window 7 without performing another format. plz help me.
Kama kweli Uli Format kwa kutumia CD ya Windows XP kuifuta hiyo Windows 7 hakuna haja tena kufuta Mafaili ya Windows 7. Kwani hiyo yenyewe Windows XP itaifuta hayo Mafaili ya Windows 7 lakini kama ulikwenda na haya maelezo yangu ya chini utakuwa umefanikiwa kuifuta hiyo windows 7 kwenye hiyo Laptop yako. La kama umetumia njia nyingine itabidi ufuate njia yangu ya chini hebu angalia namna ya Ku Format kwa kutumia Windows XP

You need a “clean install” of Windows XP when you got millions of viruses in your computer or you had tried every thing to restore your windows by using anti virus or system restore tools etc. A brand new hard drive also needs to install clean XP. A clean install simply means formatting the hard drive ( only C drive ) and reinstalling the operating system, puts the system back in the state in which you first got the machine.
Before You Proceed With The Installation

Backup your important data before you begin this process! (If you have multiple partitions on your hard drive, data on partitions other than the system partition “except C drive” will not be affected with the following steps, but a backup is still recommended to be on the safe side). You will also have to re install all the softwares you were using in your previous XP.
NOTE : Use these instructions at your own risk!. Only users experienced in installing, troubleshooting, and making repairs to Windows Operating Systems should attempt to follow these instructions on their own. If you choose to proceed, be aware that GetPcMemory assumes no responsibility for any problems encountered.
Step 1 : Prepare The Boot Sequence

Insert the windows XP cd in your cdrom and than go to the BIOS by hitting “DEL” or “F12″ when your system in powering on. Go to Boot order and make sure cdrom is on the first place.
Save settings and restart your computer.
Once you have successfully booted from the CD, you will see the Windows XP “Welcome to Setup” screen. Press ENTER to begin the setup process.
windows_xp_installation_welcome.gif

Step 2: Accept the license agreement

When you see the Windows XP license agreement press F8 to accept it and proceed.
windows_xp_installation_license_agreement.gif

Step 3: Searching for Previous Versions of Windows XP

Setup will search for existing Windows installations. You will see the next “repair or install fresh copy” screen appear only if a Windows installation currently exists on your machine. If you’re installing on a brand-new hard drive, skip to Step 5.
windows_xp_installation_previous_installation.gif

Step 4:Continue Installing a Fresh Copy

Press ESC. You will be given a list of partitions available on your hard drive.
windows_xp_installation_unpartition_drives.gif

Step 5: Partitions

If there are multiple partitions on your hard drive, or you have multiple hard drives in the computer, use the UP or DOWN arrow keys to choose your install partition. Please note that your system partition needs to be a primary partition (usually the first partition that shows up in the list), not a logical partition.
The partition should be at least 10 GB in size. Make sure that all the data you need from this partition is copied elsewhere, because it will be deleted.
Once you have selected the right partition selected, press ENTER. You will see the next “you already have a system installed” screen only if you already have Windows installed on this partition. If you are installing on a brand-new hard drive, skip to Step 7.
windows_xp_installation_multiple_warning.gif

Step 6: Continue Installing On The Selected Drive

Press C to continue. You will be given a list of install options
/
windows_xp_installation_partition_format.gif

Step 7: Format The Selected Partition

Select the option to “Format the partition using the NTFS file system (quick) and press ENTER.You will receive a warning about formatting the drive unless the drive is brand-new.
windows_xp_installation_format_warning.gif

Step 8: Continue With The Format

Press F to continue formatting selected partition. If you still haven’t backed up, this is the last change to backup your important data, after this step you will not to able to go back and restore your data.
windows_xp_installation_formatting.gif

Step 9: Copying Files

After the format setup will automatically copy files and restart your computer. Go to BIOS and remove cdrom from first boot device. Start your computer.
/
windows_xp_installation_copying_files.gif

Step 10: Automatic Installation After Restart

Setup will continue to install after the restart. it will ask you for the product key and user name etc. Fill the forms yourself.
windows_xp_installation_after_restart_setup.gif

After The Installation

Install the missing drivers because windows XP will install a limited set of drivers,you’ll have to find the rest. To see which drivers you’re missing, go to the Control Panel > System > Hardware tab > Device Manager. Things next to a Yellow exclamation is a missing driver. You’ll need to reinstall these drivers from a system CD that came with your computer or download them from the manufacture’s website.

Hii ndiyo njia Nzuri ya Ku Format Laptop yako Kwa Kutumia CD Ya Windows XP kama ulikuwa hujafanya hivyo utakuwa umekosea Ku Format hiyo Laptop yako jaribu kufuata huu Ushauri wangu utafanikiwa.
 
10.
Windows XP restarts and then continues with the installation process. From this point forward, you can use your mouse. Eventually, the Regional and Language Options page appears. Click Next to accept the default settings. If you are multilingual or prefer a language other than English, you can change language settings after setup is complete.
xp-setup-7-regional-and-lan.jpg

11.
On the Personalize Your Software page, type your name and your organization name. Some programs use this information to automatically fill in your name when required. Then, click Next.
xp-setup-8-personalize-your.jpg

12.
On the Your Product Key page, type your product key as it appears on your Windows XP CD case. The product key is unique for every Windows XP installation. Then, click Next.
xp-setup-9-your-product-key.jpg

13.
On the Computer Name and Administrator Password page, in the Computer name box, type a name that uniquely identifies your computer in your house, such as FAMILYROOM or TOMS. You cannot use spaces or punctuation. If you connect your computer to a network, you will use this computer name to find shared files and printers. Type a strong password that you can remember in the Administrator password box, and then retype it in the Confirm password box. Write the password down and store it in a secure place. Click Next.
xp-setup-10-computer-name-a.jpg

14.
On the Date and Time Settings page, set your computer’s clock. Then, click the Time Zone down arrow, and select your time zone. Click Next.
xp-setup-11-date-and-time-s.jpg

15.
Windows XP will spend about a minute configuring your computer. On the Networking Settings page, click Next.
xp-setup-12-network-setting.jpg

16.
On the Workgroup or Computer Domain page, click Next.
xp-setup-13-workgroup-or-co.jpg


Part 3: Complete the installation

17.
Windows XP will spend 20 or 30 minutes configuring your computer and will automatically restart when finished. When the Display Settings dialog appears, click OK.
xp-setup-14-display-setting.jpg

18.
When the Monitor Settings dialog box appears, click OK.
xp-setup-15-monitor-setting.jpg

19.
The final stage of setup begins. On the Welcome to Microsoft Windows page, click Next.
xp-setup-16-welcome-to-micr.jpg

20.
On the Help protect your PC page, click Help protect my PC by turning on Automatic Updates now. Then, click Next.
xp-setup-17-help-protect-yo.jpg

21.
Windows XP will then check if you are connected to the Internet:
•If you are connected to the Internet, select the choice that describes your network connection on the Will this computer connect to the Internet directly, or through a network? page. If you’re not sure, accept the default selection, and click Next.
xp-setup-18-will-this-compu.jpg

•If you use dial-up Internet access, or if Windows XP cannot connect to the Internet, you can connect to the Internet after setup is complete. On the How will this computer connect to the Internet? page, click Skip.
xp-setup-18b-how-will-this.jpg

22.
Windows XP Setup displays the Ready to activate Windows? page. If you are connected to the Internet, click Yes, and then click Next. If you are not yet connected to the Internet, click No, click Next, and then skip to step 24. After setup is complete, Windows XP will automatically remind you to activate and register your copy of Windows XP.
xp-setup-19-ready-to-activa.jpg

23.
On the Ready to register with Microsoft? page, click Yes, and then click Next.
xp-setup-20-ready-to-regist.jpg

24.
On the Collecting Registration Information page, complete the form. Then, click Next.
xp-setup-21-collecting-regi.jpg

25.
On the Who will use this computer? page, type the name of each person who will use the computer. You can use first names only, nicknames, or full names. Then click Next. To add users after setup is complete or to specify a password to keep your account private, read Create and customize user accounts.
xp-setup-22-who-will-use-th.jpg

26.
On the Thank you! page, click Finish.
xp-setup-23-thank-you.jpg

Congratulations! Windows XP setup is complete. You can log on by clicking your name on the logon screen. If you’ve installed Windows XP on a new computer or new hard disk drive, you can now use the File and Settings Transfer Wizard to copy your important data to your computer or hard disk drive.
After logon, take a few minutes to validate your copy of Windows. Validation gives you access to hundreds of free downloads from the Microsoft Download Center. To learn about the new features Windows XP provides, click the Start button, click All Programs, click Accessories, and then click Tour Windows XP.
 
Back
Top Bottom