Herbalist Dr MziziMkavu

JF-Expert Member
Feb 3, 2009
42,329
33,138

How To Fix Slow LAN Speed On Windows 11​


In this article, we will explain 6 methods that can fix slow LAN speed on Windows 11.
Whether you are attending an online meeting or playing an online multiplayer game, a stable internet connection is a must for a perfect online experience otherwise it is bound to be ruined. Apart from these, a slow internet connection can even put a brake on the files you are downloading and waste your precious time.
Untitled-design-8-3.jpg

The biggest culprit of a slow internet connection when you migrate to LAN from Wi-Fi is a malfunctioning router. But if you’ve recently switched to Windows 11, there can be several underlying reasons. Since the internet connection speed is dependable on several factors, it’s hard is figuring out the exact cause of this problem. To help you out and fix a slow LAN speed on Windows 11, we have put down some tried and tested methods that can boost your connectivity speed.


Migrate to a Different DNS​

When you face slow LAN speed issues, the first thing you should do is switch to a different DNS address. Doing so will improve your connection speed. There are several DNS service providers right now namely Google public DNS (8.8.8.8 and 8.8.4.4), Cisco OpenDNS (208.67.222.222 and 208.67.220.220), Cloudflare DNS (1.1.1.1 and 1.0.0.1), and more.
It is highly recommended to avail the Google Public DNS for better connectivity as it has the least probability of going offline or facing issues. Although you can always switch to any other DNS and see if this improves your network speed. Here’s how to change the DNS:
  • Head to the Settings App on Windows 11 using the ‘Windows + I’ shortcut. You can also search for it in the Start menu of Windows 11.
  • When in Settings Window, choose the ‘Network & internet’ section from the left pane and then ‘Ethernet’ from the right side of the window.
  • Next, press the Edit button for the ‘DNS server assignment’ option. This will bring up a dialog box named ‘Edit DNS settings’.
  • Now expand the drop-down menu and choose the ‘Manual’ option.
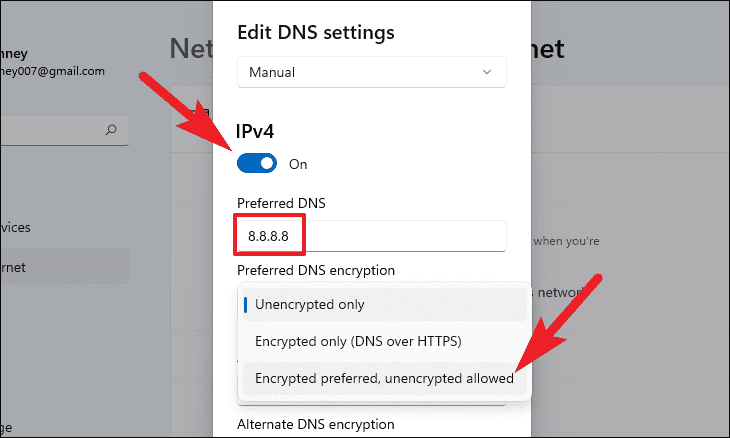
  • As soon as you do it, you will see two switches for ‘IPv4’ and ‘IPv6’. Turn on the ‘IPv4’ toggle and you’ll see two boxes named ‘Preferred DNS’ and ‘Alternate DNS’.
  • Here you can enter the DNS you intend to use. For instance, if you want to use Google Public DNS, mention ‘8.8.8.8’ inside the ‘Preferred DNS’ textbox and 8.8.4.4 inside the ‘Alternate DNS’ textbox.
fix slow LAN speed on Windows 11

  • Next, modify the ‘Preferred DNS encryption’ settings and choose ‘Encrypted only’ or ‘Encrypted Preferred, Unencrypted Allowed’.
  • After this, press the ‘Save’ button to apply the changes.

Tweak the Speed and Duplex Settings​

If you configure the Speed and Duplex settings wrongly your LAN speed will surely be restricted. Consider the following example; if you have opted for 100Mbps bandwidth but the Speed and Duplex only allow 10Mbps speed, then your network speed will be crammed up to only 10Mbps. Hence, it is essential to ensure that your Speed and Duplex settings are rightly configured. Here’s how to go about it:
  • First of all, head to the Start Menu and type Settings in the Search bar. Now choose the relevant search result to open the Windows 11 Settings Window.
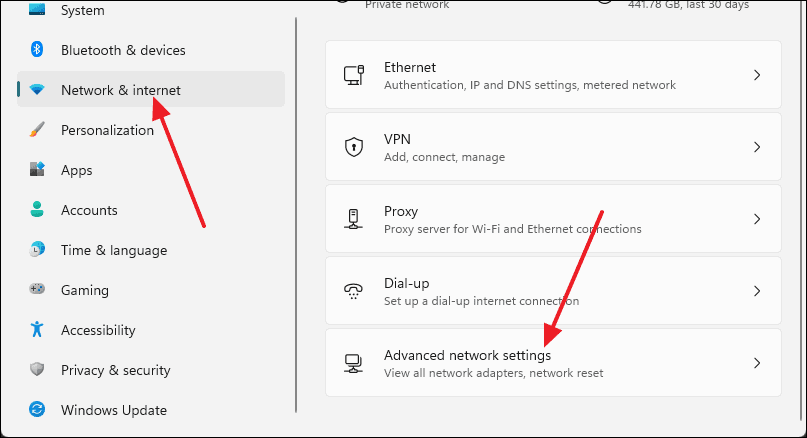
  • Next, choose the ‘Network & internet settings from the left panel and then ‘Advanced network settings’ option from the right pane.
fix slow LAN speed on Windows 11

  • Now click to open the ‘More network adapter options’. This will open a new pop-up named ‘Network Connections’.
  • Next, right-click your Ethernet Adapter to bring up the context menu and choose the ‘Properties’ option.
  • This will open up a new window; now press the Configure button near the Adapter name.
  • You will be taken to the Properties Window. Here move to the ‘Advanced’ tab and keep scrolling until you reach the ‘Speed & Duplex’ property in the ‘Property:’ list.
  • Now click on the property to highlight it and then choose the ‘100 Mbps Full Duplex’ value in the drop-down menu of the value text. This value will work if your bandwidth is approximately 100Mbps. However, if your bandwidth is greater than 100 Mbps, then choose the ‘1.0 Gbps Full Duplex’ option here.

See if any Windows Update is pending​

Another probable reason for a slow connection speed via LAN can be a pending Windows Update. If any window update is ready for download and you’re avoiding doing so for a long time, it can also cut down your internet speed. Here’s what you need to do:
  • Use the Windows + I shortcut to bring up the Settings Window on your PC.
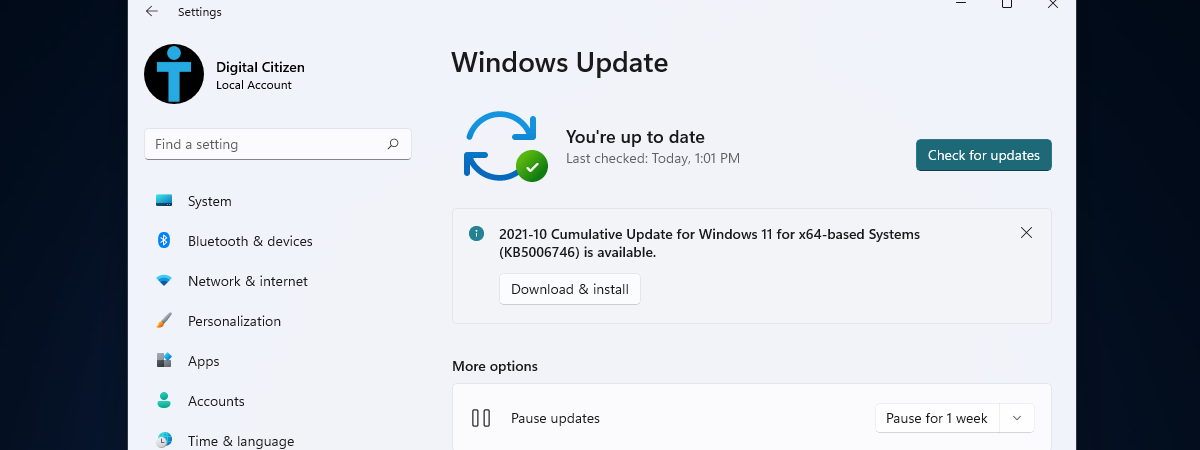
  • When in the Settings Window, choose the ‘Windows update’ tile from the left pane and then press the ‘Check for updates’ button on the right.
fix slow LAN speed on Windows 11

  • This will force Windows to automatically scan if any update is pending.
  • If Windows finds any update, it will download and install it automatically. You will have to restart your PC after the update finishes installing.
  • Now go back and see if the LAN speed is restored to normal.

Disable the Windows Update Services​

A windows update service keeps running in the background and is in charge of providing the windows update released by Microsoft to your Windows 11 PC. While this service should be enabled always and should not be turned off, sometimes you ought to disable it for reasons such as slow internet speeds.
This is because Windows Update has a bad reputation for consuming your bandwidth significantly. Thus, you can turn off this service, when you cannot afford any network interruptions in scenarios such as when you are playing your favorite online multiplayer game. Here’s how to do it.
  • First of all, bring up the Run dialog box on your Windows 11 PC.
  • Now type ‘services.msc’ in the command line and press the Enter key.
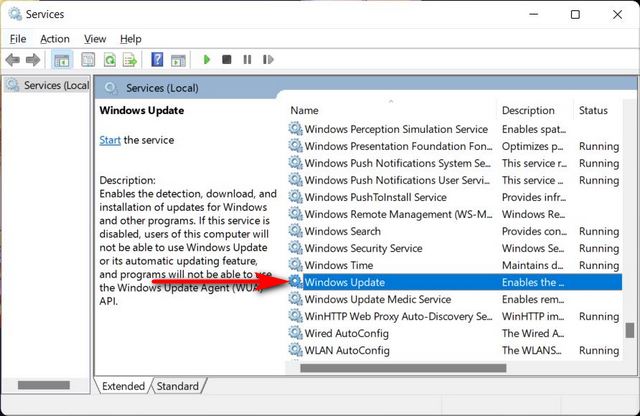
  • This will take you to the Services window of your Windows 11 PC. Now keep scrolling the list until you find the Windows Update service within it.
  • Next, double click on this service to bring up its properties window.
  • When in the Properties window, look for a ‘Stop’ button present under the Service Status.
  • Now click on this button and this will stop the service and it will no longer run in the background.
Disable-Windows-11-Update-Service-body-2.jpg

  • After doing this, you also need to prevent this service from automatically starting itself.
  • To do this, choose the ‘Disabled’ option from the dropdown menu for Startup type.
  • After performing the above changes, press the OK button to apply the changes.

Uninstall the VPN Client​

You can also experience a slow internet connection speed if you use a VP service that connects to the internet. This issue gets intense if you use the service from the free VPN client. This is because disabling or turning off these VPN clients is not enough, they can still run in the background and consume network bandwidth and resources significantly.
Hence to avoid a slow LAN connection speed, it is essential to uninstall the VPN client from your Windows 11 PC. Here’s how you can do so successfully.
Microsoft gives you two ways of uninstalling any software from your Windows 11 PC. It is possible to uninstall the software from the Settings Menu itself or go can go to the Control Panel and uninstall a specific app. I prefer uninstalling any application from the Settings menu itself. Let’s see how to make it happen.
  • First and foremost, use the ‘Settings+I’ shortcut to quickly bring up the Settings Menu.
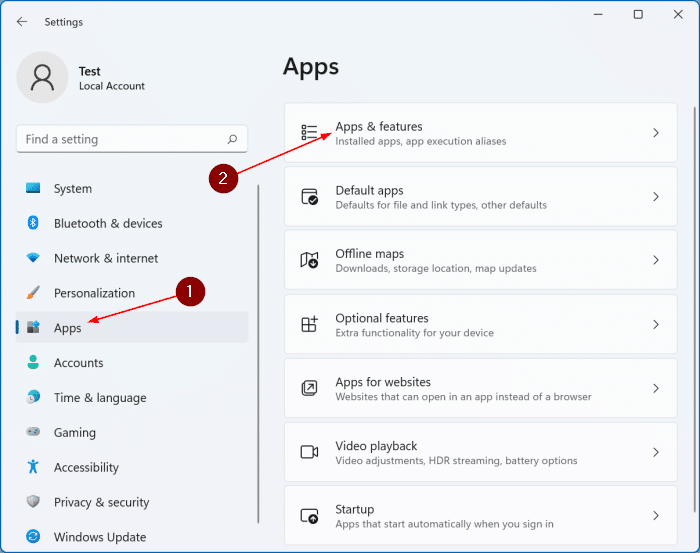
  • When you’re in the Settings menu, choose the ‘Apps’ tab from the left pane of Windows Settings and then choose the ‘Apps & features’ option from the right panel.
uninstall-apps-in-Windows-11-pic1_thumb.png

  • Here keep scrolling until you reach the list of all the apps installed on your PC. Now you need to look for the VPN client in the list that you intend to uninstall.
  • When you find it, click on the three vertical dots near it. Now choose the ‘Uninstall’ option from the flyout menu.
  • A pop-up will appear to confirm the action.
  • Click the Uninstall button here to remove the VPN client from your Windows 11 PC.

Update your Network Driver​

If the issue is not yet fixed, there is a good chance that the driver for the network adapter present on your Windows 11 PC’s motherboard is obsolete. This can be a probable cause why you are getting slow LAN speed on your PC. To quickly eliminate this reason, you need to update your network drivers. Here’s how to update your network drivers from the Device Manager of your Windows 11 PC.
  • First of all, use the Windows+R shortcut to bring up the Run dialog box on your Windows 11 PC.
  • Now type ‘devmgmt.msc’ in the command line and press the Enter key. This way you will directly reach the Device Manager Window.
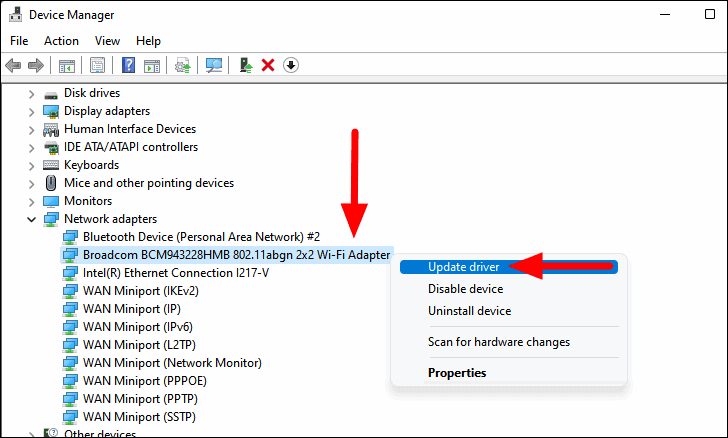
  • Now scroll down until you reach the ‘Network Adapter’ option listed here. Click on it to expand the menu and see all the network adapters.
allthings.how-how-to-install-or-update-windows-11-wifi-driver-image-7.png

  • Next, right-click to bring up the context menu of the active network adapter and choose the ‘Update driver option.
  • Now a new window will open up on your PC. Choose the ‘Search automatically for drivers’ option here.
  • Wait until Windows look for driver updates and installs them.

Conclusion​

Here we reach the end of our troubleshooting guide on How to fix slow LAN speed on Windows 11. Since it is a very common issue that is triggered by some wrong settings, they can be fixed easily using the above methods. Which of the above solution resolved the issue? Let us know in the comments.
 
Jinsi ya Kurekebisha kasi ya polepole ya LAN kwenye Windows 11

Katika nakala hii, tutaelezea njia 6 ambazo zinaweza kurekebisha kasi ya polepole ya LAN kwenye Windows 11.
Iwe unahudhuria mkutano wa mtandaoni au unacheza mchezo wa wachezaji wengi mtandaoni, muunganisho thabiti wa intaneti ni wa lazima kwa matumizi bora ya mtandaoni vinginevyo utaharibika. Kando na haya, muunganisho wa polepole wa mtandao unaweza hata kuweka breki kwenye faili unazopakua na kupoteza muda wako wa thamani.

Untitled-design-8-3.jpg

Shida kubwa ya muunganisho wa polepole wa mtandao unapohamia LAN kutoka kwa Wi-Fi ni kipanga njia kisichofanya kazi. Lakini ikiwa hivi karibuni umebadilisha Windows 11, kunaweza kuwa na sababu kadhaa za msingi. Kwa kuwa kasi ya uunganisho wa mtandao inategemea mambo kadhaa, ni vigumu kutambua sababu halisi ya tatizo hili. Ili kukusaidia na kurekebisha kasi ya polepole ya LAN kwenye Windows 11, tumeweka baadhi ya mbinu zilizojaribiwa ambazo zinaweza kuongeza kasi yako ya muunganisho.


Hamisha kwa DNS tofauti
Unapokabiliana na masuala ya kasi ya polepole ya LAN, jambo la kwanza unapaswa kufanya ni kubadili anwani tofauti ya DNS. Kufanya hivyo kutaboresha kasi ya muunganisho wako. Kuna watoa huduma kadhaa wa DNS kwa sasa ambao ni Google public DNS (8.8.8.8 na 8.8.4.4), Cisco OpenDNS (208.67.222.222 na 208.67.220.220), Cloudflare DNS (1.1.1.1 na 1.0.0.1), na zaidi.
Inapendekezwa sana kutumia Google Public DNS kwa muunganisho bora kwa kuwa ina uwezekano mdogo wa kwenda nje ya mtandao au kukabiliwa na matatizo. Ingawa unaweza kubadili DNS nyingine yoyote na kuona kama hii itaboresha kasi ya mtandao wako. Hapa ni jinsi ya kubadilisha DNS:
Nenda kwa Programu ya Mipangilio kwenye Windows 11 kwa kutumia njia ya mkato ya 'Windows + I'. Unaweza pia kuitafuta kwenye menyu ya Mwanzo ya Windows 11.
Ukiwa kwenye Dirisha la Mipangilio, chagua sehemu ya ‘Mtandao na intaneti’ kutoka kwenye kidirisha cha kushoto kisha ‘Ethernet’ kutoka upande wa kulia wa dirisha.
Kisha, bonyeza kitufe cha Hariri kwa chaguo la 'mgawo wa seva ya DNS'. Hii italeta kisanduku cha mazungumzo kinachoitwa 'Hariri mipangilio ya DNS'.
Sasa panua menyu kunjuzi na uchague chaguo la 'Mwongozo'.
Mara tu utakapoifanya, utaona swichi mbili za 'IPv4' na 'IPv6'. Washa kigeuzi cha 'IPv4' na utaona visanduku viwili vinavyoitwa 'Preferred DNS' na 'DNS Alternate'.
Hapa unaweza kuingiza DNS unayotaka kutumia. Kwa mfano, ikiwa ungependa kutumia Google Public DNS, taja ‘8.8.8.8’ ndani ya kisanduku cha maandishi cha ‘DNS Inayopendelea’ na 8.8.4.4 ndani ya kisanduku cha maandishi cha ‘DNS Mbadala’.

allthings.how-how-to-change-dns-on-windows-11-image-5.png

Ifuatayo, rekebisha mipangilio ya ‘Usimbaji fiche wa DNS Unaopendelea’ na uchague ‘Iliyosimbwa kwa njia fiche pekee’ au ‘Inayopendelewa Iliyosimbwa, Isiyosimbwa Inaruhusiwa’.
Baada ya hayo, bonyeza kitufe cha 'Hifadhi' ili kutumia mabadiliko.

Rekebisha Mipangilio ya Kasi na Duplex
Ukisanidi mipangilio ya Kasi na Duplex kimakosa kasi yako ya LAN hakika itazuiwa. Fikiria mfano ufuatao; ikiwa umechagua kipimo data cha 100Mbps lakini Speed na Duplex huruhusu tu kasi ya 10Mbps, basi kasi ya mtandao wako itasongwa hadi 10Mbps pekee. Kwa hivyo, ni muhimu kuhakikisha kuwa mipangilio yako ya Kasi na Duplex imesanidiwa ipasavyo. Hapa kuna jinsi ya kuishughulikia:
Kwanza kabisa, nenda kwenye Menyu ya Mwanzo na chapa Mipangilio kwenye upau wa Utafutaji. Sasa chagua matokeo ya utafutaji yanayofaa ili kufungua Dirisha la Mipangilio ya Windows 11.
Ifuatayo, chagua chaguo la 'Mtandao na mtandao kutoka kwa paneli ya kushoto na chaguo la 'Mipangilio ya hali ya juu ya mtandao' kutoka kwa kidirisha cha kulia.

allthings.how-how-to-fix-slow-lan-speed-on-windows-11-image-7.png

Sasa bofya ili kufungua 'Chaguo zaidi za adapta ya mtandao'. Hii itafungua dirisha ibukizi jipya linaloitwa 'Viunganisho vya Mtandao'.
Ifuatayo, bofya kulia Adapta yako ya Ethernet kuleta menyu ya muktadha na uchague chaguo la 'Sifa'.
Hii itafungua dirisha jipya; sasa bonyeza kitufe cha Sanidi karibu na jina la Adapta.
Utachukuliwa kwa Dirisha la Mali. Hapa nenda kwenye kichupo cha 'Advanced' na uendelee kusogeza hadi ufikie kipengele cha 'Kasi na Duplex' katika orodha ya 'Mali:'.
Sasa bofya kwenye kipengele ili kuiangazia kisha uchague thamani ya ‘100 Mbps Full Duplex’ kwenye menyu kunjuzi ya maandishi ya thamani. Thamani hii itafanya kazi ikiwa kipimo data chako ni takriban 100Mbps. Hata hivyo, ikiwa kipimo data chako ni kikubwa kuliko Mbps 100, basi chagua chaguo la '1.0 Gbps Full Duplex' hapa.

Angalia ikiwa Usasishaji wowote wa Windows unasubiri
Sababu nyingine inayowezekana ya kasi ya polepole ya unganisho kupitia LAN inaweza kuwa Usasishaji wa Windows unaosubiri. Ikiwa sasisho lolote la dirisha liko tayari kupakuliwa na unaepuka kufanya hivyo kwa muda mrefu, linaweza pia kupunguza kasi ya mtandao wako. Hapa ndivyo unahitaji kufanya:
Tumia njia ya mkato ya Windows + I kuleta Dirisha la Mipangilio kwenye Kompyuta yako.
Ukiwa kwenye Dirisha la Mipangilio, chagua kigae cha ‘Windows update’ kutoka kwenye kidirisha cha kushoto kisha ubonyeze kitufe cha ‘Angalia masasisho’ upande wa kulia.


win11_update.png


Hii italazimisha Windows kuchanganua kiotomatiki ikiwa sasisho lolote linasubiri.
Ikiwa Windows itapata sasisho lolote, itapakua na kusakinisha kiotomatiki. Utalazimika kuwasha tena Kompyuta yako baada ya sasisho kumaliza kusakinisha.
Sasa rudi nyuma na uone ikiwa kasi ya LAN imerejeshwa kwa kawaida.
Zima Huduma za Usasishaji wa Windows
Huduma ya sasisho ya windows inaendelea kufanya kazi chinichini na inasimamia kutoa sasisho la windows iliyotolewa na Microsoft kwako Windows 11 Kompyuta. Ingawa huduma hii inapaswa kuwashwa kila wakati na haipaswi kuzimwa, wakati mwingine unapaswa kuizima kwa sababu kama vile kasi ndogo ya mtandao.
Hii ni kwa sababu Usasishaji wa Windows una sifa mbaya ya kutumia bandwidth yako kwa kiasi kikubwa. Kwa hivyo, unaweza kuzima huduma hii, wakati huwezi kumudu kukatizwa kwa mtandao katika hali kama vile unapocheza mchezo wako unaoupenda wa wachezaji wengi mtandaoni. Hapa kuna jinsi ya kuifanya.
Kwanza kabisa, leta kisanduku cha mazungumzo ya Run kwenye Kompyuta yako ya Windows 11.
Sasa chapa ‘services.msc’ kwenye mstari wa amri na ubonyeze kitufe cha Ingiza.
Hii itakupeleka kwenye dirisha la Huduma la Windows 11 PC yako. Sasa endelea kusogeza orodha hadi upate huduma ya Usasishaji wa Windows ndani yake.
Ifuatayo, bonyeza mara mbili kwenye huduma hii ili kuleta dirisha la mali yake.
Ukiwa kwenye dirisha la Sifa, tafuta kitufe cha 'Acha' kilichopo chini ya Hali ya Huduma.
Sasa bonyeza kitufe hiki na hii itasimamisha huduma na haitafanya kazi tena chinichini.

Disable-Windows-11-Update-Service-body-2.jpg


Baada ya kufanya hivyo, unahitaji pia kuzuia huduma hii kujianzisha yenyewe.
Ili kufanya hivyo, chagua chaguo la 'Walemavu' kutoka kwa menyu ya kushuka kwa aina ya Kuanzisha.
Baada ya kufanya mabadiliko hapo juu, bonyeza kitufe cha OK ili kutumia mabadiliko.
Ondoa Mteja wa VPN
Unaweza pia kutumia kasi ya polepole ya muunganisho wa intaneti ikiwa unatumia huduma ya VP inayounganishwa kwenye mtandao. Suala hili huwa kubwa ikiwa unatumia huduma kutoka kwa mteja wa bure wa VPN. Hii ni kwa sababu kuzima au kuzima wateja hawa wa VPN haitoshi, bado wanaweza kufanya kazi chinichini na kutumia kipimo data cha mtandao na rasilimali kwa kiasi kikubwa.
Kwa hivyo ili kuzuia kasi ya polepole ya unganisho la LAN, ni muhimu kusanidua mteja wa VPN kutoka kwa Kompyuta yako ya Windows 11. Hivi ndivyo unavyoweza kufanya hivyo kwa mafanikio.
Microsoft inakupa njia mbili za kusanidua programu yoyote kutoka kwa Kompyuta yako ya Windows 11. Inawezekana kufuta programu kutoka kwa Menyu ya Mipangilio yenyewe au kwenda inaweza kwenda kwenye Jopo la Kudhibiti na kufuta programu maalum. Ninapendelea kusanidua programu yoyote kutoka kwa menyu ya Mipangilio yenyewe. Hebu tuone jinsi ya kufanya hivyo kutokea.
Kwanza kabisa, tumia njia ya mkato ya ‘Mipangilio+I’ kuleta Menyu ya Mipangilio kwa haraka.
Ukiwa kwenye menyu ya Mipangilio, chagua kichupo cha ‘Programu’ kutoka kwenye kidirisha cha kushoto cha Mipangilio ya Windows kisha uchague chaguo la ‘Programu na vipengele’ kutoka kwenye paneli ya kulia.

uninstall-apps-in-Windows-11-pic1_thumb.png


Hapa endelea kusogeza hadi ufikie orodha ya programu zote zilizosakinishwa kwenye Kompyuta yako. Sasa unahitaji kutafuta mteja wa VPN kwenye orodha ambayo unakusudia kuiondoa.
Unapoipata, bofya kwenye nukta tatu za wima karibu nayo. Sasa chagua chaguo la 'Ondoa' kutoka kwenye menyu ya kuruka.
Dirisha ibukizi litaonekana ili kuthibitisha kitendo.
Bofya kitufe cha Sanidua hapa ili kuondoa mteja wa VPN kutoka kwa Kompyuta yako ya Windows 11.
Sasisha Kiendeshaji chako cha Mtandao
Ikiwa suala bado halijatatuliwa, kuna nafasi nzuri kwamba kiendeshi cha adapta ya mtandao iko kwenye ubao wa mama wa Windows 11 PC yako imepitwa na wakati. Hii inaweza kuwa sababu inayowezekana kwa nini unapata kasi ya polepole ya LAN kwenye Kompyuta yako. Ili kuondoa haraka sababu hii, unahitaji kusasisha madereva yako ya mtandao. Hivi ndivyo jinsi ya kusasisha viendesha mtandao wako kutoka kwa Kidhibiti cha Kifaa chako cha Windows 11 PC.
Kwanza kabisa, tumia njia ya mkato ya Windows+R kuleta kisanduku cha mazungumzo ya Run kwenye Kompyuta yako ya Windows 11.
Sasa chapa ‘devmgmt.msc’ kwenye mstari wa amri na ubonyeze kitufe cha Ingiza. Kwa njia hii utafikia Dirisha la Kidhibiti cha Kifaa moja kwa moja.
Sasa tembeza chini hadi ufikie chaguo la 'Adapta ya Mtandao' iliyoorodheshwa hapa. Bofya juu yake ili kupanua menyu na kuona adapta zote za mtandao.

allthings.how-how-to-install-or-update-windows-11-wifi-driver-image-7.png

Ifuatayo, bonyeza kulia ili kuleta menyu ya muktadha ya adapta ya mtandao inayotumika na uchague chaguo la 'Sasisha kiendeshi.
Sasa dirisha jipya litafungua kwenye PC yako. Chagua chaguo la 'Tafuta kiotomatiki kwa madereva' hapa.
Subiri hadi Windows itafute sasisho za kiendeshaji na kuzisakinisha.
Hitimisho
Hapa tunafikia mwisho wa mwongozo wetu wa utatuzi wa Jinsi ya kurekebisha kasi ya polepole ya LAN kwenye Windows 11. Kwa kuwa ni suala la kawaida sana ambalo linasababishwa na mipangilio fulani isiyo sahihi, inaweza kurekebishwa kwa urahisi kwa kutumia mbinu zilizo hapo juu. Ni suluhu gani kati ya hapo juu lilisuluhisha suala hilo? Tujulishe kwenye maoni.
 

Similar Discussions

Back
Top Bottom