Wipe

Herbalist Dr MziziMkavu

JF-Expert Member
Feb 3, 2009
42,319
33,125
wipe-2012-1-thumb.jpg


The internet isn't a safe environment, hackers are monitoring passwords, cookies and browsing activities, which is why users need all the protection they can get. Privacy ( security ) software has been developed to keep users' personal information safe as they browse the internet, generally by allowing users to securely delete their internet tracks, remove junk files and shred sensitive computer data.


WIPE is a free, easy to use and powerful security tool that allows you to protect your privacy by clearing browser history and cache, cleaning index.dat files, securely removing cookies, safely deleting autocomplete history and temporary internet files and erasing any other tracks that you leave behind after having used your pc. Only the evidence of your activities, which is recorded and stored by your computer without your permission, is erased - no user documents are deleted!


Tracks preview
After the application starts you will see a screen listing all programs that may contain personal data you do not want to share. You can double click on any item in the list to see the number of files stored by the program and the amount of space each takes, e.g. view cookies, index.dat files etc.


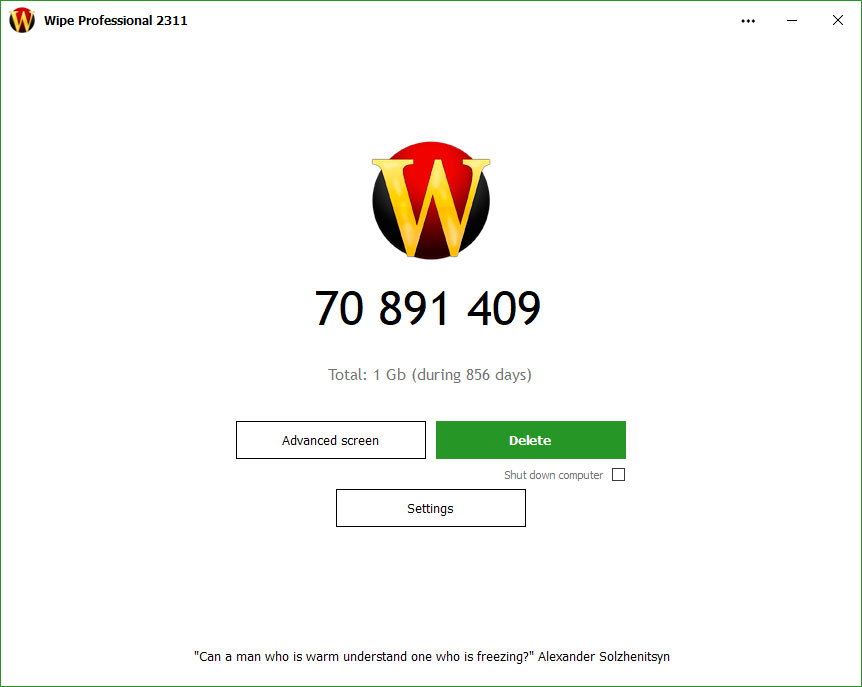
You have the opportunity to deselect a program from being wiped or simply have all files securely deleted. Upon clicking the " Delete! " button, WIPE shows you a friendly screen displaying the icon of the program being cleaned, which specific file is being deleted, a tally of the number of files and amount of space being cleared and a graph showing you the remaining run time of the program.


WIPE has an additional built-in tool to protect your privacy: Screen Lock.
Try this software for free and discover the many invisible files in which Windows records your online and offline activities!


Smart program support
WIPE removes all traces of your online and offline activities in Windows XP / Vista / Windows 7, in the most popular browsers ( Google Chrome, Internet Explorer, Mozilla Firefox, Opera ) and in many of your other, daily used, software programs.


WIPE comes with free monthly updates and regularly features new versions enabling it to recognize and erase usage tracks in newly released software.


No recovery!
WIPE incoporates US DoD 5220.22-M, Gutmann ( full 39 steps ) and Russian GOST algorithms to completely erase your personal and private data, making deleted usage tracks unrecoverable.

Impressive list. After launching the program you will see impressive cleanup list with all tracks located on your PC. List separated by areas and contains information about amount of files, registry records and disk space. Each item can be clicked for additional options and preview of content.


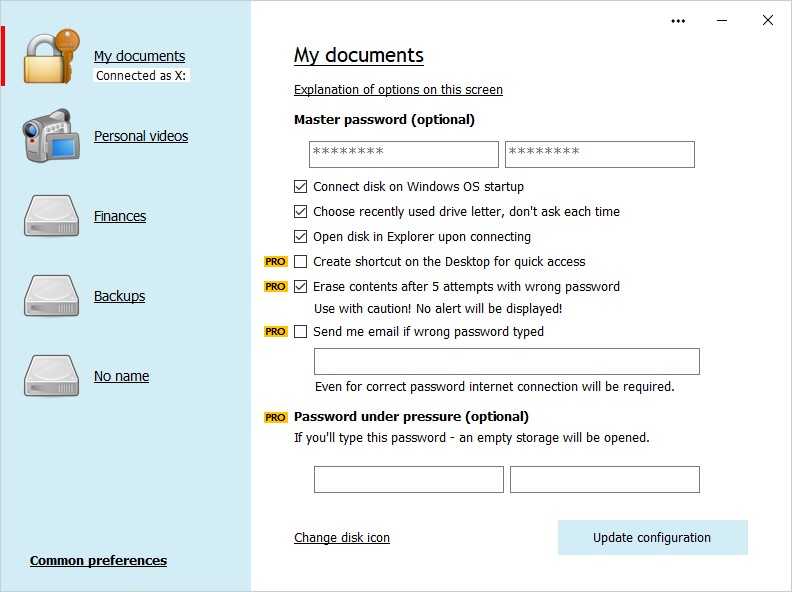
Settings. Programs settings lets you customize many functions of the software. For example, you can select one of many security options to make anti-recovery the most effective. This sections constantly improved.


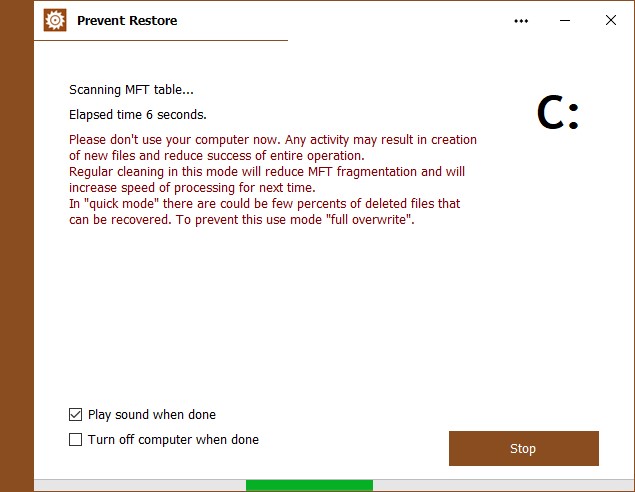
During program work you will see progress bar that indicates progress of operations. You will also see which item currently cleaned and how many items was totally deleted.

Download Wipe 2012.07

 
Prevent Restore

wfds-3-1-thumb.jpg


Just by emptying Recycle Bin the files and folders are not gone forever. Anyone can use special recovery software to restore any deleted items. Yes, this is true and its the way Windows works. Any deleted file still exists on the hard disk until overwritten with some other content, for example with some other file. Someone can recover your secret files when you're away or if you sold your PC, that's why you should use Prevent Restore.


Mission
The main purpose of the free Prevent Restore program is to make deleted files and folders unrecoverable. The program made as Wizard program and will be friendly for any computer user, even newbie. Prevent Restore will overwrite all free space on your hard disk(s) that contain fragments of deleted files with the random data to avoid any possibility of recovery. It uses several security algorithms (DoD 5220.22, Gutmann you can replace deleted data with random characters, digits, spaces e.t.c.). While writing Prevent Restore fills out information to the end of each cluster, leaving no chance to restore even just one word!


Is there any chance to recover data that was overwritten?
Here is an answer from world knowledge base WikiPedia: "Since 1996 ...there's no practical evidence that overwritten data can be recovered. Moreover, there are good reasons to think that it cannot." Prevent Restore makes unrecoverable temporary files, cached files, logs e.t.c. which were also previously deleted.


Why this program should overwrite all free disk space?
While working Prevent Restore takes all free disk space, but when finished free space will be returned to previous condition. Don't worry about that. Its made to make sure that all possible free space was overwritten. The main reason why it should be done this way is that Windows write files to any place on the hard disk - to the end of free space, to the beginning, in the middle... And the result is that deleted files located everywhere! That's why its important to fill out all free disk space.


Will it work with removable storage?
Yes, Prevent Restore can wipe deleted files on any disk like usb flash disk, memory stick or any other sort of removable disk (media storage). However you cannot use it on CD (CDR, DVD) - such disks should be physically burn to avoid any possibility of recovery.


Clears Windows paging file (virtual memory cache)
Some programs can store unencrypted (as text) passwords or other sensitive information in computer's memory. Because of the Windows virtual memory structure, this information can be located in the paging file. Prevent Restore will wipe contents of this system file to protect your privacy.


Maximum speed
Because your hard disk free space can be over hundred Gigs, complete anti-recovery process can take a while. For example, up to one hour or even more on a large disk free space. Its normal. You can leave Prevent Restore working and it will turn off computer when done. There is also built-in option to prevent computer from StandBy mode to make sure all operations will be fully complete.

http://privacyroot.com/programs/info/english/wfds-download.html
 
Secret Disk


sede-1-1-thumb.jpg


Lets say you share computer between members of your family, but you still want to have some private files on it. Or you just dont want that accidental person (if your pc goes to repair) find some secret files on your PC. There is a lot of software that can encrypt/decrypt your secret files but it can take a lot of time if you have many such files. Our solution lets you have separate disk on your PC which may be locked and unlocked with a password within one second! Moreover, when locked the disk becomes completely invisible in the Windows system.


How it works?
Just install Secret Disk and choose a password. Then, start Secret Disk. Click unlock button, enter your password and you will see one more disk X: appears in My Computer area. You can now start working with your private files to save them to secret disk X. When you need protection just click icon in the tray area to lock secret disk and it will disappear within one second with all contents! When you want your files back, just open Secret Disk program, press Unlock button and enter your password. Its easy!


Power failure
In case of power failure or Windows failure secret disk will be locked on next system boot. It happens automatically because secret disk information are kept in memory and if memory fails secret disk will not be restored on next system logon. This adds maximum protection for your files located on the disk.


100% Compatible
Secret disk compatible with any files and folders. You can work with it as usual, like your My Documents folder.


Security level
Secret Disk does not encrypt any files. Secret Disk only limit access to secret location with your files and ties virtual disk to it when needed. This will provide you enough security to hide your files from accident person taking control over your PC, but doesn't guarantee top level security (because files stored on your disk 'as is', without encryption).


This window lets you see the status of your secret disk. The disk can be locked or unlocked.


You can customize the way how secret disk works for you. There is many options to choose from.


When secret disk is unlocked it appears as additional disk on your PC, in a usual place where is other disks located. It works as usual disk. When the disk is locked it is completely invisible.

Download Secret Disk 1.35
 
Startup Guard


stgu-3-1-thumb.jpg


Many users wanted to remove applications that automatically start on Windows startup to free memory and boost system performance. But not all users know that there is a lot of hidden programs on startup that probably used once per month and just wasting system resources! Startup Guard allows you review all applications on startup and effectively choose the only one that you need.


How it works?
Startup Guard keep database of startup records that you have choosen to delete or keep. You should manually review startup records on your computer (5-10 items) and mark them as approved or not. If you're not sure if you need some file or not, Startup Guard will provide you with helpful links. Then, Startup Guard will monitor PC's startup area and apply changes according your preferences. It will also detect and notify you about new records that may appear shortly.


Facts
Usual user have about 3-5 really important auto-startup programs which is run on Windows startup. These are system drivers for keyboard, mouse, monitor, e.t.c. However, many other programs put their links to startup area to always run in the background, like, for example: update modules. These modules used not very often, may be even once per month, but dramatically decrease system performance by always running in the computer’s memory and checking for updates.


By disabling such good, but unwanted software’s you can get top PC performance (disabling auto-startup, but not removing program itself). Usually, if you disable startup record of some software it is still working fine, not loosing any features. Of cause you can always roll back any change you have made!


Remove viruses and spyware
Viruses and spyware also put their links to the startup area and start with Windows. You can catch them using Startup Guard, but it is recommended for advanced users only.


Made a mistake?
If you have deleted some important file from startup area by mistake you can always undo delete. Startup Guard allows you to undo any delete within any period of time!


Here you can see the list of Windows startup records. Usually up to 10 items, but busy computers have much more! Any program listed here automatically runs when you logging into Windows. You should click every item in the list to approve it or reject.


The program have many different settings. We strongly recommend you to enable startup monitoring, at least once per day.


You should make a decision about each program which you have on Windows startup. If you’re not sure you can click additional links provided here for more information.


Download Startup Guard 3.31
 
Free Anytime Upgrade For Windows 7


Today we will tell about new trick to upgrading your genuine windows 7 any version to Home Premium or Professional or the most favourite Ultimate Version.


The things you have to need is


• A genuine Windows 7 Any version (May be you buy or it comes Preinstalled )


• The magical key provided my me
Method :


1.) First Connect Your PC to Internet.


2.) Then go to your control panel and click on Windows Anytime Upgrade


3.) Here you will get a window asking your anytime upgrade keys


4.) Just copy paste this keys according to your version and click next


5.) Then it will verify saying its ok , click on next button


6.) A new window will open saying it may take few minute


7.) After few minute it will say your keys not working or something.


Just close the windows and restart your PC and see the magic.


Widnows 7 Home Premium:1). 6RBBT-F8VPQ-QCVPQ-KHRB8-RMV82


Windows 7 Professional: 1). VTDC3-WM7HP-XMPMX-K4YQ2-WYGJ8


2). 6RQ9V-6GCG4-8WV2H-966GF-DQ4DW


3). 32KD2-K9CTF-M3DJT-4J3WC-733WD


Windows 7 Ultimate: 1). FJGCP-4DFJD-GJY49-VJBQ7-HYRR2


2). 342DG-6YJR8-X92GV-V7DCV-P4K27


Windows 7 Keyboard Tricks That Will Impress Your Friends


Aero Shortcuts


  • [Windows] + [Spacebar] (Aero Peek)
    Make all open windows transparent to view gadgets and icons on desktop.
Windows7shortcuts02.png

  • [Windows] + [D] (Aero Peek)
    Show or hide the desktop.
  • [Windows] + [Home] (Aero Shake)
    Minimize all but selected window. Reverse by clicking the key combination again.
  • [Windows] + left arrow OR [Windows] + right arrow (Aero Snap)
    Dock selected window to the left or right half of your screen.
  • [Windows] + up arrow OR [Windows] + down arrow (Aero Snap)
    Maximized and restores the selected window.
  • [Windows] + [SHIFT] + up arrow OR [Windows] + [SHIFT] + down arrow (Aero Snap)
    Maximizes and restores selected window in vertical dimension only.
  • [Windows] + [Tab] (Aero Flip)
    Launch 3D representation of open windows and click [Tab] key again to flip through them.
Windows & Taskbar


  • [Alt] + [Ctrl] + [Tag] + left/right/up/down arrow
    Flip window.
  • [Alt] + [Tab]
    Cycle through open windows.
Windows7Shortcuts04.png


  • [Windows] + [T] OR [Windows] + [SHIFT] + [T]
    Move focus to front or back of taskbar. Press [T] again while holding the [Windows] key to cycle through items in the taskbar from left to right or, with [SHIFT] button held too, from right to left.
  • [Windows] +
    Puts focus on the ‘show hidden icons’ button on the system tray.

    [*][Windows] + [1] THROUGH [Windows] + [9]
    Launch first through ninth icon on taskbar, including items pinned to taskbar.
    [*][Windows] + [SHIFT] + [1] THROUGH [Windows] + [SHIFT] + [9]
    Starts new instance of respective taskbar icon.
    [*][Windows] + [Ctrl] + [1] THROUGH [Windows] + [Ctrl] + [9]
    Cycles through multiple instances of the respective icon.
  • [Windows] + [Alt] + [1] THROUGH [Windows] + [Alt] + [9]
    Opens jump list for respective icon.
Windows7Shortcuts03.png
Multiple Monitors


  • [Windows] + [SHIFT] + right arrow OR [Windows] + [SHIFT] + left arrow
    Move selected window from one monitor to another. They will remain in the same relative location.
  • [Windows] + [P]
    Select presentation display mode.
Windows7Shortcuts01.png
Magnifier


  • [Windows] + [+] OR [Windows] + [-]
    Activates Windows Magnifier to zoom in or out of screen.
  • [Ctrl] + [Alt] + [D]
    Switch to docked mode.
  • [Ctrl] + [Alt] + [L]
    Switch to lense mode.
Windows7Shortcuts05.png

  • [Ctrl] + [Alt] + [F]
    Switch from docked or lens mode back to full screen mode.
  • [Ctrl] + [Alt] +
    Invert colors.
    [*][Windows] + [Esc]
    Exist magnifier views.

Other


  • [Windows] + [G]
    Cycle through desktop gadgets.
  • [Windows] + [X]
    Launches Windows Mobility Center. Especially useful if you’re working on a laptop.
Windows7Shortcuts06.png

Enjoy....... Usisahau kuponyeza Like................ Mr Rocky @
AshaDii @ummu kulthum @Cantalisia @gfsonwin

 
Last edited by a moderator:
[h=1]How to Reset / Recover / Change Forgotten Administrator Password in Windows?[/h]
If you like this article, please share it with your friends and contacts on Google Plus, Facebook and Twitter using following buttons so that they can also enjoy the article:


hX+zQAAAAASUVORK5CYII=


eX4DKuVtXDsPfl0AAAAASUVORK5CYII=


Many times we face this problem when we or our friends forget Windows administrator password and can't log into Windows. So here we are posting a few methods / utilities which can be used to reset or recover forgotten Windows password:
DISCLAIMER: Following information should be used only if its your system and you have forgotten account password. Don't use this information to access a system which is not yours without permission.
1st Method:
This method includes the first thing which should do whenever you forget your Windows login password. When we install Windows, it automatically creates an account "Administrator" and sets its password to blank. So if you forget your user account password then try this:
Start your computer and when you see Windows Welcome screen / Login screen, press <ctrl>+<alt>+<del> keys twice and it'll show Classic Login box.
Windows_Classic_Logon_Box.png

Now type "Administrator" (without quotes) in Username and leave Password field blank. Now press Enter and you should be able to log in Windows.
Now you can reset your account password from "Control Panel -> User Accounts".
Same thing can be done using Safe Mode. In Safe Mode Windows will show this in-built Administrator account in Login screen.
2nd Method:
If the above mentioned trick doesn't work, try following trick which is actually a loophole in Windows XP Setup and also a big security hole:
A. Boot using Windows XP Setup CD and follow the instruction like Accepting EULA, etc.
B. When it asks to repair your existing Windows installation, accept it and press "R" to run the repair.
C. Setup will start repairing your Windows and will start copying files, etc.
D. After a few minutes setup will restart your system and when it restarts don't press any key when it shows "Press any key to continue..." otherwise Setup will start from the beginning. Don't press any key and setup will resume where it left.
E. Now it'll start doing other tasks and will show a small progressbar with a few details in left side.
F. Look carefully at the details and when it shows "Installing devices", press <Shift>+F10 keys in your keyboard.
G. It'll open a Command Prompt window. Now type nusrmgr.cpl and press <Enter>.
Remove_Change_Administrator_Password_Using_Windows_XP_Setup.png

H. It'll open the same "User Accounts" window which you see in Control Panel.
I. Now you can remove or reset any account password without any problem.
3rd Method:
Windows XP and later Windows versions provide a built-in method to recover forgotten password by using "Password Reset Disk". If you created a Password Reset Disk in past, you can use that disk to reset the password.
If you don't know how to create a password reset disk, lets tell you in details. You can create the password reset disk using Control panel -> User Accounts applet.
First open Control Panel and click on User Accounts icon. It'll open User Accounts window. Now click on your user account and then click on "Prevent a forgotten password" link given in left-side pane. It'll open forgotten password wizard as shown in following screenshot:
Create_Windows_Password_Reset_Disk.png

Follow the instructions and you'll have a password reset disk in your hand.
4th Method:
You can also use various bootable rescue CDs to reset your Windows password as mentioned in following link:
Download FREE Bootable Rescue CDs from Kaspersky, BitDefender, Avira, F-Secure and Others
There are also a few 3rd party utilities available to help you recover your Windows password such as:

  • UBCD for Windows
  • Ultimate Boot CD (UBCD)
  • Offline NT Password & Registry Editor
You can search for their download links on Google, Bing or any other favorite search engine.
5th Method:
If all fails, then simply reinstall Windows and create new account. To recover lost data, you can use Data recovery tools available on net but the chances will be very low to get data back.
 
AutoRun Disabler: Portable Utility to Disable Autorun Functionality in Windows

How to Disable Autorun Functionality in Windows Using Registry Editor?
It requires some registry skills. Once again our regular reader "Masroor Aijaz aka JX Great" has created another excellent tool called "AutoRun Disabler" which allows you to disable Autorun functionality for different kind of drives like CD drive, removable drives, etc quickly and easily.
autorun_disabler_by_vishal_gupta-d3211r4.png

Its a portable utility so you don't need to install it. Simply download the ZIP file, extract it and run the EXE file. Select the desired option from the list and click on OK button to apply it.
Download Link
You'll need Microsoft .NET Framework 3.5 or higher to use this tool.


Category: Troubleshooting


This category contains lots of useful guides, instructions and tutorials to help computer users in troubleshooting and fixing various PC problems.
Following is a list of all articles posted in this category, click on a link to read the complete article:


Speed Up Windows 7 – Master Tutorial to Make Windows 7 Super Fast

If you like this article, please share it with your friends and contacts on Google Plus, Facebook and Twitter using following buttons so that they can also enjoy the article:
t.png

This is the 3rd tutorial of our "Master Tutorial" series. We have already posted 2 other tutorials for Windows XP and Windows Vista in past and now its turn of Windows 7.
Although Windows 7 is already very fast and reliable but this tutorial will help you in getting the max performance out of your system.
So without wasting any time, here we start our tutorial:

1. Registry Tweaks:


Following topic contains a few registry tweaks to optimize your system performance and add a few useful extras:

Ultimate Collection of Registry Tweaks to Speed Up Windows 7


You just need to download the ZIP file, extract it and run the file. It'll ask for confirmation, accept it. Restart your system to take affect.

2.
Right-click on Computer icon on Desktop and select Properties (or press WIN + Pause/Break keys). Now click on Advanced system settings link in left side pane (You can open it directly by giving sysdm.cplcommand in RUN or start menu search box). Now click on Settings button in Performance section:

Opening_Performance_Settings_in_win.png

It'll open another window. Disable all unnecessary options in Visual Effects tab, you can leave following options enabled according to your requirements:

  • Enable Aero Peek (If you want to use Aero Peek feature)
  • Enable desktop composition (If you want to use Windows Aero theme)
  • Enable transparent glass (If you want to use transparency in Windows)
  • Show thumbnails instead of icons (If you want to show thumbnails in Explorer)
  • Show window contents while dragging (If you want windows to show contents while moving them)
  • Smooth edges of screen fonts (If you want to show smooth fonts)
  • Use drop shadows for icon labels on the desktop (If you want to show shadows under desktop icon labels)
  • Use visual styles on windows and buttons (If you want to use Windows Aero or Basic theme)
Disable_Aero_Peek_in_Windows_7.png

3. Open Windows Explorer and go to "Organize -> Folder and Search Options" and click on "View" tab.
Now disable following options:

  • Display file size information in folder tips
  • Hide extensions for known file types
  • Show encrypted or compressed NTFS files in color
  • Show pop-up description for folder and desktop items
Windows_Folder_Options.png

4. Right-click on Computer icon on Desktop and select Manage (You can also open it directly by givingservices.msc command in RUN or start menu search box).
Now go to Services & Applications -> Services. Here you can set a few unnecessary services to Manual, so that these services don't start automatically with Windows and you can get a faster startup.
Windows_7_Services_List.png

Visit following tutorial to know which services can be set to MANUAL to increase system performance:
Windows 7 Services Configuration: Turn Off / Disable Unnecessary Services to Optimize Performance
5. Type msconfig in RUN or Startmenu search box and press Enter. Now go to Startup tab and disable unwanted startup entries. You can disable your graphics card's driver utility, Sound Card utility, etc to speed up the system startup and to increase system performance.
Windows_7_msconfig.png

6. Open Sound applet in Control Panel (or type mmsys.cpl in RUN or Startmenu search box and press Enter). Now go to Sounds tab and select No Sounds from Sound Scheme section. You can keep some of your favorite sounds enabled but make sure to set Exit Windows, Windows Log off, Windows Logon and Start Navigation to (None).
Windows_7_No_Sound.png

Also disable "Play Windows Startup sound" option to disable the sound clip which is played at login screen.
7. Also don't forget to:

  • Defrag the hard disk regularly
  • Install only necessary software
  • Use the latest device drivers
  • Keep your Windows up-to-date

After following all the above mentioned points, you'll definitely notice major improvements in your Windows 7 performance.
 
Speed Up Windows XP – Master Tutorial to Make Windows XP Super Fast

If you like this article, please share it with your friends and contacts on Google Plus, Facebook and Twitter using following buttons so that they can also enjoy the article:

eX4DKuVtXDsPfl0AAAAASUVORK5CYII=


t.png

This tutorial is meant for increasing the performance of Windows XP, either it can be a fresh installation or an older one.
1. Following is a registry file containing a few registry modifications, which are completely safe and can increase the performance of Windows. Just download the attached ZIP file, extract it and then run the file:

Tweak Windows XP


Restore Default Settings
(Use this file if you want to restore default Windows settings)
2. Right-click on Desktop and select Properties, Now in the new window go to Appearance tab and click on Effects button. Now in the new opened window uncheck the following options:

  • Use the following transition effect for menus & tooltips.
  • Show shadows under menus.
Windows_XP_Advanced_Desktop_Settings.png


3.
Right-click on My Computer icon on Desktop and select Properties (or press <WIN> key +<Pause/Break> key), now go to Advanced tab in new window and click on Settings button inPerformance section.

Now disable all unnecessary options in Visual Effects tab, you can remain following options enabled according to your requirements:

  • Show window contents while dragging.
  • Smooth edges of screen fonts.
  • Use common tasks in folders (If you use the left side pane in My computer)
  • Use drop shadows on icon labels on the desktop. (to make the desktop icons label transparent.)
  • Use visual styles on windows and buttons. (If you use XP themes.)
Windows_XP_Performance_Settings.png


4.
Open Windows Explorer and click on Tools -> Folder Options. Now go to View tab:
Windows_XP_Folder_Options.png


Now uncheck following options:

  • Automatically search for network folders & printers.
  • Display file size information in folder tips.
  • Display simple folder view in Explorer's Folders list.
  • Show encrypted or compressed NTFS files in color.
  • Show pop-up description for folder and desktop icons.
  • Use simple file sharing.

Other options don't affect the system performance. You can enable/disable them according to your requirements.
5. Right-click on My Computer icon on Desktop and select Manage (You can also open it by typingservices.msc in RUN and press Enter). Now go to Services & Applications -> Services. Here you can set a few unnecessary services to Manual, which will not start with windows and will decrease the boot time and will increase system performance. Please follow the following tutorial to know about which services can be safely set to MANUAL:

Windows XP Services Configuration: Turn Off / Disable Unnecessary Services to Optimize Performance


6.
Type msconfig in RUN and press Enter. Now go to Startup tab and deselect the unnecessary entries, which you don't want to start automatically with Windows, e.g. you can disable VGA driver utility, Sound Card utility, etc to speed up the startup time and to increase system performance.

7.
Open Sound & Audio Devices in Control Panel (or type mmsys.cpl in RUN), go to Sounds tab and select No Sounds in Sound Scheme section. Or you can remain some of your favorite sounds but set Exit Windows, Start Windows, Windows Logoff, Windows Logon to (None).

8.
Also don't forget to:

  • Defrag the hard disk regularly
  • Install only necessary software
  • Use the latest device drivers
  • Keep your Windows up-to-date
After following all the above mentioned points, you'll definitely notice major improvements in your Windows XP performance.
 
77 Tips for Windows 7: Make Windows 7 Faster, Secure and Easier to Use


If you like this article, please share it with your friends and contacts on Google Plus, Facebook and Twitter using following buttons so that they can also enjoy the article:


Windows 7 is already faster, secure and customizable compared to other Windows versions but if you want to get more from it, you should definitely go through a huge list of 77 tips for Windows 7 which has been posted by Microsoft TechNet website:

77 Tips for Windows 7

The tips cover following areas:

  • Make Windows 7 faster
  • Get more done with Windows 7
  • The best Windows 7 shortcuts
  • Securing Windows 7
All tips are really worth a read. Thanks to Microsoft for providing them in a single place.
The topic also mentions 14 best Windows 7 keyboards shortcuts which are as follows:
Win+H - Move current window to full screen
Win+I - Restore current full screen window to normal size or minimize it if not full screen
Win+Shift+arrow - Move current window to alternate screen
Win+D - Minimize all windows and show the desktop
Win+E - Launch Explorer with Computer as the focus
Win+F - Launch a search window
Win+G - Cycle through gadgets
Win+L - Lock the desktop
Win+M - Minimize the current window
Win+R - Open the Run window
Win+T - Cycle through task bar opening Aero Peek for each running item
Win+U - Open the Ease of Use center
Win+Space - Aero Peek the desktop
Ctrl+Win+Tab - Open persistent task selection window, roll mouse over each icon to preview item and minimize others


If you like this article, please share it with your friends and contacts on Google Plus, Facebook and Twitter using following buttons so that they can also enjoy the article:
Speed Up Windows Vista – Master Tutorial to Make Windows Vista Super Fast

So you are using Windows Vista and feel that its slower than Windows XP? Then you have come to the right place.
Following tutorial will help you in tweaking your Windows Vista to the max and you'll feel a significant improvement in your system performance. So without wasting any time lets start:
1. Following is a registry file containing a few registry modifications, which are completely safe and can increase the performance of Windows Vista. Just download the attached ZIP file, extract it and then run the file:

Tweak Windows Vista

Restore Default Settings

(Use this file if you want to restore default Windows settings)
2. Right-click on My Computer icon on Desktop and select Properties (or press <WIN> key +<Pause/Break> key), click on Advanced system settings link in left side pane (You can also open it by typing sysdm.cpl in RUN or start menu search box and press Enter). Now click on Settings button inPerformance section:
Opening_Performance_Settings_in_win.png


Now disable all unnecessary options in Visual Effects tab, you can remain following options enabled according to your requirements:

  • Enable desktop composition (If you want to use Windows Aero theme)
  • Enable transparent glass (If you want to use transparency in Windows)
  • Show preview and filters in folder (If you use Details Pane in Explorer)
  • Show thumbnails instead of icons (If you want to show thumbnails in Explorer)
  • Show window contents while dragging (If you want windows to show content while moving them)
  • Smooth edges of screen fonts (If you want to show smooth fonts)
  • Use drop shadows for icon labels on the desktop (If you want to show shadows under desktop icon labels)
  • Use visual styles on windows and buttons (If you want to use Windows Aero or Basic theme.)
3. Open Windows Explorer and click on Organize -> Folder and Search Options. Now go to View tab:
Windows_Folder_Options.png


Now disable following options:

  • Display file size information in folder tips.
  • Display simple folder view in Navigation pane.
  • Hide extensions for known file types.
  • Show encrypted or compressed NTFS files in color.
  • Show pop-up description for folder and desktop items.
Other options don't affect the system performance. You can enable/disable them according to your requirements.

4.
Right-click on My Computer icon on Desktop and select Manage (You can also open it by typingservices.msc in RUN or start menu search box and press Enter).
Now go to Services & Applications -> Services. Here you can set a few unnecessary services to Manual, which will not start with windows and will decrease the boot time and will increase system performance.
Please follow the following tutorial to know about which services can be safely set to MANUAL:

Windows Vista Services Configuration: Turn Off / Disable Unnecessary Services to Optimize Performance


5.
Type msconfig in RUN or Startmenu search box and press Enter. Now go to Startup tab and deselect the unnecessary entries, which you don't want to start automatically with Windows, e.g. you can disable VGA driver utility, Sound Card utility, etc to speed up the startup time and to increase system performance.
You can also disable these items using Windows Defender. Open Windows Defender and click on Toolsand then click on "Software Explorer".
6. Open Sound in Control Panel (or type mmsys.cpl in RUN or Startmenu search box and press Enter), go to Sounds tab and select No Sounds in Sound Scheme section. Or you can remain some of your favorite sounds but set Exit Windows, Windows Logoff, Windows Logon and Start Navigation to (None).
7. Also don't forget to:

  • Defrag the hard disk regularly
  • Install only necessary software
  • Use the latest device drivers
  • Keep your Windows up-to-date
After following all the above mentioned points, you'll definitely notice major improvements in your Windows Vista performance.

 
How to Boot Windows in “Safe Mode” When “F8&#8243; Key is not Working? Add “Safe Mode” Option to Windows Boot Loader

If you like this article, please share it with your friends and contacts on Google Plus, Facebook and Twitter using following buttons so that they can also enjoy the article:

t.png

"Safe Mode" in Windows is a special mode which is mainly used for troubleshooting purposes. Many times when you can't boot into Windows because of a virus infection, a faulty software or driver installation, you can boot into Safe Mode and fix the problem. You can scan your system with antivirus, uninstall faulty software or driver using Safe Mode and you'll be able to boot into Windows normally without any problem.

So you can see Safe Mode is very useful feature of Windows OS. If you don't know how to boot into Safe Mode, let us tell you in details!
To boot into Safe Mode, you need to press "F8" key in your keyboard just before Windows boot screen appears. If you have a dual boot

system, you can press "F8" key when the boot loader is shown where you select a Windows to boot. As soon as you press "F8" key, a new screen is shown which contains several booting options and on top of all options, you get an option to start Windows in Safe Mode.

Many times you are not able to get the screen where you select Safe Mode option. Sometimes "F8" key doesn't work in many systems or sometimes you can't press the "F8" key exactly when it needs to be pressed by you.
Then what to do in such situation? How to access Safe Mode option and boot into Safe Mode successfully?

Don't worry. Today in this tutorial, we'll tell you a way to add a new option in Windows boot loader to boot Windows into Safe Mode. In this way, you'll not need to press "F8" key. Just select Safe Mode option from Windows boot loader and get ready to boot Windows in Safe Mode without any problem.

So without wasting time, lets start the tutorial. We have divided this tutorial in 2 parts:

  • STEP 1: Adding a new entry for Safe Mode in Windows boot loader
  • STEP 2: Adding functionality to new entry in Windows boot loader
STEP 1: Adding a New Entry for Safe Mode in Windows Boot Loader
First we'll add a new entry in Windows boot loader to start Windows in Safe Mode. We'll do that by making a copy of existing Windows entry in boot loader.
This method is different for Windows XP and Windows Vista, 7.
For Windows XP and Server 2003 users:
1. Right-click on My Computer icon and select Properties. It'll open System Properties window. You can directly open it by using sysdm.cpl command in RUN.
2. Now go to "Advanced" tab and click on "Settings" button present in "Startup and Recovery" section.
3. It'll open a new window. Now click on "Edit" button as shown in following screenshot:
Editing_Windows_XP_Boot_INI_File.png

4. It'll open "boot.ini" file in Notepad. This is the main file which provides required information to Windows boot loader like which entries should be shown, how much time should be given to users, etc.
The boot.ini file content should be similar to following:
[boot loader]
timeout=30
default=multi(0)disk(0)rdisk(0)partition(1)\WINDOWS
[operating systems]
multi(0)disk(0)rdisk(0)partition(1)\WINDOWS="Microsoft Windows XP Professional" /noexecute=optin /fastdetect
5. Now we need to make a copy of existing Windows entry. We'll select the last line showing "Microsoft Windows XP Professional", copy it and paste it at the end. So now the file content should look like following:
[boot loader]
timeout=30
default=multi(0)disk(0)rdisk(0)partition(1)\WINDOWS
[operating systems]
multi(0)disk(0)rdisk(0)partition(1)\WINDOWS="Microsoft Windows XP Professional" /noexecute=optin /fastdetect
As you can see now there are 2 same entries in the file. Now edit the 2nd entry and add "Safe Mode" text after Windows XP Professional label.
So the final content of the boot.ini file would look like following:
[boot loader]
timeout=30
default=multi(0)disk(0)rdisk(0)partition(1)\WINDOWS
[operating systems]
multi(0)disk(0)rdisk(0)partition(1)\WINDOWS="Microsoft Windows XP Professional" /noexecute=optin /fastdetect
multi(0)disk(0)rdisk(0)partition(1)\WINDOWS="Microsoft Windows XP Professional Safe Mode" /noexecute=optin /fastdetect
Adding_Safe_Mode_Entry_Windows_XP_Boot_Loader.png

Save the file and close it.
That's it. We have successfully added a new entry in boot loader to start Windows in Safe Mode.

For Windows Vista, Windows 7 and Server 2008 users:

Windows Vista and Windows 7 boot loader is quite different from Windows XP boot loader. It doesn't use boot.ini file. Although you can use built-in BCDEDIT command to modify boot loader, its a bit complicated task. So we are going to use a freeware "VistaBootPro" to modify Windows Vista and Windows 7 boot loader.
1. First download and install VistaBootPro using following link:
Download VistaBootPRO

2.
Now open the software and click on "Manage OS Entries" tab. The program might show a warning message for Windows 7 users, ignore it.
3. You'll see a checkbox "Add New OS Entry" at the bottom of the window. Enable the checkbox, provide any desired name in "OS Name" text box which you want to set for new entry in boot loader to start Windows in Safe Mode. We'll use "Windows 7 Safe Mode" for OS Name.
Select "OS Type" as "Windows Vista". Don't worry! Even if you are editing Windows 7 boot loader, you'll need to select Windows Vista as OS type. It'll work without any problem.
Select "OS Drive" as C:.
Adding_Safe_Mode_Entry_Windows_Boot_Loader.png

4. That's it. Click on "Apply Updates" button and you have added a new entry in Windows boot loader to start Windows in Safe Mode.
STEP 2: Adding Functionality to New Entry in Windows Boot Loader
In above step we have added a new entry in Windows boot loader but it'll not start Windows in Safe Mode as we have not changed the entry functionality.
In this step, we'll set the entry to start Windows in Safe Mode.
1. Type msconfig in RUN or start menu search box and press Enter. It'll open System Configuration Utility window.
2. Now go to "BOOT.INI" tab in Windows XP and "Boot" tab in Windows Vista and 7 systems.
3. Now you just need to select the new entry for Safe Mode which we created in step 1 and enable "Safe Boot" option for it as shown in following screenshots:
Windows XP or Server 2003:
Enabling_XP_Safe_Mode_Option_MSConfig.png

Windows Vista, Windows 7 and Server 2008:
Enabling_Safe_Mode_Option_MSConfig.png

4. That's it. Click on Apply button and you have successfully added a new entry in Windows boot loader to start Windows in Safe Mode.
Using "Safe Mode" Option Present in Windows Boot Loader
Now when you'll start your system, you'll see the new option to start Windows in Safe Mode present in boot loader:
Safe_Mode_Option_Windows_Boot_Loader.png

Select the option using arrow keys and press Enter key. It'll start booting Windows in Safe Mode and you'll be able to boot Windows into Safe Mode without any problem:
Windows_Safe_Mode.png

Feel free to share your feedback or ask any question regarding this tutorial in your comment...
 
[Fix] “Network Connections” Folder is Empty in Windows, Not Showing Network Adapters List

If you like this article, please share it with your friends and contacts on Google Plus, Facebook and Twitter using following buttons so that they can also enjoy the article:


t.png

Today I'm going to post a solution of a weird problem which I faced yesterday. Yesterday I updated driver of my network card and when I restarted my system, I faced a strange problem.
Suddenly the network connection icon in system tray started showing a yellow exclamation mark on it as shown in following screenshot:
Network_Connection_Icon_Yellow_Exclamation_Mark.png


I double-checked the Internet connectivity and it was working absolutely fine. I was able to browse on Internet.
To investigate the issue, I checked the Network Connections folder and to my surprise, it was empty. It was not showing network adapters list. It was absolutely blank:

I did lots of things to fix the issue like restarting the router, enabling/disabling network services but all in vain.
At last I tried resetting network adapters configuration using Windows registry and it did the trick. I was able to fix this annoying issue using my favorite Registry Editor. Actually Windows stores a cache of network adapters configuration in registry and if by any chance the cache becomes corrupted, you might face such kind of strange issues.
Anyway I'm sharing the solution here so that if anyone else faces this problem, he'll be able to fix it easily without any hard work.
To fix this issue, you just need to follow these simple steps:

1.
Type regedit in RUN or start menu search box and press Enter. It'll open Registry Editor.
2. Now go to following key:
HKEY_LOCAL_MACHINE\SYSTEM\CurrentControlSet\Control\Network
3. In right-side pane, you'll see a binary key "Config". Select it and press Delete key on your keyboard. You just need to delete Config key.
Don't worry. When you delete the key and open Network Connections folder or restart your system, Windows automatically re-creates the key. By deleting the key we are just clearing the configuration cache.
4. Once you delete the key, close Registry Editor and open Network Connections folder again and now it should show all network adapters without any problem.
Network_Connections_Folder_Fixed.png


PS:
If you don't want to edit registry manually and want a ready-made registry script to do the task automatically, download following ZIP file, extract it and run extracted REG file. It'll ask for confirmation, accept it:
Download Registry Script
 
Back
Top Bottom