Haya tena kwa Wale Wapenzi wa kutumia Apple Macintosh leo hii hapa OSX LEON 10.7

Herbalist Dr MziziMkavu

JF-Expert Member
Feb 3, 2009
42,318
33,125
Haya tena kwa Wale Wapenzi Wa Apple Macintosh kama mimi kitu hicho hapo chini maelezo yake yapo hapo fuatilia kwa makini jinsi ya kuiweka hiyo Latest Leon 10.7 Final waliyotoa Apple store haya tena kazi kwenu........


xMove + MultiBeast: Install OS X 10.7 Lion on any Supported Intel Core 2 or Core i based PC Posted by tonymacx86 on Wednesday, July 20, 2011
Labels: chimera, Core i3, Core i5, Core i7, DSDT, guide, installer, Lion, Mac, MultiBeast, OS X, Snow Leopard, xMove


Any OSx86 installation guide can seem daunting at first glance, especially when trying to remember cryptic terminal commands and sorting through volumes of misinformation on the web. This guide requires no coding, terminal work, or Mac experience of any kind.


Because Apple is only distributing OS X Lion through the Mac App Store until next month, we've had to rethink our retail installation method. What follows is our recommendation for the easiest, cleanest and most Mac-like installation process. For best results, follow this guide to the letter.​

You will need:Unachotakiwa uwe nacho kwenye computer yako au Laptop yako :


A System Running Mac OS X Snow Leopard 10.6.6 or later with:

  • Intel Core 2 or above, 64 bit CPU
  • Mac App Store Account + $29.99
  • Internet Access to Download 4GB OS X Lion App through Mac App Store
  • 4GB space available in /Applications
  • 8GB additional free space on your hard drive
  • Mac Pro 3,1 system definition and the latest Chimera Bootloader from MultiBeast
Don't have Snow Leopard yet? To install Mac OS X Snow Leopard from the Retail DVD follow iBoot + MultiBeast.

STEP 1: Purchase OS X Lion from the Mac App Store

1. Boot into your existing Snow Leopard installation.
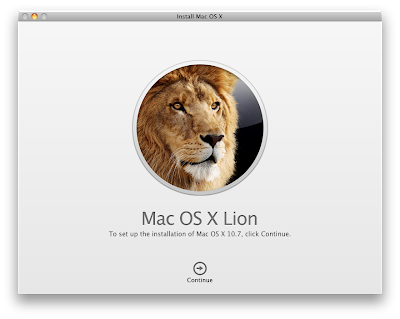
2. Download the OS X Lion App directly from the Mac App Store - it will automatically open.
Screen+shot+2011-07-08+at+1.36.48+PM.png
3. Click Continue.​
Screen+shot+2011-07-08+at+1.36.55+PM.png
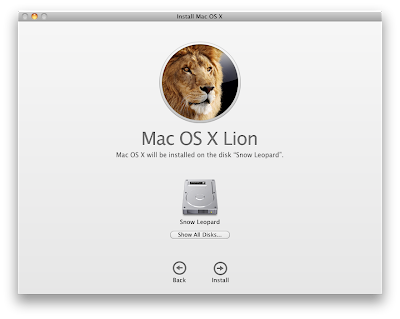
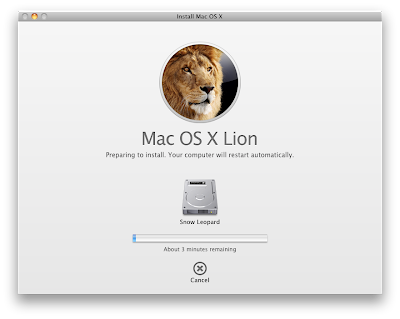
4. Target your currently booted Snow Leopard drive and hit Install. This will not install the OS or affect this drive in any way. It will simply install the files necessary to do so later in the process.
Screen+shot+2011-07-08+at+1.37.03+PM.png

Screen+shot+2011-07-08+at+1.37.35+PM.png
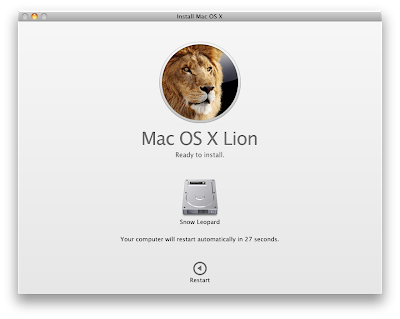
5. Click Restart to reboot.


STEP 2: Prepare the Installer Partition


1. Boot back into your existing Snow Leopard installation.
2. Open /Applications/Utilities/Disk Utility
3. Highlight your Snow Leopard drive in left column.
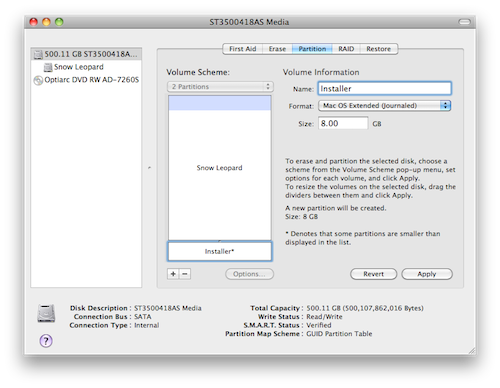
4. Choose the Partition tab, and Click the + to Add a Partition.​
Screen+shot+2011-07-13+at+4.32.39+PM.png
5. Name the secondary partition Installer with a size of 8 GB and click Apply.

Screen+shot+2011-07-13+at+4.32.59+PM.png
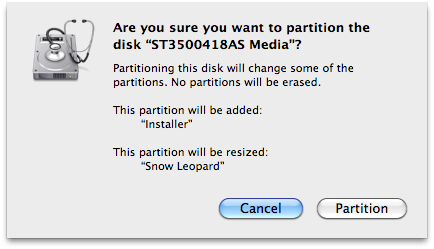
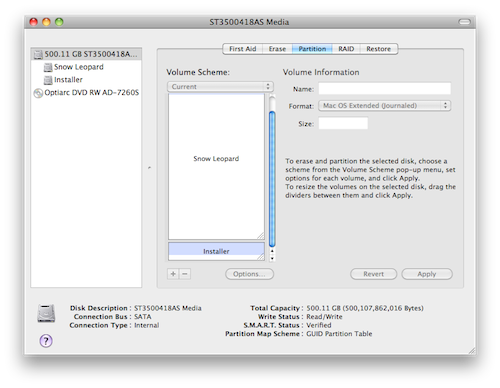
6. Click Partition.​
Screen+shot+2011-07-13+at+4.33.52+PM.png
7. Close Disk Utility


STEP 3: xMove

1. Download xMove
2. Double-Click xMove, and choose Installer as Destination.

WARNING: DO NOT choose existing Snow Leopard as the Destination.
Do not interrupt the process- it will only take a few minutes. When done, you'll have a secondary partition on your drive containing the OS X Lion Installer!


STEP 4: Boot Installer & Install OS X Lion

1. Reboot- at the Chimera boot screen, choose Installer
2. It will boot directly to a familiar Mac OS X Installer complete with Disk Utility.
3. Install OS X Lion over existing Snow Leopard or onto any empty drive or partition.

If you've installed directly over an existing Snow Leopard installation, you're done! You should already have done proper post-installation steps on your existing Snow Leopard drive, so skip Step 5 and simply reboot into Lion!

STEP 5: MultiBeast
Multibeast+2.png

MultiBeast is an all-in-one post-installation tool designed to enable boot from hard drive, and install support for Audio, Network, and Graphics. It contains two different complete post-installation solutions: UserDSDT and EasyBeast. In addition it includes System Utilities to rebuild caches and repair permissions and a collection of drivers, boot loaders, boot time config files and handy software.


Choose one of the following options directly following a fresh installation:


UserDSDT is a bare-minimum solution for those who have their own pre-edited DSDT. Place your DSDT.aml on the desktop before install. Audio, Graphics and Network will have to be enabled separately. Check out our DSDT Database to download your motherboard's pre-edited DSDT.

EasyBeast is a DSDT-free solution for any Core2/Core i system. It installs all of the essentials to allow your system to boot from the hard drive. Audio, Graphics and Network will have to be enabled separately.

1. At Chimera boot screen, choose your freshly installed Lion drive
2. Complete setup and registration routine
3. When you get to the desktop, run MultiBeast
4. If you have a custom pre-edited DSDT, place it on your desktop and choose UserDSDT
5. All others select EasyBeast
6. Select System Utilities
7. Reboot to OS X Lion

You may also use MultiBeast to install further drivers to enable ethernet, sound, graphics, etc... Be sure to read the documentation provided in MultiBeast Features.pdf about each option. Both UserDSDT and EasyBeast install the proper bootloader by default, so you'll not need to check that option.

8. Optionally, you can now use Disk Utility to delete the Installer partition.


Congratulations!


You now have a fully updated bootable version of OS X Lion on your CustoMac! If you have any trouble, there are plenty of folks in the tonymacx86 forum with similar hardware to help out! Special thanks to all the hard work and effort of everyone involved in the community, all of our Mods for testing and retesting this method, and to Adamsmasher and Complx for the new logos!

If you've had success using xMove + MultiBeast, consider a contribution to help keep the sites going. We're constantly updating and tweaking our tools to help you.

Thanks in advance!

-tonymacx86 & MacMan

Related Posts:

Get Ready for OS X Lion


Building a Sandy Bridge CustoMac: Recommended Builds for OS X


For discussions on this and other topics, register today at tonymacx86.com!

Ukitaka kuipata hiyo Leon bonyeza hapa
Mac OS X 10.7 Lion (Final Retail) (download torrent) - TPB

Ukiwa na Swali lolote kuhusu hiyo Mac Leon jiunge na hii blog TonyMacx86 Bonyeza hapa tonymacx86 Blog: xMove + MultiBeast: Install OS X 10.7 Lion on any Supported Intel Core 2 or Core i based PC


Si wengine tunadownload to kutoka kwa piratebay kuna hiyo copy ya GM master seed na ni sawa na iyo wanayouza kwa apple store kwisha kazi
 
Haya tena kwa Wale Wapenzi Wa Apple Macintosh kama mimi kitu hicho hapo chini maelezo yake yapo hapo fuatilia kwa makini jinsi ya kuiweka hiyo Latest Leon 10.7 Final waliyotoa Apple store haya tena kazi kwenu........

HIVI MKUU is it possible Running mac os KWENYE pc za kawaida apart from apple macntoci pc


xMove + MultiBeast: Install OS X 10.7 Lion on any Supported Intel Core 2 or Core i based PC Posted by tonymacx86 on Wednesday, July 20, 2011
Labels: chimera, Core i3, Core i5, Core i7, DSDT, guide, installer, Lion, Mac, MultiBeast, OS X, Snow Leopard, xMove


Any OSx86 installation guide can seem daunting at first glance, especially when trying to remember cryptic terminal commands and sorting through volumes of misinformation on the web. This guide requires no coding, terminal work, or Mac experience of any kind.


Because Apple is only distributing OS X Lion through the Mac App Store until next month, we've had to rethink our retail installation method. What follows is our recommendation for the easiest, cleanest and most Mac-like installation process. For best results, follow this guide to the letter.​

You will need:Unachotakiwa uwe nacho kwenye computer yako au Laptop yako :


A System Running Mac OS X Snow Leopard 10.6.6 or later with:

  • Intel Core 2 or above, 64 bit CPU
  • Mac App Store Account + $29.99
  • Internet Access to Download 4GB OS X Lion App through Mac App Store
  • 4GB space available in /Applications
  • 8GB additional free space on your hard drive
  • Mac Pro 3,1 system definition and the latest Chimera Bootloader from MultiBeast
Don't have Snow Leopard yet? To install Mac OS X Snow Leopard from the Retail DVD follow iBoot + MultiBeast.

STEP 1: Purchase OS X Lion from the Mac App Store

1. Boot into your existing Snow Leopard installation.
2. Download the OS X Lion App directly from the Mac App Store - it will automatically open.
Screen+shot+2011-07-08+at+1.36.48+PM.png
3. Click Continue.​
Screen+shot+2011-07-08+at+1.36.55+PM.png
4. Target your currently booted Snow Leopard drive and hit Install. This will not install the OS or affect this drive in any way. It will simply install the files necessary to do so later in the process.
Screen+shot+2011-07-08+at+1.37.03+PM.png

Screen+shot+2011-07-08+at+1.37.35+PM.png
5. Click Restart to reboot.


STEP 2: Prepare the Installer Partition


1. Boot back into your existing Snow Leopard installation.
2. Open /Applications/Utilities/Disk Utility
3. Highlight your Snow Leopard drive in left column.
4. Choose the Partition tab, and Click the + to Add a Partition.​
Screen+shot+2011-07-13+at+4.32.39+PM.png
5. Name the secondary partition Installer with a size of 8 GB and click Apply.

Screen+shot+2011-07-13+at+4.32.59+PM.png
6. Click Partition.​
Screen+shot+2011-07-13+at+4.33.52+PM.png
7. Close Disk Utility


STEP 3: xMove

1. Download xMove
2. Double-Click xMove, and choose Installer as Destination.

WARNING: DO NOT choose existing Snow Leopard as the Destination.
Do not interrupt the process- it will only take a few minutes. When done, you'll have a secondary partition on your drive containing the OS X Lion Installer!


STEP 4: Boot Installer & Install OS X Lion

1. Reboot- at the Chimera boot screen, choose Installer
2. It will boot directly to a familiar Mac OS X Installer complete with Disk Utility.
3. Install OS X Lion over existing Snow Leopard or onto any empty drive or partition.

If you've installed directly over an existing Snow Leopard installation, you're done! You should already have done proper post-installation steps on your existing Snow Leopard drive, so skip Step 5 and simply reboot into Lion!

STEP 5: MultiBeast
Multibeast+2.png

MultiBeast is an all-in-one post-installation tool designed to enable boot from hard drive, and install support for Audio, Network, and Graphics. It contains two different complete post-installation solutions: UserDSDT and EasyBeast. In addition it includes System Utilities to rebuild caches and repair permissions and a collection of drivers, boot loaders, boot time config files and handy software.


Choose one of the following options directly following a fresh installation:


UserDSDT is a bare-minimum solution for those who have their own pre-edited DSDT. Place your DSDT.aml on the desktop before install. Audio, Graphics and Network will have to be enabled separately. Check out our DSDT Database to download your motherboard's pre-edited DSDT.

EasyBeast is a DSDT-free solution for any Core2/Core i system. It installs all of the essentials to allow your system to boot from the hard drive. Audio, Graphics and Network will have to be enabled separately.

1. At Chimera boot screen, choose your freshly installed Lion drive
2. Complete setup and registration routine
3. When you get to the desktop, run MultiBeast
4. If you have a custom pre-edited DSDT, place it on your desktop and choose UserDSDT
5. All others select EasyBeast
6. Select System Utilities
7. Reboot to OS X Lion

You may also use MultiBeast to install further drivers to enable ethernet, sound, graphics, etc... Be sure to read the documentation provided in MultiBeast Features.pdf about each option. Both UserDSDT and EasyBeast install the proper bootloader by default, so you'll not need to check that option.

8. Optionally, you can now use Disk Utility to delete the Installer partition.


Congratulations!


You now have a fully updated bootable version of OS X Lion on your CustoMac! If you have any trouble, there are plenty of folks in the tonymacx86 forum with similar hardware to help out! Special thanks to all the hard work and effort of everyone involved in the community, all of our Mods for testing and retesting this method, and to Adamsmasher and Complx for the new logos!

If you've had success using xMove + MultiBeast, consider a contribution to help keep the sites going. We're constantly updating and tweaking our tools to help you.

Thanks in advance!

-tonymacx86 & MacMan

Related Posts:

Get Ready for OS X Lion


Building a Sandy Bridge CustoMac: Recommended Builds for OS X


For discussions on this and other topics, register today at tonymacx86.com!

Ukitaka kuipata hiyo Leon bonyeza hapa
Mac OS X 10.7 Lion (Final Retail) (download torrent) - TPB

Ukiwa na Swali lolote kuhusu hiyo Mac Leon jiunge na hii blog TonyMacx86 Bonyeza hapa tonymacx86 Blog: xMove + MultiBeast: Install OS X 10.7 Lion on any Supported Intel Core 2 or Core i based PC


[/QUOTE]
 
Haya tena kwa Wale Wapenzi Wa Apple Macintosh kama mimi kitu hicho hapo chini maelezo yake yapo hapo fuatilia kwa makini jinsi ya kuiweka hiyo Latest Leon 10.7 Final waliyotoa Apple store haya tena kazi kwenu........

HIVI MKUU is it possible Running mac os KWENYE pc za kawaida apart from apple macntoci pc


xMove + MultiBeast: Install OS X 10.7 Lion on any Supported Intel Core 2 or Core i based PC Posted by tonymacx86 on Wednesday, July 20, 2011
Labels: chimera, Core i3, Core i5, Core i7, DSDT, guide, installer, Lion, Mac, MultiBeast, OS X, Snow Leopard, xMove


Any OSx86 installation guide can seem daunting at first glance, especially when trying to remember cryptic terminal commands and sorting through volumes of misinformation on the web. This guide requires no coding, terminal work, or Mac experience of any kind.


Because Apple is only distributing OS X Lion through the Mac App Store until next month, we've had to rethink our retail installation method. What follows is our recommendation for the easiest, cleanest and most Mac-like installation process. For best results, follow this guide to the letter.​

You will need:Unachotakiwa uwe nacho kwenye computer yako au Laptop yako :


A System Running Mac OS X Snow Leopard 10.6.6 or later with:

  • Intel Core 2 or above, 64 bit CPU
  • Mac App Store Account + $29.99
  • Internet Access to Download 4GB OS X Lion App through Mac App Store
  • 4GB space available in /Applications
  • 8GB additional free space on your hard drive
  • Mac Pro 3,1 system definition and the latest Chimera Bootloader from MultiBeast
Don't have Snow Leopard yet? To install Mac OS X Snow Leopard from the Retail DVD follow iBoot + MultiBeast.

STEP 1: Purchase OS X Lion from the Mac App Store

1. Boot into your existing Snow Leopard installation.
2. Download the OS X Lion App directly from the Mac App Store - it will automatically open.
Screen+shot+2011-07-08+at+1.36.48+PM.png
3. Click Continue.​
Screen+shot+2011-07-08+at+1.36.55+PM.png
4. Target your currently booted Snow Leopard drive and hit Install. This will not install the OS or affect this drive in any way. It will simply install the files necessary to do so later in the process.
Screen+shot+2011-07-08+at+1.37.03+PM.png

Screen+shot+2011-07-08+at+1.37.35+PM.png
5. Click Restart to reboot.


STEP 2: Prepare the Installer Partition


1. Boot back into your existing Snow Leopard installation.
2. Open /Applications/Utilities/Disk Utility
3. Highlight your Snow Leopard drive in left column.
4. Choose the Partition tab, and Click the + to Add a Partition.​
Screen+shot+2011-07-13+at+4.32.39+PM.png
5. Name the secondary partition Installer with a size of 8 GB and click Apply.

Screen+shot+2011-07-13+at+4.32.59+PM.png
6. Click Partition.​
Screen+shot+2011-07-13+at+4.33.52+PM.png
7. Close Disk Utility


STEP 3: xMove

1. Download xMove
2. Double-Click xMove, and choose Installer as Destination.

WARNING: DO NOT choose existing Snow Leopard as the Destination.
Do not interrupt the process- it will only take a few minutes. When done, you'll have a secondary partition on your drive containing the OS X Lion Installer!


STEP 4: Boot Installer & Install OS X Lion

1. Reboot- at the Chimera boot screen, choose Installer
2. It will boot directly to a familiar Mac OS X Installer complete with Disk Utility.
3. Install OS X Lion over existing Snow Leopard or onto any empty drive or partition.

If you've installed directly over an existing Snow Leopard installation, you're done! You should already have done proper post-installation steps on your existing Snow Leopard drive, so skip Step 5 and simply reboot into Lion!

STEP 5: MultiBeast
Multibeast+2.png

MultiBeast is an all-in-one post-installation tool designed to enable boot from hard drive, and install support for Audio, Network, and Graphics. It contains two different complete post-installation solutions: UserDSDT and EasyBeast. In addition it includes System Utilities to rebuild caches and repair permissions and a collection of drivers, boot loaders, boot time config files and handy software.


Choose one of the following options directly following a fresh installation:


UserDSDT is a bare-minimum solution for those who have their own pre-edited DSDT. Place your DSDT.aml on the desktop before install. Audio, Graphics and Network will have to be enabled separately. Check out our DSDT Database to download your motherboard's pre-edited DSDT.

EasyBeast is a DSDT-free solution for any Core2/Core i system. It installs all of the essentials to allow your system to boot from the hard drive. Audio, Graphics and Network will have to be enabled separately.

1. At Chimera boot screen, choose your freshly installed Lion drive
2. Complete setup and registration routine
3. When you get to the desktop, run MultiBeast
4. If you have a custom pre-edited DSDT, place it on your desktop and choose UserDSDT
5. All others select EasyBeast
6. Select System Utilities
7. Reboot to OS X Lion

You may also use MultiBeast to install further drivers to enable ethernet, sound, graphics, etc... Be sure to read the documentation provided in MultiBeast Features.pdf about each option. Both UserDSDT and EasyBeast install the proper bootloader by default, so you'll not need to check that option.

8. Optionally, you can now use Disk Utility to delete the Installer partition.


Congratulations!


You now have a fully updated bootable version of OS X Lion on your CustoMac! If you have any trouble, there are plenty of folks in the tonymacx86 forum with similar hardware to help out! Special thanks to all the hard work and effort of everyone involved in the community, all of our Mods for testing and retesting this method, and to Adamsmasher and Complx for the new logos!

If you've had success using xMove + MultiBeast, consider a contribution to help keep the sites going. We're constantly updating and tweaking our tools to help you.

Thanks in advance!

-tonymacx86 & MacMan

Related Posts:

Get Ready for OS X Lion


Building a Sandy Bridge CustoMac: Recommended Builds for OS X


For discussions on this and other topics, register today at tonymacx86.com!

Ukitaka kuipata hiyo Leon bonyeza hapa
Mac OS X 10.7 Lion (Final Retail) (download torrent) - TPB

Ukiwa na Swali lolote kuhusu hiyo Mac Leon jiunge na hii blog TonyMacx86 Bonyeza hapa tonymacx86 Blog: xMove + MultiBeast: Install OS X 10.7 Lion on any Supported Intel Core 2 or Core i based PC


[/QUOTE]
 
HIVI MKUU is it possible Running mac os KWENYE pc za kawaida apart from apple macntoci pc


[/QUOTE]Mkuu njunwa wamavoko Unaweza kutumia hiyo apple Lion 10.7 au Lion 10.8 kwenye Computer za kawaida ili mradi utmie kwenye computer za Desktop ndio uzuri zaidi kuliko kutumia Laptop hiyo OSX Lion inauwa Laptop za kawaida ukitumia jaribu kutumia kwa njia ya Vmware Sio utumie moaj kwa moja Laptop yako itakufa muda sio mrefu fuatilia hapa .
[Working Method] Install Mac 10.7 Lion on VMware – Windows 7 Intel PC

MARCH 14, 2011 BY DINESH

Probably this is the first complete and working guide available on internet to install Mac OS X 10.7 Lion on VMware in Windows 7 Intel PC. After several days of searches, attempts, reading and collecting information from different places, I managed to install latest Mac OS X Lion 10.7 on my Intel Core2duo computer with VMware workstation in Windows 7.
This method should work in VMware Player also, but I prefer workstation because of Snapshot feature. I don't think you would face any issues on other types of Intel processors, but make sure you have Hardware Virtualization Technology (VT), 64 Bit, and Core2duo or later supported processor. I'm not sure about AMD processor users. Someone please try and update in comments area for AMD processor with Lion on VMware.

This method is completely for testing and learning purpose only.
What You Need?


  1. VMware workstation 7
  2. Lion OS X bootable VMDK file created from original installation medium (DVD or ISO file) –Check this guide and make this bootable image as described.
  3. Additional Files (Click here to download) – Its a zipped file from two sets of files and a darwin.iso file.
    One for patch your VMware software to support Mac OS X server guest ( Original Source), second one with pre configured Virtual machine files (Original source) and darwin.iso file to install VMware tools on guest to get more screen resolutions and VMware shared folders.
  4. Check the VT in your host BIOS as shown here with some tools.
  5. Just little bit time to read the complete guide
    icon_smile.gif
The Demonstration PC Configuration

I'm doing and taking screenshots for this guide from my Intel Core2duo 2.66GHz, 3GB RAM, Intel P35 chipset and Windows 7 32 Bit host Operating System
Steps to Install Mac 10.7 Lion on VMware–Windows 7 Intel PC

1) Download the additional files and extract the macosx_guest_vmware_7.tar.gz.
Before run the patch, I highly recommend to take a full backup of VMware Workstation/VMplayer programs files (Normally located under C:\Program Files\VMware).
By running this patch, it will modify some VMware exe files and unlock VMware to support Mac OS X server guest versions in Windows host.
Close the all virtual machines and VMware program completely, then open the command prompt as administrator in Windows OS, execute the windows.bat file.

2) Extract the Lion_107.zip file which you download in additional files set. Make sure extracted file location is having enough of disk space to grow (may be up to 10GB).
Open Mac OS X Server 10.6 64-bit.vmx file in VMware workstation or VMPlayer.
Go to the settings of virtual machine and add a hard disk, select existing option and browse theLion installer image VMDK file we created by previous guide.

You can modify the memory size and increase number of processors based on physical computer processor cores.
Remove the CD/DVD drive file attached with this pre configured file.
3) That's it. Start the virtual machine now. It should boot now. It will boot from 5GB vmdk file we created as bootable installer image.
Select the Language in first screen and start the installation.

4) Select 'Macintosh' disk in the next screen. If you can't see the disk to select and continue, then go to ‘Utilities' and click on ‘Disk Utility'. Create a partition as shown below.

5) I'm sure installation will end smoothly. Complete the initial configurations and setups at the next boot. You can remove the 5GB installer VMDK file from virtual machine to avoid any over writing on this virtual hard disk.

6) Here is the working Mac OS X 10.7 Lion on VMware workstation as a virtual machine in Windows 7 Intel based computer. It's really nice to run and play around with Apple's latest OS on normal PC. I'm sure this method will work with final release of 10.7 too.

Take a Snapshot before do anything now!
Some Post Installation Checkups and Configurations

1) Network
Network inside Lion virtual machine worked out of the box. I configured NAT and Bridged network types which worked nicely with my physical internet connection.

2) USB storage Access
USB storage access including Flash disk and external hard disk works fine in VM.

3) Increase Screen Resolution and VMware Shared Folders in Lion OS X
You will get only one screen resolution size inside Lion OS in VMware. Install VMware tools to increase the screen size and get more resolution options, also VMware shared folders work fine without any network between Lion guest and Windows 7 host. This helps to share data between host and guest easily.
There are two issues in VMware tools.
a) Full screen view is not working properly. You can't switch the guest lion virtual machine to‘Full Screen' in View menu, its just breaking the desktop and need to be restarted.
What I did was, setup the resolution size to match my physical monitor's size then used ‘Quick Switch' in View menu. Its very similar to full screen mode as I'm getting the virtual machine's screen fully in my monitor with 1400×900 resolution.
b) Sound is not working. The pre configured VM file (VMX) which you download already not having sound card. After adding sound card to virtual machine and install VMware tools, still sound is the problem.
I have tried several other packages including EnsoniqAudioPCI and AppleAudio kext files, but no luck. If sound works for someone, please share how you did.
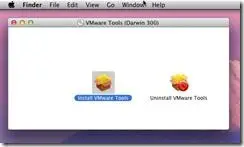
To Install VMware tools, mount the darwin.iso to DVD/CD drive and run the installation. Restart the VM.

Here are the available screen resolutions after VMware tools installation to increase the screen size.

4) VMware Shared Folders in Lion OS X guest and Windows 7 Host
Go to Settings of virtual machine and select ‘Shared Folders' under ‘Options'. Select ‘Always Enabled' and add the Folder or Partition from Windows host Operating System. That's it, now try to open the ‘VMware Shared Folders' shortcut from desktop of guest machine.
You should be able to access the host's shared folder or partition from Lion virtual machine now.

5) Sound
As I said earlier, its not working with me now. I'll be keep trying possible methods to make this work in Windows host. It may work inside Lion virtual machine when you run this Mac host with VMware Fusion.

I'm not a Mac user, but while comparing with Snow Leopard 10.6, Lion 10.7 looks good with new features and new interface to work.
Now, I expect your comments, successful and failure attempts by this method. Feel free to drop a comment if this works or not. As I said earlier, I did this in Intel Core2duo computer, So I need your inputs on other types of processors including Intel i-series and AMD processors.
Help others by your comments and share this guide to install Mac OS X Lion on VMware with Windows 7 host.
Subscribe to our free newsletter and download a free ebook.

​[Working Method] Install Mac 10.7 Lion on VMware - Windows 7 Intel PC
 
Last edited by a moderator:
Back
Top Bottom