Herbalist Dr MziziMkavu
JF-Expert Member
- Feb 3, 2009
- 42,318
- 33,125
How To Install Windows 11 On Unsupported Devices
Microsoft’s latest operating system, Windows 11, is now here, and while it comes with a long list of system requirements, it’s feasible to get around them. Microsoft has even written a blog post describing how to install Windows 11 if you don’t have a suitable PC. Continue reading to learn more about the Windows 11 installation process, as well as whether upgrading to the most recent OS is correct for you.
Microsoft has been keen to highlight Windows 11’s severe system requirements, which include a very narrow list of compatible Intel, AMD, and Qualcomm processors, as well as some security needs since the new operating system was introduced earlier in 2021. Here’s a quick rundown of Windows 11’s minimal system requirements:
- 1 gigahertz (GHz) processor
- 4 gigabytes of RAM
- 64 GB of storage space
- DirectX 12compatible graphics
- Plus UEFI, Secure Boot, and Trusted Platform Module (TPM) v2.0
List of Contents [hide]
- 0.1 CPU isn’t compatible with Windows 11
- 0.2 Upgrading to Windows 11
- 0.2.1 As a result, we advise beginner users to hold off on upgrading to Windows 11.
- 0.2.2 Installing Windows 11 on a device that does not fulfill the minimal requirements is entirely your responsibility.
- 1 How to Install Windows 11 on an Unsupported Device
- 1.1 Upgrading from Windows 10 to Windows 11
- 1.1.1 1) Download Windows 11
- 1.1.2 2) Change the registry to eliminate the CPU and TPM checks.
- 1.1.3 3) Using the ISO file, install Windows 11.
- 1.1 Upgrading from Windows 10 to Windows 11
- 2 Conclusion
CPU isn’t compatible with Windows 11
If your PC’s CPU is incompatible with Windows 11, you may believe that purchasing a new computer is the only method to upgrade your operating system. Fortunately, the functional requirement is not as hard as they appear. If your PC still fulfills the above-mentioned minimum requirements, you should be able to install Windows 11.Microsoft previously had a softer stance on listed system requirements. This is for prior versions of Windows, and this looks to be the case again with Windows 11. Check out Microsoft’s blog post on installing Windows 11 on machines that don’t match the minimal requirements for further information.
Upgrading to Windows 11
There aren’t many compelling reasons to update to Windows 11 right now if your current Windows computing environment provides a seamless, dependable experience (see our blog to learn about some of the more noteworthy improvements in Windows 11). Some reports have even indicated gaming performance concerns with Windows 11, albeit this is something that usually improves as the OS develops.Whether or if your PC matches the system requirements for Windows 11, there are always unknowns and hazards when a new operating system is released. Also, keep in mind that Microsoft has pledged to support Windows 10 until 2025, implying that it will continue to be the most reliable and commonly used version of Windows for some time.
As a result, we advise beginner users to hold off on upgrading to Windows 11.
Waiting allows Microsoft and the Windows user community to work out some of the unanticipated difficulties and faults that occur when a sophisticated piece of software is installed on millions of various PC settings. Because the Windows 11 customer experience cannot be assured for those of us who have the majority of the fundamental criteria but lack an officially-supported CPU or TPM 2.0 module, Microsoft does not advocate installing Windows 11.However, some of us may still be able to install and utilize Windows 11 without any problems. If you do install Windows 11 on a computer that does not satisfy the basic requirements, Microsoft warns you:
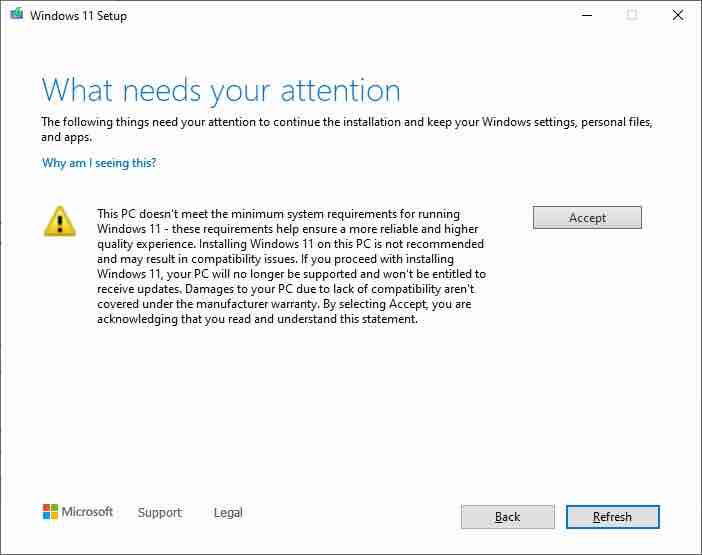
This PC doesn’t meet the minimum system requirements for running Windows 11 – these requirements help ensure a more reliable and higher quality experience. Installing Windows 11 on this PC is not recommended and may result in incompatibility issues. If you proceed with installing Windows 11, your PC will no longer be supported and won’t be entitled to receive updates. Damages to your PC due to lack of compatibility aren’t covered under the manufacturer warranty.
Despite this disclaimer, the initial Windows 11 update was distributed to install on unsupported devices; however, Microsoft may abandon this strategy in the future. In conclusion, if your Windows 10 PC does not immediately offer to upgrade to Windows 11, and the Windows 11 compatibility tool fails your PC:
Installing Windows 11 on a device that does not fulfill the minimal requirements is entirely your responsibility.
How to Install Windows 11 on an Unsupported Device
Have you gotten this far? Do you still wish to install Windows 11? While we don’t advocate it, for the time being, there are several steps you may take to reduce the dangers of installing a new operating system on an unsupported PC:- Always make a backup of any vital data on the device you’re updating (ideally in two ways, such as another drive, and potentially the cloud)
- Install Windows 11 on a spare device, rather than your primary PC, if feasible.
- Install Windows 11 on a separate partition from your existing operating system (for more information, see our blog post on how to have two operating systems on your PC).
- If you’re a computer newbie, ask the assistance of a friend or relative who is well-versed in Windows.
Installing or updating Windows may be stressful enough on its own. But considering all of the variables involved, installing Windows 11 on an incompatible device adds another layer of danger. If you don’t have TPM 2.0 or a compatible CPU, the solution we describe here should allow you to bypass the minimal requirements and install Windows 11.
We tested it successfully on a three-year-old Dell Inspiron 5370 laptop with an Intel i3-7130U CPU. Windows 11 does not support it. It’s the easiest solution we’ve found. It should allow you to return to Windows 10 if the update doesn’t provide the desired experience. If you still choose to proceed, please keep the following in mind:
It is totally at your own risk to install Windows 11 on an unsupported device!
Upgrading from Windows 10 to Windows 11
The simplest way to install Windows 11 is to update an existing Windows 10 system. This approach will also maintain any personal files and programs. However, we highly advise you to back up any data you wish to keep before beginning:1) Download Windows 11
It may seem apparent, but you will need a copy of Windows 11 to install it. This could not be simpler. Simply download the ISO file, which includes all of Windows 11’s core data, from the Microsoft Windows 11 download page:- Scroll down to “Download Windows 11 Disk Image (ISO),” then pick “Windows 11,” click “Download”. Choose your language from the selection menu.
- After clicking “Confirm,” a button should appear giving the 64-bit Windows 11 download in your preferred language. To begin your download, click here.
Because of its size, the Windows 11 ISO will most likely take some time to download. So let’s go on to the next step while it does.
2) Change the registry to eliminate the CPU and TPM checks.
You’ll need to change a registry item to circumvent the hardware check for the TPM 2.0 or supported CPU. We don’t suggest this. But in this situation, Microsoft’s Support site lists the edit as a possible remedy. Along with the now-familiar warning about the risk of installing Windows 11 on incompatible hardware.- Open the Registry Editor. Type “Regedit” into the Windows search box (located in the bottom-left corner of your screen by default). Hit Enter.
- Look through the folders to Computer\HKEY_LOCAL_MACHINE\SYSTEM\Setup\MoSetup
- Select using a right-click in the right pane New > DWORD (32-bit) Value
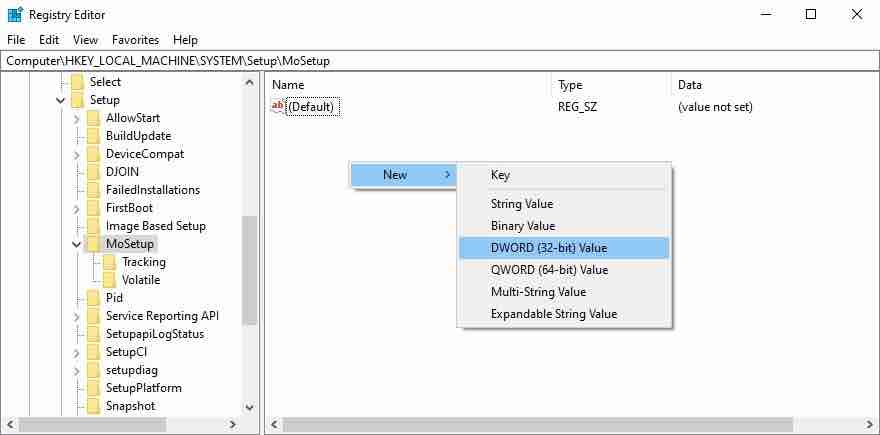
- Name the value AllowUpgradesWithUnsupportedTPMOrCPU
- Double-click the new value, and then enter 1 in the “Value data:” column. Select “OK” to exit the registry editor.

3) Using the ISO file, install Windows 11.
Locate and double-click the Windows 11 ISO file after it has completed downloading. Because ISO files are virtual drives, once opened, you should see a Windows 11 disc mounted in “My Computer.” Navigate to the disc, then open the main folder and start “Setup.” If you’re installing Windows 11 on a laptop, be sure it has enough juice to endure the length of the installation or utilize the power supply.Go through all of the setup screens. This will walk you through the software licensing terms, which you must agree to, as well as download installation updates.
You’ll then see Microsoft’s notice for incompatible hardware, which states that you won’t be able to get Windows 11 updates and that damages to your PC caused by incompatibility aren’t covered by the manufacturer’s guarantee. To advance, you must accept this statement.
Setup will then check to see if your computer has enough free space. If this is the case, you can proceed with the installation.
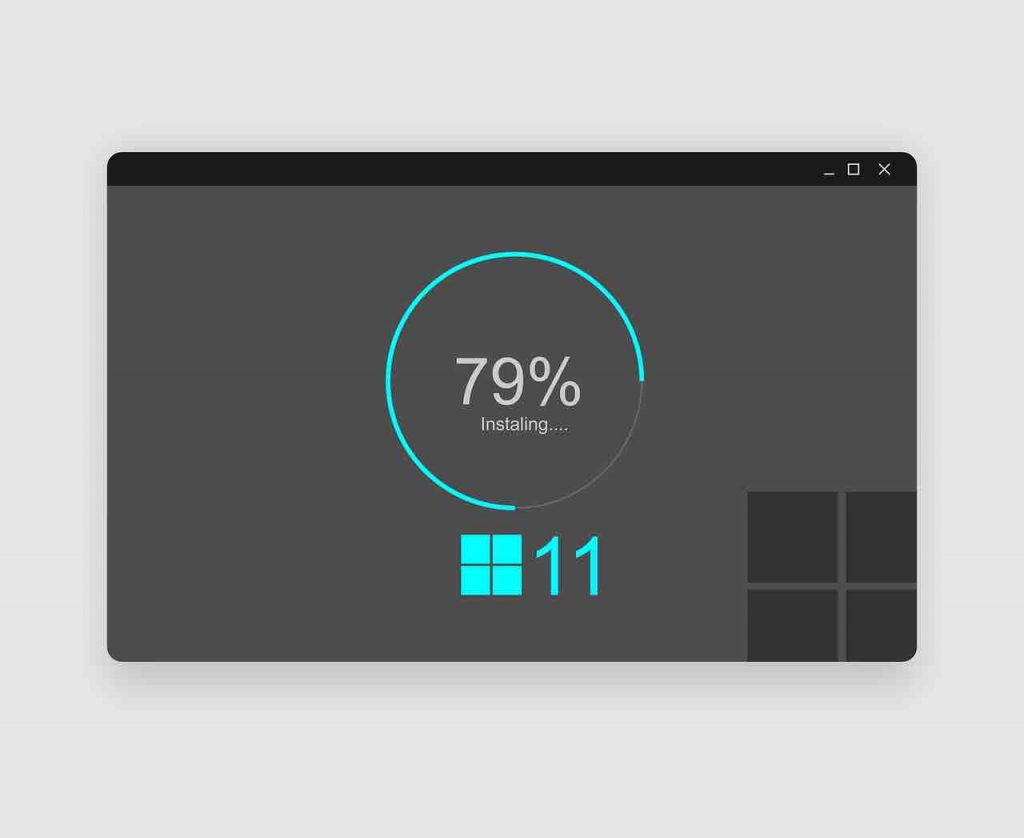
Windows 11 may take some time to install and may need to be restarted during the process.