Herbalist Dr MziziMkavu
JF-Expert Member
- Feb 3, 2009
- 42,316
- 33,125
Hi,
I'll show you how to Install "Lion OSX" into a PC. It's quite kinda easy to install Mac OSX, the most difficult part is to get the correct or right "Bootloader" that will allow us to run the OS. I had installed Lion in all my computers, even some friends and it runs pretty smooth. For instances, I've installed it in my Toshiba Satellite L305 and everything Works flawlessly, even the Wireless card worked out the box.
You won't need any patching files thru this installation, Just the bootloaders and some kexts in the Chameleon Bootloader Extra folder (I'll provide the links in the bottom of the page).
One thing you might want to know before you read or start installing Lion OSX, is that you don't need Mac OSX 10.6.8 to install Lion OSX in a drive, unless you want to upgrade from it. But if you have an empty drive and wants to use it to install Lion OSX, you can do it straight up without having to install Snow leopard OS 10.6.8. The only things you'll need is Lion OSX install in a partition that can boot it up and make sure that the same partition has Chameleon for Lion install, along with some kexts. Nothing Else is needed.
.
Things you'll need to install Lion operating System in a PC:
- Lion OSX image
- Computer running MAC OSX
- 2 partitions (one save in you desktop for easy access and the other-one for The actual Lion OSX installation.)
- Some Kexts needed to be install in the Installer drive. (Those kexts has to be install in the "Extra Folder" inside Chameleon Only, there's no need for installing them into the "Extensions" Folder in the Mac OSX System)
- PCEFI 10.6 Lion+Snow.pkg
- Chameleon for Lion OSX. (Link to download it is on my forum). By the way, Thanks to all the people that worked in making Chameleon for Lion. Always be support of their work...!
- Again, If you're just upgrading from 10.6.8 to Lion OSX no need to create any new partition, just use the same one that 10.6.8 is using, you won't lose anything!.
The 2 partitions that I had mention above is to use 1 and extract and modify "BaseSystem.dmg" and replace the shortcut from "Packages" for the actual folder. Otherwise you won't be able to modify it. and the second partition is to Transfer all the datas from the modified "BaseSystem.dmg" to a bootable partition. So, basically you will need those 2 partitions o if you prefer, you can use a partition created from your hard drive and a USB pen or portable drive. Whichever way you chose you'll need to create an image and "restore" BaseSystem.dmg and later transfer all those files via restore (again) to a new drive or partition. it might sound complicated but is not, just follow the directions below.
Note: If you're just upgrading from 10.6.8 to Lion OSX you don't need to create a new partition when you're installing Lion OSX, just chose the main partition as the drive you wants to install it. But you might experiences some issues if you have installed modified kexts. that said, if by any chances you're having issues with some hardwares you're better off by installing Lion OSX from a clean install.!
Ready to start? just follow the instructions below:
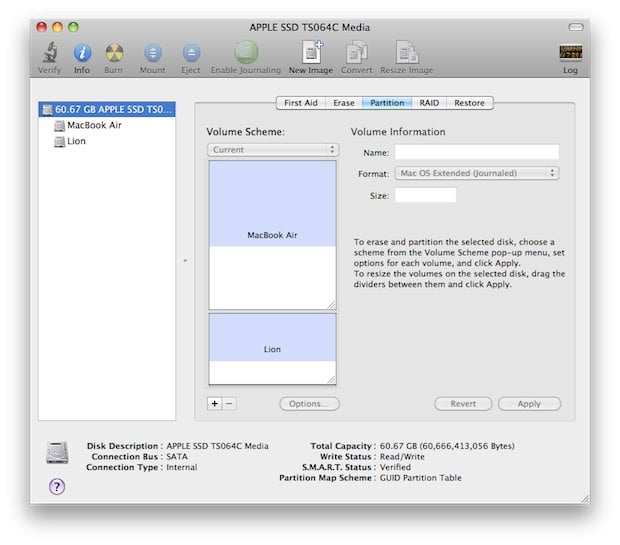
Open "Disk Utility" app and create a new image as shown in images below:

Using Disk utility restore BaseSystem.dmg on The New image Lion.dmg (that one you saved in the desktop). The Restoring will change your image name from Lion.dmg to "Mac OS X Base System". rename it again "Lion.dmg" so you won't get confused. (rename it using Finder).
Delete packages link inside /System/installation from the new image (that one you named Lion.dmg) and Copy Packages folder from InstallESD.dmg to Lion.dmg inside /System/Installation/ folder
Install Chameleon and PCEFI on Lion.dmg (Before we restore or transfer Lion.dmg to the partition that will install Lion OSX).
Now is time to restore Lion.dmg (Which you saved in your desktop) and transfer all the files via "Restore" to the Lion OSX Boot drive. You can use either a Portable drive, USB pen or a Partition from your main hard drive. Either way the partition has to be
GUID + HFS+ journaled format and after it's created and formatted name it "Lion OSX boot" or whatever you like. This is only so you can have an idea what steps to take.
after Disk utility finished "Restoring" Lion.dmg (from your desktop) to the partition you had named "Lion OSX boot", you'll need to copy
- Mach Kernel from InstallESD.dmg
Once you have done that, is time to install into "Lion OSX Boot" (that one that will install Lion OSX into your PC)
- Chameleon Bootloader
- PCEFI 10.6 Lion+Snow.pkg
Also you'll need to install a few kexts into the extra folder in Chameleon so that the hardware can work. such as fakesmc.kext, NullCPUPowerManagement.kext, ElliottForceLegacyRTC.kext, AppleACPIPS2Nub.kext, ApplePS2Controller.kext, VoodooBattery.kext, etc. To get my card reader worked I had used " IOAHCIBlockStorageInjector.kext".
I had swap "Intel® Wireless WiFi Link 4965AGN" for "Aria Extreme N" wireless card in my Toshiba Satellite L305 and it worked out of the box (The wireless card works with Atheros Kext)
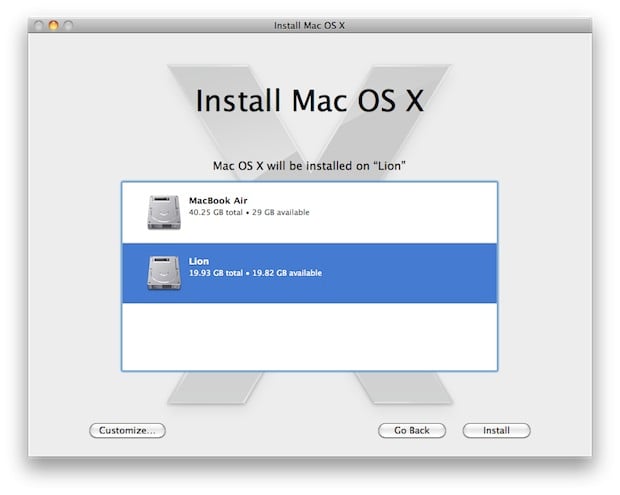
Next step is to create a partition where you wants Lion OSX to be install, or you can create it once Lion OSX is loaded and use "Disk Utility" app from the Installation.
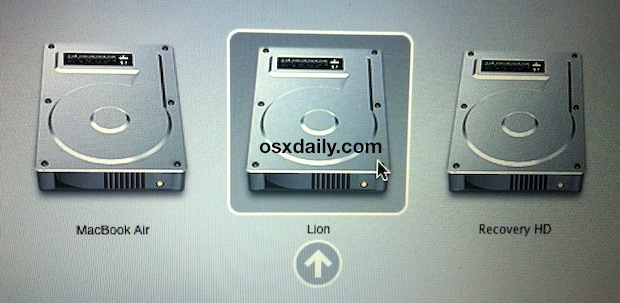
So, Restart you computer and make sure you boot up the partition that has Lion OSX.
After "Lion OSX" has been restarted you need to install "Chameleon for Lion" and some kexts into the "Extra folder" of it, so that Lion will boot up from the partition you had chosen to installed Lion OSX. So, Chameleon have to be install the following times (along with the kexts in the extra folder of it):
1)- In the new image (that you remained "Lion.dmg". 2)- In the partition or USB drive/Pen where you had restored/transferred all the files of "Lion.dmg" image. 3)- In the final partition where you had installed Lion OSX. Or you if had just upgraded from 10.6.8 to Lion OSX, just installed using the same drive/partition.
Note: If you have any trouble Replacing The Packages files from Lion OSX to the new image.dmg make sure that the new image the you had created has 4.6 GB (DVD-R, DVD-Ram) of size (as is shown in image 2), otherwise it won't let you replace them and you will get an message saying that you don't have enough space available. Always double check the instructions above.
Links for Kexts and Bootloader"
fakesmc.kext, ElliottForceLegacyRTC.kext, NullCPUPowerManagement.kext, etc.
MEGAUPLOAD - The leading online storage and file delivery service
PCEFI 10.6 for Lion (From Netkas) You won't need it but if you have issues loading Lion then you can install it to boot up. So, don't use it unless such issues comes up.
MEGAUPLOAD - The leading online storage and file delivery service
Chameleon for Lion OSX
MEGAUPLOAD - The leading online storage and file delivery service
Enjoy your Hackintosh...!
I'll show you how to Install "Lion OSX" into a PC. It's quite kinda easy to install Mac OSX, the most difficult part is to get the correct or right "Bootloader" that will allow us to run the OS. I had installed Lion in all my computers, even some friends and it runs pretty smooth. For instances, I've installed it in my Toshiba Satellite L305 and everything Works flawlessly, even the Wireless card worked out the box.
You won't need any patching files thru this installation, Just the bootloaders and some kexts in the Chameleon Bootloader Extra folder (I'll provide the links in the bottom of the page).
One thing you might want to know before you read or start installing Lion OSX, is that you don't need Mac OSX 10.6.8 to install Lion OSX in a drive, unless you want to upgrade from it. But if you have an empty drive and wants to use it to install Lion OSX, you can do it straight up without having to install Snow leopard OS 10.6.8. The only things you'll need is Lion OSX install in a partition that can boot it up and make sure that the same partition has Chameleon for Lion install, along with some kexts. Nothing Else is needed.
.
Things you'll need to install Lion operating System in a PC:
- Lion OSX image
- Computer running MAC OSX
- 2 partitions (one save in you desktop for easy access and the other-one for The actual Lion OSX installation.)
- Some Kexts needed to be install in the Installer drive. (Those kexts has to be install in the "Extra Folder" inside Chameleon Only, there's no need for installing them into the "Extensions" Folder in the Mac OSX System)
- PCEFI 10.6 Lion+Snow.pkg
- Chameleon for Lion OSX. (Link to download it is on my forum). By the way, Thanks to all the people that worked in making Chameleon for Lion. Always be support of their work...!
- Again, If you're just upgrading from 10.6.8 to Lion OSX no need to create any new partition, just use the same one that 10.6.8 is using, you won't lose anything!.
The 2 partitions that I had mention above is to use 1 and extract and modify "BaseSystem.dmg" and replace the shortcut from "Packages" for the actual folder. Otherwise you won't be able to modify it. and the second partition is to Transfer all the datas from the modified "BaseSystem.dmg" to a bootable partition. So, basically you will need those 2 partitions o if you prefer, you can use a partition created from your hard drive and a USB pen or portable drive. Whichever way you chose you'll need to create an image and "restore" BaseSystem.dmg and later transfer all those files via restore (again) to a new drive or partition. it might sound complicated but is not, just follow the directions below.
Note: If you're just upgrading from 10.6.8 to Lion OSX you don't need to create a new partition when you're installing Lion OSX, just chose the main partition as the drive you wants to install it. But you might experiences some issues if you have installed modified kexts. that said, if by any chances you're having issues with some hardwares you're better off by installing Lion OSX from a clean install.!
Ready to start? just follow the instructions below:
Open "Disk Utility" app and create a new image as shown in images below:


Using Disk utility restore BaseSystem.dmg on The New image Lion.dmg (that one you saved in the desktop). The Restoring will change your image name from Lion.dmg to "Mac OS X Base System". rename it again "Lion.dmg" so you won't get confused. (rename it using Finder).


Delete packages link inside /System/installation from the new image (that one you named Lion.dmg) and Copy Packages folder from InstallESD.dmg to Lion.dmg inside /System/Installation/ folder


Install Chameleon and PCEFI on Lion.dmg (Before we restore or transfer Lion.dmg to the partition that will install Lion OSX).
Now is time to restore Lion.dmg (Which you saved in your desktop) and transfer all the files via "Restore" to the Lion OSX Boot drive. You can use either a Portable drive, USB pen or a Partition from your main hard drive. Either way the partition has to be
GUID + HFS+ journaled format and after it's created and formatted name it "Lion OSX boot" or whatever you like. This is only so you can have an idea what steps to take.

after Disk utility finished "Restoring" Lion.dmg (from your desktop) to the partition you had named "Lion OSX boot", you'll need to copy
- Mach Kernel from InstallESD.dmg
Once you have done that, is time to install into "Lion OSX Boot" (that one that will install Lion OSX into your PC)
- Chameleon Bootloader
- PCEFI 10.6 Lion+Snow.pkg
Also you'll need to install a few kexts into the extra folder in Chameleon so that the hardware can work. such as fakesmc.kext, NullCPUPowerManagement.kext, ElliottForceLegacyRTC.kext, AppleACPIPS2Nub.kext, ApplePS2Controller.kext, VoodooBattery.kext, etc. To get my card reader worked I had used " IOAHCIBlockStorageInjector.kext".
I had swap "Intel® Wireless WiFi Link 4965AGN" for "Aria Extreme N" wireless card in my Toshiba Satellite L305 and it worked out of the box (The wireless card works with Atheros Kext)

Next step is to create a partition where you wants Lion OSX to be install, or you can create it once Lion OSX is loaded and use "Disk Utility" app from the Installation.
So, Restart you computer and make sure you boot up the partition that has Lion OSX.
After "Lion OSX" has been restarted you need to install "Chameleon for Lion" and some kexts into the "Extra folder" of it, so that Lion will boot up from the partition you had chosen to installed Lion OSX. So, Chameleon have to be install the following times (along with the kexts in the extra folder of it):
1)- In the new image (that you remained "Lion.dmg". 2)- In the partition or USB drive/Pen where you had restored/transferred all the files of "Lion.dmg" image. 3)- In the final partition where you had installed Lion OSX. Or you if had just upgraded from 10.6.8 to Lion OSX, just installed using the same drive/partition.
Note: If you have any trouble Replacing The Packages files from Lion OSX to the new image.dmg make sure that the new image the you had created has 4.6 GB (DVD-R, DVD-Ram) of size (as is shown in image 2), otherwise it won't let you replace them and you will get an message saying that you don't have enough space available. Always double check the instructions above.
Links for Kexts and Bootloader"
fakesmc.kext, ElliottForceLegacyRTC.kext, NullCPUPowerManagement.kext, etc.
MEGAUPLOAD - The leading online storage and file delivery service
PCEFI 10.6 for Lion (From Netkas) You won't need it but if you have issues loading Lion then you can install it to boot up. So, don't use it unless such issues comes up.
MEGAUPLOAD - The leading online storage and file delivery service
Chameleon for Lion OSX
MEGAUPLOAD - The leading online storage and file delivery service
Enjoy your Hackintosh...!
Maealezo ya Laptop yangu hayo hapo chini
Casper Nivana Laptop
Intel® Core™ 2 Duo CPU P7350 Processor 2.000GHz, RAM 4GB DDR2 667MHZ 1GB Nvidia GeForce G105 Graphics,3MB L2 Cache 320GB SATA Hard Disk Drive
Dual Boots: Snow Leopard OS and Windows 7 Ultimate
MziziMkavu