Herbalist Dr MziziMkavu
JF-Expert Member
- Feb 3, 2009
- 42,319
- 33,125
12 Common Windows 11 Issues And Fixes
Windows 11 is a bit of a mishmash. On the one side, many users would like to stay on Windows 10. Better window snapping choices, more flexibility over desktop systems, and new design touches such as curved edges on windows are all compelling reasons to upgrade to Windows 11 right now.
If you update to Windows 11 or install it from scratch, you’ll notice numerous serious annoyances, including a context menu that requires you to click twice, a sluggish taskbar, and a default browser menu that makes switching away from Edge more difficult.
If you’re having trouble with Windows 11, we can help. On this page, you’ll find solutions to the most frequent Windows 11 issues.
1. Truncated Context Menus Make You Click Twice
Microsoft has battled to decide if its user interface should be designed for computer-literate people or for others who aren’t as tech-savvy.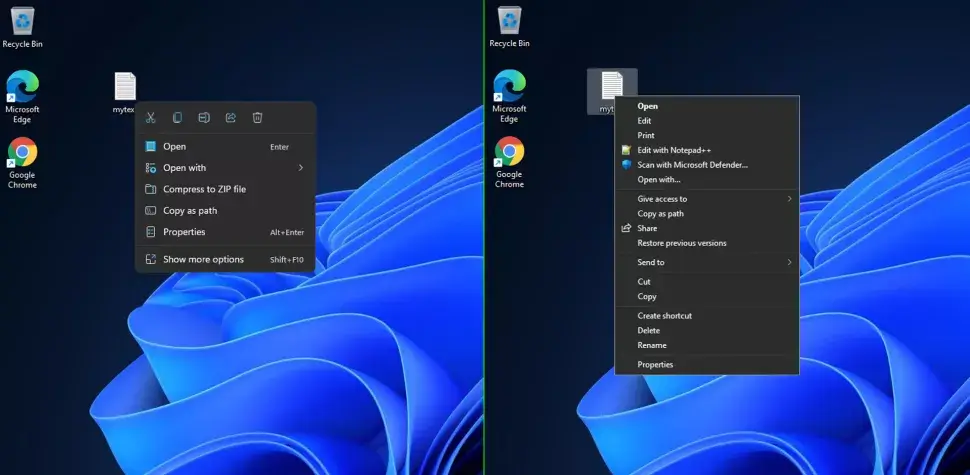
1. Open Regedit. The simplest method is to press Windows + R, type regedit, and press Enter.
2. Click Yes if User Account Control prompts you to.
3. Navigate to HKEY_CURRENT_USER\SOFTWARE\CLASSES\CLSID\
4. Create a new registry key called {86ca1aa0-34aa-4e8b-a509-50c905bae2a2}underneath CLSID. Generate keys by right-clicking on the right side of the window, selecting New->Key, and then typing the desired folder name.
5. Create a new key called InprocServer32 underneath {86ca1aa0-34aa-4e8b-a509-50c905bae2a2}.
6. Open the (Default) key in InprocServer32 and set its value to blank, then click OK.
You’ll see that the Data that was before marked as “(value not set)” is now null.
7. Close registry editor and reboot.
The classic-style context menu will now appear. Delete the InProc32 key if you want to return to the default, minimal context menu.
2. Explorer Loses Ribbon, Hides Options
Are you looking for the ribbon? You can’t handle the ribbon, at least according to Microsoft. The ribbon has been removed from File Explorer for Windows 11, and many of the options have been buried in places where they are harder to access. You must first open the View submenu, then the Show menu in Windows 11.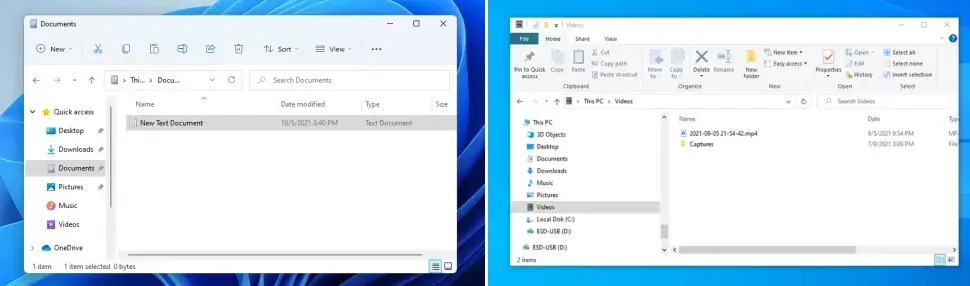
Fix
- Open Regedit. In Windows 11, you may accomplish this by pressing Windows + R and typing regedit into the Run box, or you can use the Search feature to look for regedit. Click Yes if User Account Control asks for approval.
- Navigate to HKEY_LOCAL_MACHINE\SOFTWARE\Microsoft\Windows\CurrentVersion\Shell Extensions
- Create a registry key called Blocked If it doesn’t already exist, find it and navigate to it.
- Right-click in the right window pane and select New String->Value. New addition with the name emerges. “New Value #” and a number.
- Rename your value to {e2bf9676-5f8f-435c-97eb-11607a5bedf7}. This is how it must be spelt.
- Close Regedit and restart your PC.
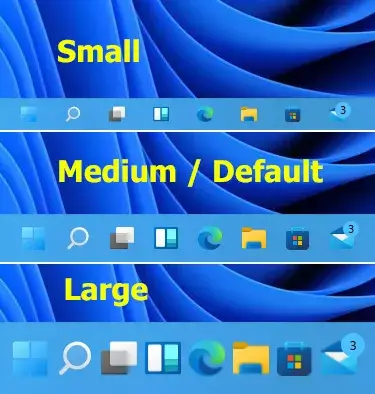
3. The Taskbar Cannot Be Resized
The ability to expand your taskbar is one simple feature that Windows 11 removes. However, there is a registry setting that allows you to pick between small, medium, and big sizes. That’s not very adaptable, but it’s a start.
Fix
- Open Regedit. In Windows 11, you may accomplish this by pressing Windows + R and typing regedit into the Run box, or you can use the Search feature to look for regedit.
- Navigate to HKEY_CURRENT_USER\Software\Microsoft\Windows\CurrentVersion\Explorer\Advanced.
- Create a new DWORD (32-bit) Value simply choosing with the right mouse button in the right window pane New->DWORD (32-bit) Value.
- Name the value TaskbarSi.
- Set the value to one of the numbers 0, 1, or 2, which corresponds to small, medium, or large. By double-clicking on TaskbarSi, you can change the value.
- Close Regedit and reboot.
4. The Taskbar Cannot Be Moved
- Open Regedit. You may find it by typing “Regedit” into the Run menu (Windows + R). Say yes if prompted to confirm.
- Navigate to HKEY_CURRENT_USER\Software\Microsoft\Windows\CurrentVersion\Explorer\StuckRects3.
- Open the Settings key for Double-clicking it to edit it.
- Change “03” to “01” in the second row’s fifth value. By eliminating the 03 and typing 01, you can achieve this. Click the OK button.
- If you have many monitors and want the taskbars on all of them to be on top, set the same values to 01 for all of them for all registry keys in the HKEY_CURRENT_USER\Software\Microsoft\Windows\CurrentVersion\Explorer\MMStuckRects3 folder. This folder will not exist if you do not have multiple monitors.
- Close Regedit.
- Launch the command prompt in administrative mode. You can do so by searching for “cmd,” selecting the top result by right-clicking it, and choosing “Run as administrator.” If you’re asked to confirm, select Yes.
- Stop and restart the explorer.exe process by entering taskkill /f /im explorer.exe and hitting Enter followed by start explorer.exe.
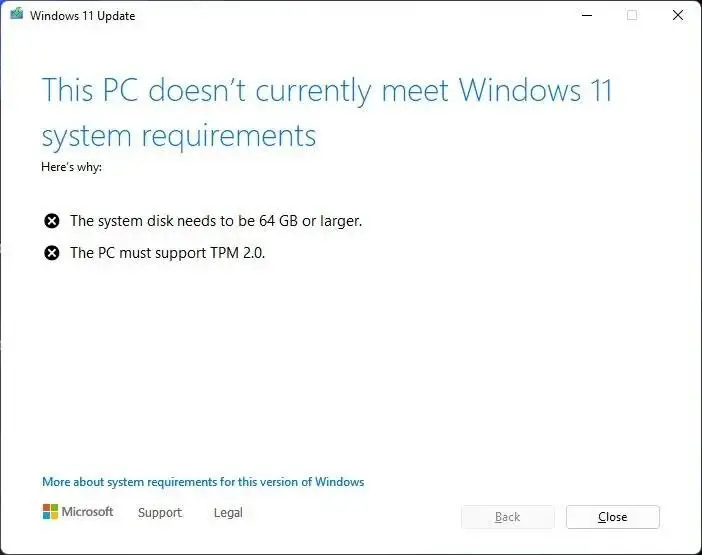
5. TPM Required, Strict Hardware Specifications
The need for Microsoft to make judgments for you is most clear in Windows 11’s stringent hardware requirements. Whereas earlier versions of the OS could be installed on almost any PC from the last 10 to 15 years, Windows 11 setup will prohibit you from running it on a machine that doesn’t have one of the restricted lists of approved AMD or Intel CPUs, which includes many processors sold just a few years ago (first-gen Ryzen for example).Even worse, Microsoft insists you have TPM 2.0 encryption, a feature that many older motherboards don’t have. The reason for these requirements is not performance but enhanced security. However, if Windows 10 can run fine without TPM there’s no reason why TPM can’t be optional in Windows 11.
You can get around Windows 11’s TPM, CPU, and RAM requirements by using one of a couple of simple methods.
Fix –
Microsoft has given a registry hack that loosens up the hardware compatibility for some customers who wish to install Windows 11 on computers that don’t meet all of them. This hack can be used to run on a computer with at least TPM 1.2 and an incompatible CPU.- Open Regedit.
- Navigate to HKEY_LOCAL_MACHINE\SYSTEM\Setup\MoSetup.
- Create a DWORD (32-bit) Value called AllowUpgradesWithUnsupportedTPMOrCPUif it doesn’t already exist.
- Set AllowUpgradesWithUnsupportedTPMOrCPU to 1.
- Close regedit and restart your PC. Using installation media, you should now be able to update to Windows 11 from within Windows 10. (provided you created it).
6. It’s Difficult to Change the Default Browser
When you switched to a different browser on Windows 10, you could set it as the default as part of the installation. It’s not quite as simple on Windows 11. Not only is Chrome unable to do this on its own, at least for the time being, but there are additional settings to adjust.
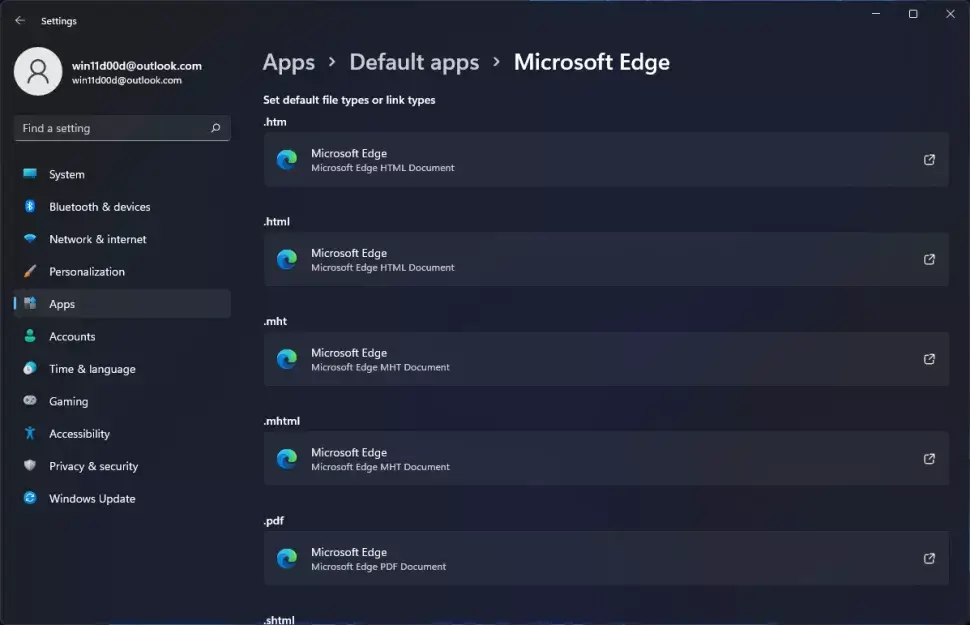
- Navigate to the Default apps settings menu. The quickest way to get there is to search for “Default programs” in Windows search and then select the top result. Alternatively, you can click on Settings->Apps->Default apps.
- Scroll down and select the browser you’d like to be the new standard. (ex: Google Chrome).
- Scroll down to HTTPS and click the name of the default browser at the moment(ex: Edge). There will be a pop-up menu.
- Select the new browserClick OK if you need to be the default.
- For.htm and.html, repeat steps 3 and 4. You can now quit, and your usual browser will be switched for any Web URLs you visit, including local HTML files on your hard disks / SSD, which is what most people care about. You may, however, configure your favorite browser to open PDFs as well as more exotic formats like XHTML and SHTML.
7. Tips for minimizing installation issues in Windows 11
Even though the upgrade to Windows 11 should go easily because Microsoft will strive to give the new version exclusively to devices that have had a good upgrading experience in the past, you may still run into issues during or following installation. However, if you plan ahead of time, you can reduce the likelihood of complications. And, if something goes wrong, you’ll be capable of regaining swiftly without risking data lossMake a backup that is just temporary
If something goes wrong during the installation and you need to roll back, a full backup is probably the best recovery approach. It’s also a wonderful technique to keep your files safe.
Metered connection should be disabled.
Windows Update will not be able to obtain Windows 11files if your internet connection is metered. If you’re going to upgrade via Windows Update, ensure sure your connection isn’t metered.
Change networks or turn off the metered connection (provided you still have enough data.) if you have a capped internet connection to upgrade to Windows 11.
Follow these procedures to turn off a metered connection in Windows 10:
- Open Settings.
- Click on Network & Security.
- Click on Wi-Fior Ethernet.
- Choose the current network connection.
- Under the “Metered connection” part, turn off the Set as a metered connection toggle switch.

Windows Update should be able to download the Windows 11 files on the PC when you finish the procedures.
Disconnect all non-essential devices.
USB flash drives, SD cards, external hard drives, printers, scanners, dongles, and Bluetooth devices are all examples of non-essential peripherals that can cause the setup to fail. Unplug any peripherals that are attached to the computer. All you’ll need is a computer with a monitor, keyboard, and mouse, as well as an internet connection.You can connect the peripherals to the computer when the installation is finished.
8. Windows 11 has a black screen issue.
A black screen is a regular problem during or after a new installation, and it’s often due to a problem with the graphic driver or another aspect of the upgrading process.Because determining the cause of an issue can be difficult, the most straightforward solution is to revert to a previous version.

Follow these procedures to remove and revert to an earlier version of Windows:
- Open Settings.
- Click on System.
- Click the Recovery page on the right side.
- Under the “Recovery options” section, in the “Previous version of Windows” settings, click the Go back


5. Select any of the reasons available.
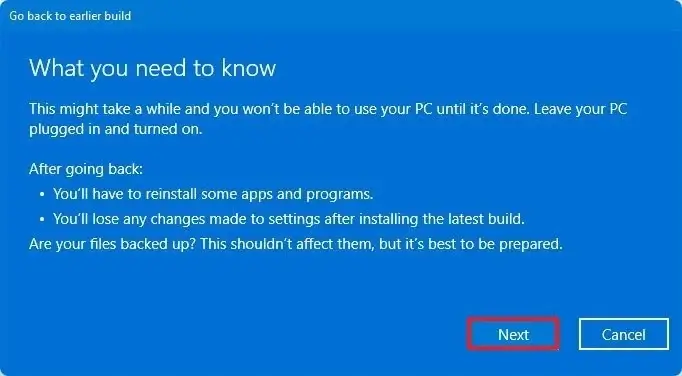
6. Click the Next
7. Select the No, thanks
8. Click the Next
9. Again, choose the Next button again.
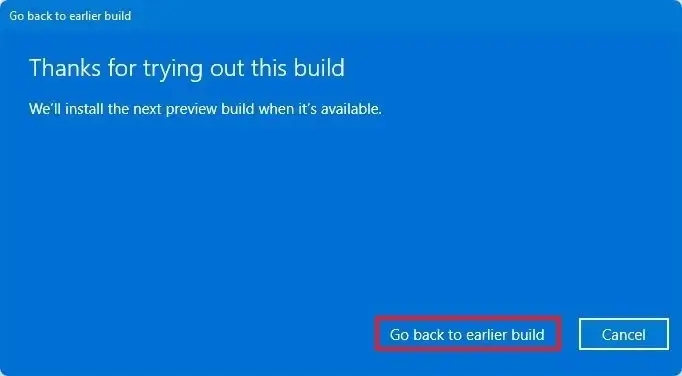
10. Click the Go back to an earlier build
9. Windows 11 installation error
You may get two notifications during the upgrade from Windows 10 to Windows 11 that are not specific but imply that something went wrong:
- Error: We couldn’t complete the updates. Undoing changes. Don’t turn off your computer.
- Error: Failure configuring Windows Updates. Reverting changes.
To check the error code, use these steps:
- Open Settings.
- Go on Update & Security.
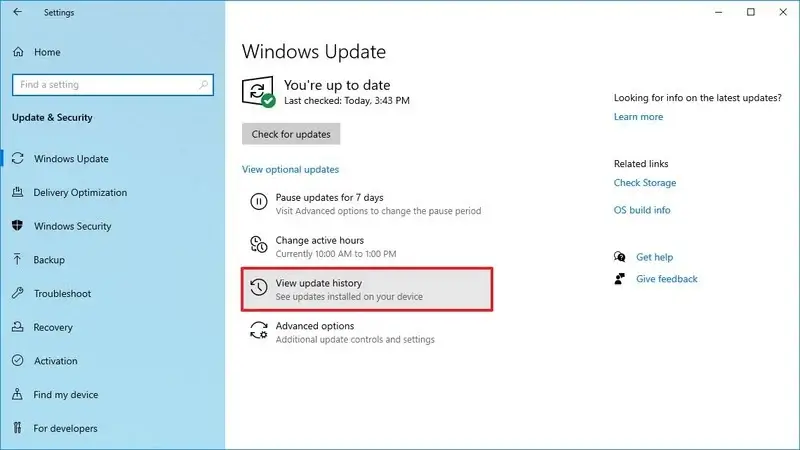
- Click on Windows Update.
- Then click on the View your update history
- Examine the error code associated with the failed update.
10. Problems with Wi-Fi and Ethernet adapters in Windows 11
It’s typical to have issues with Ethernet and Wi-Fi adapters after updating to a new version of Windows. The connection may become unreliable at times, and in other instances, it may entirely fail.
While numerous factors such as drivers, settings, wireless signal, cable, switch, router, and Internet Service Provider (ISP) might create a networking problem, it can also be a flaw in the current build of Windows 11.
Troubleshooter for networks
Follow these instructions to resolve network adapter issues after upgrading to Windows 11:
- Open Settings.
- Click on System.
- Choose the Troubleshoot page on the right side.
- Click the Other troubleshooters
- Under the “Other” section, click the Run button for the “Network Adapter.”
- Follow the on-screen instructions (if applicable).
11. AMD performance issue
AMD has stated on its support page that there is a memory issue with multiple processors (including Ryzen chips) with Windows 11 that can reduce performance by up to 5% in some programs and up to 15% in some games.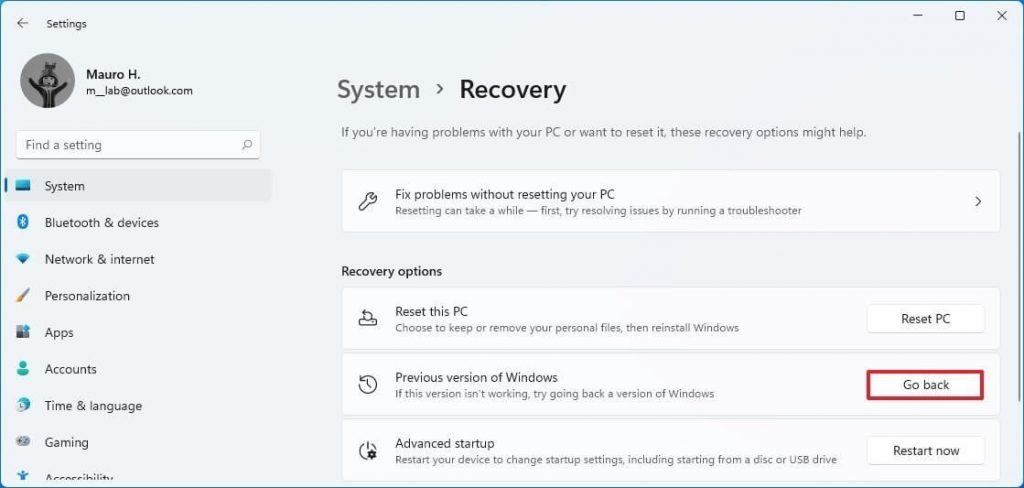
Follow these procedures to uninstall Windows 11 in order to remedy the performance issue:
- Open Settings.
- Choose System.
- Select the Recovery page on the right side.
- Choose the Go back button in the “Previous version of Windows” settings under the “Recovery options” section.
- Select any of the given reasons.
- Click the Next
- Then, click the No, thanks
- Click the Next
- Further, click the Next button again.
- Click the Go back to earlier build button
12 Error code 0x80070070 while upgrading
The error number , 0x80070070 – 0x50012,0x80070070 – 0x50011 or 0x80070070 – 0x60000 indicates that the machine does not have adequate space to process the setup. Usually, clearing off temporary files to make more space on the drive would solve the problem.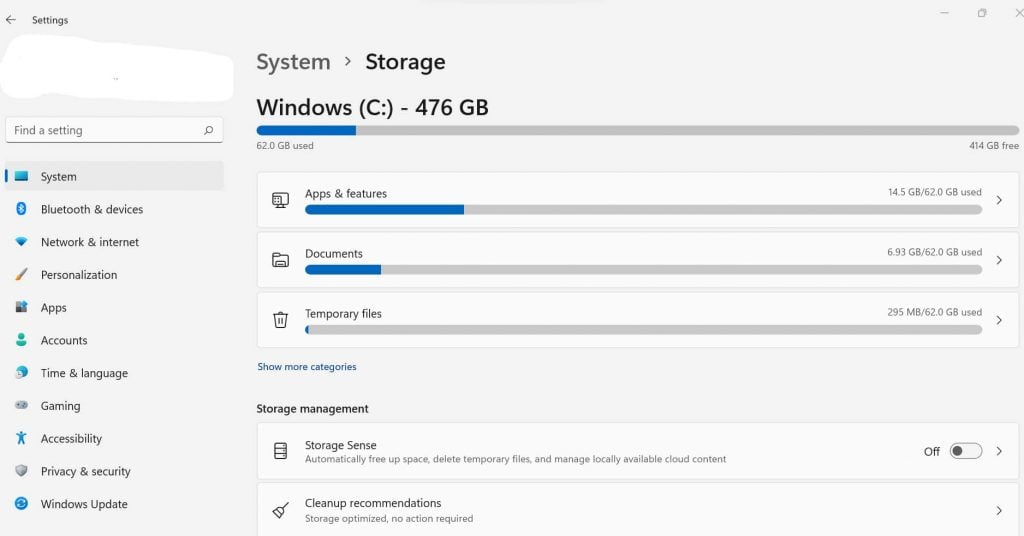
Use the following procedures to free up storage space so that you may proceed with the update:
- Open Settings.
- Choose System.
- Choose Storage.
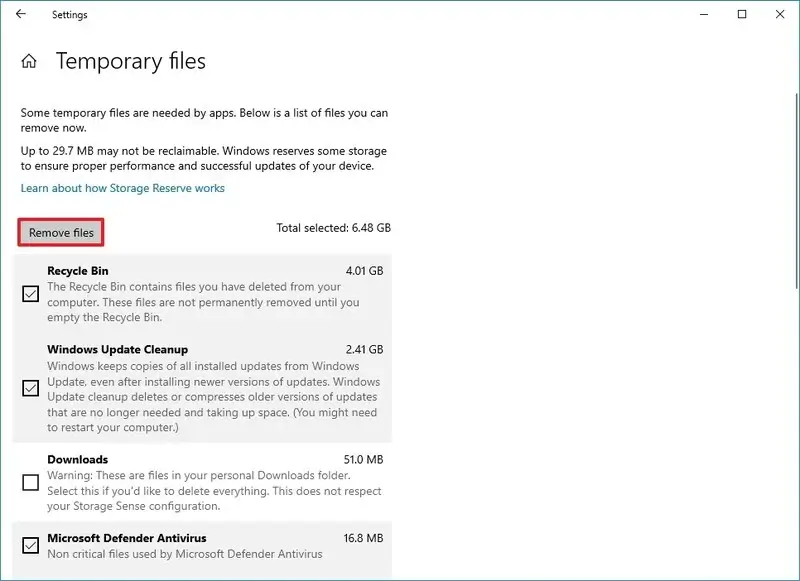
- Click the Temporary files option for the system drive under the “Storage” column.
- Check the items to remove.
- Click the Remove files
Once you are done with the procedures, you can proceed with the update to Windows 11’s first release.
If you don’t have enough space, connect ext. hard-drive with at least 16Gb of free space that the setup can utilize as temporary storage during the upgrading.
You may also follow this tutorial, which includes further tips, to free up more storage capacity on your PC.