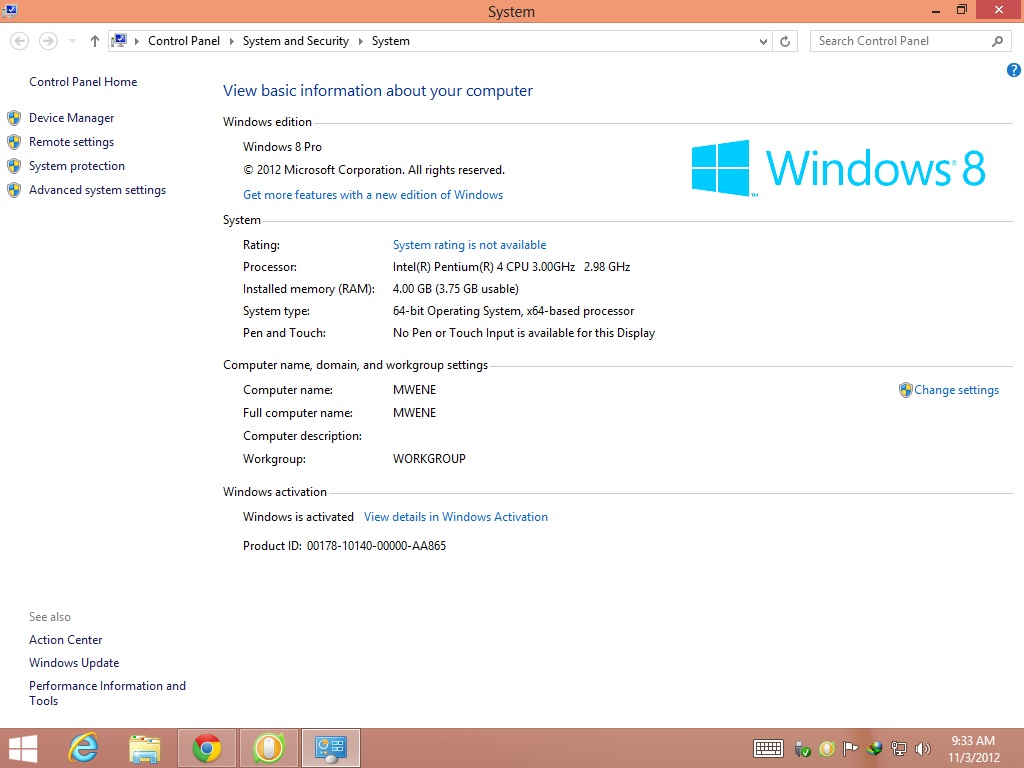
Windows 8 Pro Activator

Haya mkuu Papizo nimepata Software ya kufanya Trial kudumu moja kwa moja soma haya maelezo kisha U Download :
How to crack/extend trial period of software


Extend-crack-trial-period-of-software.png
We cant work on computers without softwares. There are many softwares which are free. But, some are shareware i.e. they allow us to try them for specific trial period and after this trial period expires, we have to purchase them to continue using them further. There are pretty handy hacks to crack/extend trial period of demo softwares. So, today I am posting my favorite trick to crack/extend trial period of software so that you can continue using your Trial software even if the trial period expires.
Crack/Extend Trial period of software:

Usually, trial softwares use computer clock to check for their trial period validity. If they find computer date exceeding trial period, they start showing the Trial expired prompt. At such times, one can roll back computer date to the date in Trial period to bypass trial period prompt. There are some automated softwares which do this job for you. RunAsDate is one of them.
1. Download RunAsDate software.
Password: Techozens – Citizens Of Technology
2. Run the software on your computer. Hit on Browse select the software whose trial period has expired. Now, select the date which lies in valid Trial period of the software (e.g. If you have installed the software on 15th and trial period is for 15 days, choose any date from 15th to 29th). But, remember, do not choose the date beyond this trial period.
3. You can hit on "Run" to start the program. Also, you can create a desktop shortcut which will enable you to start program every time within Trial period date.
Manual Method:
Well, this RunAsDate method does not work for certain softwares like Deep Freeze which have entry in startup itself. Deep Freeze checks for computer date on every restart. So, here, one has to rely on Manual method i.e. manually rolling back computer date to extend trial period

Ukitaka ku download Bonyeza hapa http://thepiratebay.se.seventhproxy.com/torrent/4696946/RunAsDate

Au hapa RunAsDate - CNET Download.com
 
Last edited by a moderator:
Haya mkuu Papizo nimepata Software ya kufanya Trial kudumu moja kwa moja soma haya maelezo kisha U Download :
How to crack/extend trial period of software


Extend-crack-trial-period-of-software.png
We cant work on computers without softwares. There are many softwares which are free. But, some are shareware i.e. they allow us to try them for specific trial period and after this trial period expires, we have to purchase them to continue using them further. There are pretty handy hacks to crack/extend trial period of demo softwares. So, today I am posting my favorite trick to crack/extend trial period of software so that you can continue using your Trial software even if the trial period expires.
Crack/Extend Trial period of software:

Usually, trial softwares use computer clock to check for their trial period validity. If they find computer date exceeding trial period, they start showing the Trial expired prompt. At such times, one can roll back computer date to the date in Trial period to bypass trial period prompt. There are some automated softwares which do this job for you. RunAsDate is one of them.
1. Download RunAsDate software.
Password: Techozens – Citizens Of Technology
2. Run the software on your computer. Hit on Browse select the software whose trial period has expired. Now, select the date which lies in valid Trial period of the software (e.g. If you have installed the software on 15th and trial period is for 15 days, choose any date from 15th to 29th). But, remember, do not choose the date beyond this trial period.
3. You can hit on "Run" to start the program. Also, you can create a desktop shortcut which will enable you to start program every time within Trial period date.
Manual Method:
Well, this RunAsDate method does not work for certain softwares like Deep Freeze which have entry in startup itself. Deep Freeze checks for computer date on every restart. So, here, one has to rely on Manual method i.e. manually rolling back computer date to extend trial period

Ukitaka ku download Bonyeza hapa http://thepiratebay.se.seventhproxy.com/torrent/4696946/RunAsDate

Au hapa RunAsDate - CNET Download.com


Nashukuru sana mkuu wangu MziziMkavu kwa msaada wako I appreciate kwa kweli, then naona hapo kwenye maelezo yako number moj imegoma kabisa, naona file wamelifuta, then link za mwisho naona hazifanyi kazi na window 7 umejaaribu kuitumia na imefanya kazi vizuri kabisa??Namba msaada pleasee
 
Last edited by a moderator:
Nashukuru sana mkuu wangu MziziMkavu kwa msaada wako I appreciate kwa kweli, then naona hapo kwenye maelezo yako number moj imegoma kabisa, naona file wamelifuta, then link za mwisho naona hazifanyi kazi na window 7 umejaaribu kuitumia na imefanya kazi vizuri kabisa??Namba msaada pleasee
Mkulu Papizo nimekuwekea Link mbili umejaribu zote hujaipata hiyo Unlocker Trial RunAsDate? hebu bonyeza hapa tena RunAsDate (download torrent) - TPB Na hii ingine bonyeza hapa RunAsDate - CNET Download.com kisha unipe Feedback. Na kuhus Active Windows 7 mimi huwa ninatumia njia hii hapa


Reset Windows 7 Trial Activation for 360 days Without Any Software Tools


<center></center>
Microsoft Corporation offers the most popular Computer Operating Systems, from Windows XP to Windows 8 (in Alpha stage now). While Windows Vista was a bitter disappointment in terms of market expectations and the results delivered by the OS, Windows 7 silenced everyone by adding blazing speed to the lethal mix of features like Windows Aero Graphics, BitLocker Encryption and ReadyBoost apart from several invisible background services like Automatic Defragmentation and Windows Backup.
Windows 7

Perhaps the only two things deterring Windows XP users from switching to Windows 7 were:


  • The bitter experience trying out Windows Vista, which had most of the fancy features like Windows Aero Graphics and ReadyBoost, but had very poor resource management structure, making the system excruciatingly slow and heating up computers which worked fine with Windows XP.


  • The excessively high cost of Windows 7 Ultimate as compared to Windows XP
While not much can be done to dispel fears about a repeat of the Vista nightmare, other than asking people to try out Windows 7 on non-essential machines before switching over completely, the second objection can be removed in a way by extending the Free Trial period of Windows 7, when you can try out all the features for up to 360 days with minor risk-free tweaks to the system.***
Please follow these steps carefully:
Step 1 : Go to the Start Menu, by clicking on the Start Button, type “cmd” in the search box. When the Link/Button appears above, right-click on it and click on “Run as administrator”.


Step 2 : Now, in the command prompt window, type in the following command:
slmgr -rearm
and press the Enter (or Return) Key.

Step 3 : After a couple of seconds, a confirmation message window should pop up saying that the command has been successfully executed, and you need to restart the computer.

The steps listed above can be carried out 3 times, thus extending the total No-Activation Free Trial Period by 90 days, from 30 to 120 days.
If you want to continue using Windows 7 beyond these 120 days without any Activation Key, you’d have to make changes to the Windows registry, which is very risky, since a minor mistake might land you in trouble. So, follow the steps listed below very very carefully!
Step 1 : Again go to the Start Menu, and in the search box type:
regedit
and press the Enter (or Return) key.

Step 2 : Once you are inside the Windows Registry Editor Program, go to:
HKEY_LOCAL_MACHINE
\SOFTWARE
\Microsoft
\WindowsNT
\CurrentVersion
\SoftwareProtectionPlatform
When you click on Software Protection Platform, you’ll see several links in the right column.
Double click on “SkipRearm” to open a popup window.

In the window, you need to change the “Value data” to “1&#8243; instead of “0&#8243;.
That’s all!
Now you can keep extending the Trial Activation period another 8 times, thus bringing the total period of No-Activation Free Trial of Windows 7 to 360 days using the above method!
In case you wish to use Windows 7 legally with a proper activation key and not just trial, you should purchase a key from the Microsoft.com Website or an authorized distributor in your city. We are only sharing methods known by several Microsoft Windows 7 users, and it is advisable not to use this Free Trial Method on essential work computers, to avoid rude shocks!

***Please note that while we have tried out every method and tweak listed above, we can take no responsibility in case of any damage to your computer by following these steps. We shall however be glad to try and help you with the problems if any.

How to Last 30 day Trials Forever (How to use RunAsDate)


Last edited by a moderator:
backup unafanya vipi? nisaidieni
Mkuu mansakankanmusa
How to Create a System Image Backup in Windows 7

infosmall1.png
Information

By default, the system image only includes the drives required for Windows to run. This would be all NTFSformatted partitions or drives with a operating system installed on it (ex: C ) and the System Reservedpartition are selected (checked) to be included in the backup and cannot be unselected.

This will show you how to create a system image (clone) backup of the entire hard drive or partition thatWindows 7 is on, and any other selected drive or partition. You can use this image to be able to do asystem image recovery to restore the hard drive or partition at boot back to the way it was at the time the backup image was created.


If you want to include additional drives in the system image, you can manually create a system image. If you manually create a system image, it can be saved on a USB flash drive, CDs, DVDs, or a hard drive.

If a system image was created through Windows Backup instead with the Include a System Image of Drives box checked, you can set Windows to retain as many system images as it has space for on the backup disk or to only keep the most recent system image.


notesmall1.png
Note

Keeping different versions of system images

If you're saving your system images on an internal or external drive, or on CDs or DVDs, you can keep several versions of system images. On internal and external hard drives, older system images will be deletedwhen the drive runs out of space. To help conserve disk space, you can manually delete older system images.

Backup images are saved as backup periods in this format at the selected saved to location like the example below.

(backup location)\WindowsImageBackup\( computer name)\Backup (year-month-day) (time-hhmmss)

For example, if your computer name is Computer, your backup image location is on hard disk or partition (network or local) D: , and you backed up on 11/22/2008 at 1:00:50 PM (It uses 24 hour time), then that backup image would be located in the folder below.
D:\WindowsImageBackup\Computer \Backup 2008-11-22 130050
If you're saving your system images in a network location, you can only keep the most current system image for each computer. If you have an existing system image for a computer and are creating a new one for the same computer, the new system image will overwrite the existing one.

If you want to keep multiple system image versions on the same drive or partition, then you can then do the steps below before creating a new system image to be able to keep them all together.
1. Navigate to the location of where you saved the created system image that you want to keep before creating a new system image. (see above)

2. Right click on the WindowsImageBackup folder and click on Rename.

3. Rename it to something like WindowsImageBackup-Copy-1 and press enter.
NOTE: This way you can just easily change the 1 an the end of the name to 2, 3, 4, etc... for each new system image that you make a copy of.

4. You now have a different image version that you can leave at this location.
warnsmall.png
NOTE:

  • If you renamed a WindowsImageBackup folder that you want to restore, then you must rename the current WindowsImageBackup folder, then rename the image you want back to WindowsImageBackup in order to be able to restore it.

warnsmall.png
Warning


  • Windows 7 can only include drives formatted with the NTFS file system in the system image.
  • Windows 7 cannot include the partition or drive that you are saving the backup image to in the image.
  • All "system" or "boot" drives/partitions are included in the system image by default, so you will not be able to save the system image to a system or boot drive/partition.
  • If you are saving the system image to a HDD or partition, then you can only save the system image on a separate hard drive (recommended) or partition than what Windows 7 is installed on. It cannot be saved to the C: drive.
  • Only the Windows 7 Professional, Ultimate, and Enterprise editions can backup to a network location.
  • You cannot restore a 64-bit Windows 7 backup image on a 32-bit system.
  • You cannot restore a 64-bit Windows 7 backup image with a 32 bit Windows 7 installation DVD or recovery partition, or the other way around. You must use the same 32-bit or 64-bit Windows 7 installation DVD or recovery partition as the backup image is.
  • When restoring a system image from a dynamic volume, the disks on your computer cannot be formatted to match the layout of the disks on the backup. To have full functionality, select a volume (partition) on a basic disk as your backup location instead.
  • I would recommend to create a system image on a separate HDD, or a separate partition on a separate HDD, for the best reliability to restore from it. CDs or DVDs are just not as reliable. A scratch one just one of them could ruin the whole image.


Here's How:
1. Open the Control Panel (icons view).

2. Click on the Backup and Restore icon.

3. Click on the Create a system image link. (See screenshot below)

4. If prompted by UAC, click on Yes.

5. Select the location to where you would like to save the backup image at, and click on the Nextbutton. (See screenshot below)
NOTE: See the Warning box at the top of the tutorial. Only the Windows 7 Professional,Ultimate, and Enterprise editions can backup to a network location.

6. If available, check any additional hard drives or partitions (ex: Vista) that you would like to include in the backup image with the Windows 7 (System and C: ) partition or hard drive, and click on the Next button. (See screenshot below)
NOTE: See the WARNING box at the top of the tutorial. If you do not want to add any additional hard drives or partitions, then just leave the others unchecked. You will not see this, if you do not have any other OS installed other than Windows 7.

7. Click on the Start backup button. (See screenshot below)

8. You will now see this window. (See screenshot below)
NOTE: If you wish to stop creating the backup image during this point, click on the Stop backup,Stop, and Close buttons.

9. When it is finished you will see this create a System Repair disc pop-up window. Click on No. (See screenshot below)
NOTE: For how to always hide or show this message, see this tutorial.

10. Click on the Close button. (See screenshot below)

11. Close the Backup and Restore window. (See screenshot below step 3)
That's it,
Shawn


Last edited by a moderator:
Nashukuru sana mku wangu MziziMkavu ila pia vile ile ile kitu kama nikidownload na nikifanya setting inakubali ila haisemi kitu chochote,

Ok another issue mkuu wangu ila naomba usinichoke please nilkuwa nahitaji hiki kitabu kama nitawezaa kukipata please

PICmicro® MCU C An Introduction to Programming the Microchip PIC in CCS C

Nitashukuru sana kama nitaweza kukipata.
 
Last edited by a moderator:
Nashukuru sana mku wangu MziziMkavu ila pia vile ile ile kitu kama nikidownload na nikifanya setting inakubali ila haisemi kitu chochote,

Ok another issue mkuu wangu ila naomba usinichoke please nilkuwa nahitaji hiki kitabu kama nitawezaa kukipata please

PICmicro® MCU C An Introduction to Programming the Microchip PIC in CCS C

Nitashukuru sana kama nitaweza kukipata.
Mkuu Papizo Kasheshe wewe ni mtu wa wapi hapo Tanzania? chukuwa hii hapa Papizo papizo papizooooooooooooooooo

Picmicro Mcu C An Introduction To Programming The Microchip Pic In Ccs C pdf free ebook download from bm.erciyes.edu.tr

PICmicro MCU C - An Introduction to Programming the Microchip PIC in CCS C

http://world-load.com/search?uid=13...gramming_the_Microchip_PIC_in_CCS_C.ebook.rar
 

Attachments

  • eBook - PIC Programming with C.pdf
    2.2 MB · Views: 37


You the best mkuu wangu, acha tu ume ni save sana tena sanaaa mkuu MziziMkavu ,nashukuru sana kwa muda wako na msaada wako.......maana najuwa umenipiga tafu kidogo nikikwama basi nitakushtua tu lazima wala hamna tatizo.....Daaaa me nipo hapa hii sehemu wameban piratebay mkuu sipo tz umeshapajuwaa??
 
Last edited by a moderator:
You the best mkuu wangu, acha tu ume ni save sana tena sanaaa mkuu MziziMkavu ,nashukuru sana kwa muda wako na msaada wako.......maana najuwa umenipiga tafu kidogo nikikwama basi nitakushtua tu lazima wala hamna tatizo.....Daaaa me nipo hapa hii sehemu wameban piratebay mkuu sipo tz umeshapajuwaa??
uniambiwe wapi wamei BAN Pirate niambie kwenye Pm Papizo
 
Last edited by a moderator:

Attachments

  • Windows 7 (2)-2012-11-04-23-07-45.png
    Windows 7 (2)-2012-11-04-23-07-45.png
    291.3 KB · Views: 94
Last edited by a moderator:
Wakuu kwa wale bado Windows 8 Final Activator hawaja download wachukue hii hapa chini
Windows 8 Professional X86-X64 English AIO + Activator
<dl class="col1" style="float: left; margin-top: 10px; margin-bottom: 10px; margin-left: 0px; width: 307px;"><dt style="float: left; font-weight: bold; padding: 0px 5px 0px 0px; color: rgb(123, 86, 58); border-bottom-width: 1px; border-bottom-style: dashed; border-bottom-color: rgb(232, 220, 210); clear: both;">Type:</dt><dd style="padding: 0px 0px 0px 40px; border-bottom-width: 1px; border-bottom-style: dashed; border-bottom-color: rgb(232, 220, 210);">Applications > Windows</dd><dt style="float: left; font-weight: bold; padding: 0px 5px 0px 0px; color: rgb(123, 86, 58); border-bottom-width: 1px; border-bottom-style: dashed; border-bottom-color: rgb(232, 220, 210); clear: both;">Files:</dt><dd style="padding: 0px 0px 0px 40px; border-bottom-width: 1px; border-bottom-style: dashed; border-bottom-color: rgb(232, 220, 210);">3</dd><dt style="float: left; font-weight: bold; padding: 0px 5px 0px 0px; color: rgb(123, 86, 58); border-bottom-width: 1px; border-bottom-style: dashed; border-bottom-color: rgb(232, 220, 210); clear: both;">Size:</dt><dd style="padding: 0px 0px 0px 40px; border-bottom-width: 1px; border-bottom-style: dashed; border-bottom-color: rgb(232, 220, 210);">3.88 GiB (4161598262 Bytes)</dd></dl><dl class="col2" style="float: left; margin-top: 10px; margin-bottom: 10px; margin-left: 0px; clear: right; width: 260px;"><dt style="float: left; font-weight: bold; padding: 0px 5px 0px 0px; color: rgb(123, 86, 58); border-bottom-width: 1px; border-bottom-style: dashed; border-bottom-color: rgb(232, 220, 210); clear: both;">Quality:</dt><dd id="rating" class="" style="padding: 0px 0px 0px 70px; border-bottom-width: 1px; border-bottom-style: dashed; border-bottom-color: rgb(232, 220, 210);">+14 / -25 (-11)</dd><dt style="float: left; font-weight: bold; padding: 0px 5px 0px 0px; color: rgb(123, 86, 58); border-bottom-width: 1px; border-bottom-style: dashed; border-bottom-color: rgb(232, 220, 210); clear: both;">Uploaded:</dt><dd style="padding: 0px 0px 0px 70px; border-bottom-width: 1px; border-bottom-style: dashed; border-bottom-color: rgb(232, 220, 210);">2012-10-28 14:53:21 GMT</dd><dt style="float: left; font-weight: bold; padding: 0px 5px 0px 0px; color: rgb(123, 86, 58); border-bottom-width: 1px; border-bottom-style: dashed; border-bottom-color: rgb(232, 220, 210); clear: both;">By:</dt><dd style="padding: 0px 0px 0px 70px; border-bottom-width: 1px; border-bottom-style: dashed; border-bottom-color: rgb(232, 220, 210);">NepsterJay
trusted.png
</dd><dt style="float: left; font-weight: bold; padding: 0px 5px 0px 0px; color: rgb(123, 86, 58); border-bottom-width: 1px; border-bottom-style: dashed; border-bottom-color: rgb(232, 220, 210); clear: both;">Seeders:</dt><dd style="padding: 0px 0px 0px 70px; border-bottom-width: 1px; border-bottom-style: dashed; border-bottom-color: rgb(232, 220, 210);">2482</dd><dt style="float: left; font-weight: bold; padding: 0px 5px 0px 0px; color: rgb(123, 86, 58); border-bottom-width: 1px; border-bottom-style: dashed; border-bottom-color: rgb(232, 220, 210); clear: both;">Leechers:</dt><dd style="padding: 0px 0px 0px 70px; border-bottom-width: 1px; border-bottom-style: dashed; border-bottom-color: rgb(232, 220, 210);">1385</dd><dt style="float: left; font-weight: bold; padding: 0px 5px 0px 0px; color: rgb(123, 86, 58); border-bottom-width: 1px; border-bottom-style: dashed; border-bottom-color: rgb(232, 220, 210); clear: both;">Comments</dt><dd style="padding: 0px 0px 0px 70px; border-bottom-width: 1px; border-bottom-style: dashed; border-bottom-color: rgb(232, 220, 210);">218 </dd>
<dt style="float: left; font-weight: bold; padding: 0px 5px 0px 0px; color: rgb(123, 86, 58); border-bottom-width: 1px; border-bottom-style: dashed; border-bottom-color: rgb(232, 220, 210); clear: both;">Info Hash:</dt><dd style="padding: 0px 0px 0px 70px; border-bottom-width: 1px; border-bottom-style: dashed; border-bottom-color: rgb(232, 220, 210);"> </dd>6F1FAE6E49E5FC82AE66B3660949F707C929E862</dl>


GET THIS TORRENT
(Problems with magnets links are fixed by upgrading your torrent client!)

Windows 8 is the latest version of Microsoft Windows, an operating system from Microsoft, for use on personal computers, including home and business desktops, laptops, tablets, media center PCs.system Requirements1 GHz or faster

processor1 GB RAM (32-bit) or 2 GB RAM (64-bit),16 GB of available disk space (32-bit) or 20 GB (64-bit),video card with support for DirectX 9 and WDDM 1.0 or higher driver.Windows 8

Professional English Retail AIO (32bit+64bit)File: en_windows_8_x64_x86_aio.isoCRC-32: 513fa338MD4: ebacdf692591a215251bfdfe8eeccd51MD5: e0d1c5edc949733a31a086ccbab73af4SHA-1: 3f5f7ecd2e6fd1dacff35a0c0ed8382900aa7694No key needed while Installing. Default key added and can

be changed later after installing.Made from Retail TN ISOs.Windows 8 PERMANENT Activator For W8 Build 9200Install:1. RUN AS ADMINISTARTOR [right click on the .exe - click on Run As Administrator]2. CLICK ON INSTALL / UNINSTALL WINDOWS 8When command Prompt Opens and Askes to

PRESS Y / N JUST PRESS Y AND THAT'SALL IT WILL ACTIVATE IT BY ITSELF( IT SHOULD SAY ACTIVATION SUCCESSFUL PRESS OK AND OK AGAIN, AND THEN ON COMMAND PROMPT IT WILL SAY THAT IT WILL RESTART - so

LET IT RESTART BY ITSELF3. IT WILL THEN RESTART AND Voila ACTIVATED.I Also Thinks it Works With All Version of Windows 8 but has not yet tested except for PRO version which prove that it works.It also work on RTM VERSION of Windows 8 and with W.Z.T Release.

Kuipakuwa bonyeza hapa
http://unblockedpiratebay.com/index.php?loadurl=/torrent/7768001/Windows_8_Professional_X86-X64_English_AIO___Activator#.UKlN_uT0DSh


Kama huna Bit Torrent bonyeza hapa
http://www.bittorrent.com/

Na Ukitaka Ku Activate Windows 8 Final chukuwa hapa
http://mollelpixels.blogspot.com/2012/10/windows-8-loader-activator.html


Msikose kuleta Feedback na
(Like) nyingi tu.


guys hebu nilete challenge hapa.

Kwamba hizi activator ni fake. Wewe unaona mashine yako ipo activated kumbe sio kweli changa la macho.

Moja kati ya feature ambayo huwezi kufanya katika windows 8 ambayo haipo activated ni kupersonalise nani ameweza baada ya kutumia hii activator?

Atlest mtu anihakikishie kwa kunionesha acount picha yake
 
Back
Top Bottom