Windows 8 Pro Activator

Daaa hiyo haapo naona yangu inaisha 2020 ila ya mkuu MziziMkavu inaisha 2030, Nashukuru sana kwa kweli maana hapa kazi mtindo mmoja sasa......Nimeifanyia testing naona inafanya kazi vizuri kabisaa
 

Attachments

  • Design.png
    Design.png
    62.9 KB · Views: 35
Last edited by a moderator:
Mimi inanigomea hiyo Os kila nikijaribu :- inaleta error code:-oxooooo5dparameter:-oxo30F03040x756................ nimejaribu hadi win to flash tpc yangu ni 32 bit so nimetumia ile ya x86 tatizo pale pale.
 
Mimi inanigomea hiyo Os kila nikijaribu :- inaleta error code:-oxooooo5dparameter:-oxo30F03040x756............... . nimejaribu hadi win to flash tpc yangu ni 32 bit so nimetumia ile ya x86 tatizo pale pale.
mkuu Shaffin Simbamwene Umetumia njia gani mpa ikakataa hiyo OS Windows 8?

kwanza kabla ya yote Download hii Microsoft .NET Framework 2.0 Service Pack 2 kwenye Computer yako unatumia Windows 7 ipi? Windows 7 32 Bit au Windows 7 64 Bit ? utachaguwa wewe mwenyewe hapo chini Download Microsoft .NET Framework 2.0 Service Pack 2 Bonyeza hapa Download: .NET Framework 2.0 Service Pack 2 - Microsoft Download Center - Download Details


kisha Download EasyBCD is the ultimate bootloader modification tool created to give end users complete control over everything from that happens before and during Windows startup. With EasyBCD, adding Windows 8/7/Vista entries, legacy Windows entries, Linux, Mac OS X, BSD, and more to the boot menu is truly a one-click experience. It gives you the power to easily create and manage bootable USB devices, boot from ISO images or virtual hard disks, boot from network paths and usb devices, and much, much more. With EasyBCD, users can make and restore backups of BCD settings, set up the MBR, repair boot files, change the boot drive, diagnose system boot problems, disable driver verification, create safe mode entries, limit CPU and memory usage, create multiple boot files and so much more in a snap. Just point, click, and watch as your bootloader automatically does magic. EasyBCD is the only bootloader on the planet that gives end users full control over anything and everything that happens before their operating system boots, and supports more operating systems than any other bootloader on the planet.What's new in this version: Support for Windows 8, EFI machines, and 13 different languages.

2230fe968f810a0e79132fc581a4f8f6c233_18023735650_6cb913875f_o_540x453.png


Ku Download Easy BCD Bonyeza hapa EasyBCD - CNET Download.com
Kisha Utaadd hiyo Windows 7 yako kwenye hiyo Easy BCd kuwa iwe ay kwanza ku bootloader.
Kisha Weka Patrition ya Windows 8 kwenye hard disk yako ya Windows 7 fanya hivi :
Create and format a hard disk partition

You must be logged on as an administrator to perform these steps.
To create a partition or volume (the two terms are often used interchangeably) on a hard disk, there must be either unallocated (empty) space on the hard disk or free space within an extended partition on the hard disk.
If there is no unallocated space, you can create some by shrinking an existing partition, deleting a partition, or by using a third-party partitioning program. For more information, see Can I repartition my hard disk? For more information about reformatting a hard disk, see the "What is reformatting?" section below.
Show all To create and format a partition (volume)

When you create partitions on a basic disk using Disk Management, the first three volumes you create will be formatted as primary partitions. Beginning with the fourth volume, each volume will be configured as a logical drive within an extended partition. For more information, see What are partitions and logical drives?


  • Open Computer Management by clicking the Start button
    4f6cbd09-148c-4dd8-b1f2-48f232a2fd33_47.png
    , clicking Control Panel, clicking System and Maintenance, clicking Administrative Tools, and then double-clicking Computer Management.
    18abb370-ac1e-4b6b-b663-e028a75bf05b_41.png
    If you are prompted for an administrator password or confirmation, type the password or provide confirmation.
  • In the Navigation pane, under Storage, click Disk Management.
  • Right-click an unallocated region on your hard disk, and then click New Simple Volume.
  • In the New Simple Volume Wizard, click Next.
  • Type the size of the volume you want to create in megabytes (MB) or accept the maximum default size, and then click Next.
  • Accept the default drive letter or choose a different drive letter to identify the partition, and then click Next.
  • In the Format Partition dialog box, do one of the following:
    • If you don't want to format the volume right now, click Do not format this volume, and then click Next.
    • To format the volume with the default settings, click Next.
  • Review your choices, and then click Finish.

    How To Create Extra Partitions In Windows Using Disk Management Console


    • [*=center]<fb:like send="false" layout="box_count" width="450" show_faces="false" font="arial" fb-xfbml-state="rendered" class="fb_edge_widget_with_comment fb_iframe_widget" style="position: relative; display: inline-block; "><iframe id="f1b7bc3aec" name="f45c15864" scrolling="no" title="Like this content on Facebook." class="fb_ltr" src="http://www.facebook.com/plugins/like.php?api_key=272706486511&channel_url=http%3A%2F%2Fstati c.ak.facebook.com%2Fconnect%2F xd_arbiter.php%3Fversion%3D11% 23cb%3Df3cdf79e9%26origin%3Dht tp%253A%252F%252Fwww.guidingte ch.com%252Ff1b10b8a24%26domain %3Dwww.guidingtech.com%26relat ion%3Dparent.parent&colorscheme=light&extended_social_context=false&font=arial&href=http%3A%2F%2Fwww.guidingt ech.com%2F681%2Fcreate-partition-windows-disk-management%2F&layout=box_count&locale=en_US&node_type=link&sdk=joey&send=false&show_faces=false&width=450" style="position: absolute; border-style: none; overflow: hidden; height: 61px; width: 45px; "></iframe></fb:like>
      [*=center]<iframe allowtransparency="true" frameborder="0" hspace="0" marginheight="0" marginwidth="0" scrolling="no" tabindex="0" vspace="0" width="100%" id="I0_1350852430257" name="I0_1350852430257" src="https://plusone.google.com/_/+1/fastbutton?bsv=m&abtk=AEIZW7TN8L0W6WYsLK3Mnh%2B npvuph8JrdjXBUxf2lbCZo/w3olmBqusEGvBd3%2BvRHcPMHHIwVu Mvi4lJEsRwU1yGNik9l3MolCJ62/dsT8NMKF4YVjPiRz8%3D&size=tall&hl=en-US&origin=http%3A%2F%2Fwww.guidin gtech.com&url=http%3A%2F%2Fwww.guidingte ch.com%2F681%2Fcreate-partition-windows-disk-management%2F&ic=1&jsh=m%3B%2F_%2Fapps-static%2F_%2Fjs%2Fgapi%2F__fea tures__%2Frt%3Dj%2Fver%3DymLRz 9R3QIo.tr.%2Fsv%3D1%2Fam%3D!vj VqvImSc8CICbuUGw%2Fd%3D1%2Frs% 3DAItRSTMkFp_tXOOBh7Z9yHTTdN58 RiHUnw#_methods=onPlusOne%2C_r eady%2C_close%2C_open%2C_resiz eMe%2C_renderstart%2Concircled&id=I0_1350852430257&parent=http%3A%2F%2Fwww.guidin gtech.com" title="+1" style="position: static; top: 0px; width: 50px; margin: 0px; border-style: none; left: 0px; visibility: visible; height: 60px; "></iframe>
      [*=center]<iframe allowtransparency="true" frameborder="0" scrolling="no" src="http://platform.twitter.com/widgets/tweet_button.1347008535.html#_ =1350852431111&count=vertical&id=twitter-widget-0&lang=en&original_referer=http%3A%2F%2F <a href=" http:="" www.guidingtech.com%2f681%2fcr"="" target="_blank">www.guidingtech.com%2F681%2Fcr</a> eate-partition-windows-disk-management%2F&amp;related=abhijeet mk%3AGuiding%2 0Tech%20Founder&amp;size=m&amp;text=Ho w%20To%20Create%20Extra %20Partitions%20In%20Windows%2 0Using%20Disk%20Management%20C onsole&amp;url=http%3A%2F%2Fwww.gu idingte ch.com%2F681%2Fcreate-partition-windows-disk-management%2F&amp;via=guidingtech" class="twitter-share-button twitter-count-vertical" title="Twitter Tweet Button" data-twttr-rendered="true" style="width: 59px; height: 62px; "></iframe>
    When you buy a branded Windows computer, usually you’ll find a single partition ( the C: drive) which has the OS and other programs installed on it. Sometimes, there may be another partition for recovery purposes, but otherwise, the manufacturers do not partition the hard disk by default.
    What are disk partitions in Windows

    According to Windows:
    A partition, sometimes also called a volume, is an area on a hard disk that can be formatted with a file system and identified with a letter of the alphabet. For example, drive C on most Windows computers is a partition.
    In simple terms, if your hard disk is a bookshelf then partitions are different shelves on it which store data.
    Why you should create partitions

    Managing all the data on that single available partition or the C drive isn’t prudent because C drive contains all the important Windows and programs folders. So if anything corrupts the OS then that would jeopardize your data too.
    Also, managing files and folders on one partition is cumbersome. And if it comes to formatting the computer , there is no option to move data to another partition to save it from deletion (external media is required to save all important data).
    Some recommendations before your create partitions

    1. The primary partition that contains your operating system shouldn’t be used to store important data. It should be smaller in size as compared to other partitions that you create. For example, if you’ve got 250GB storage, allot around 40GB to the C: drive (assuming you have Vista/Windows 7…if you have XP then 20GB is enough).
    2. Create another partition that you’ll use to store important files. This one could take the maximum space on the hard disk.
    3. Keep your primary partition organized and clean. Use tools like Revo Uninstaller to uninstalluseless applications and Ccleaner to clean it up.
    So now that you are convinced that you should partition your hard disk into more drives, lets check out the Windows’ inbuilt Disk Management console which helps you in that task.
    How To Partition Your Hard Disk in Windows

    You can make partitions of disk with the help of Disk Management console. You can make as many partitions as you want.
    This is a step by step guide to create a partition on your computer hard disk using the Disk Management console:
    Click on Windows Start
    start5.png
    button. Type Computer Management in a search box.
    computermanagement.png

    Click Disk Management option on the left panel. It will load disk configuration information
    diskmanagement.png

    All information of partitions in your computer will be displayed on the right hand side.
    diskmanagement1.png

    Right click on the partition you want to shrink. Click on Shrink volume.
    shrinkvolume.png

    Note that you can only shrink a partition if it has enough vacant space. And you should always make sure that a partition has some space to accommodate more data. Shrinking 5GB of space means new size of partition will be 5GB less than previous size.
    shrink.png

    You can see in the image below that 5GB space is shown as unallocated space. Note the new size of D drive. It is 85.57 GB now from 90.54 GB.
    shrink1.png

    You can make a new partition of this unallocated disk space by right clicking on it and selectingNew simple Volume from the menu.
    newvolume.png

    Click on Next button.
    simplevolume.png

    Now choose the size of disk. You can allocate all the unallocated space, i.e. 5000 MB.
    simplevolume2.png

    Assign a letter to a drive from a drop down list.
    simplevolume3.png

    Format the volume using NTFS file system. Check Perform a quick format option. Click Next button.
    simplevolume4.png

    Click on Finish button. It will create a new partition of your hard disk.
    simplevolume5.png

  • How To Extend Disk Space In Windows

    You can also extend volume of any partition by right clicking on a partition and selecting Extend volume option from the menu. In the Extend Volume Window click on Next button.
    extendvolume.png

    Now you can extend your disk space by allocating unallocated disk space. In the above example we have 5000 MB unallocated space, so we can give this space to extend the disk size. After selecting amount of space click Next button.
    extendvolume1.png

    You can check that the size of D drive is again 90.45 GB. So in this way disk space will be extended.
    extendvolume2.png

    So that was how to shrink a volume, create a new volume out of the unallocated volume and add that unallocated volume to a previous volume to extend it.

    Angalia hiyo Video:
  • Ukifanikiwa nipe feedback.


Last edited by a moderator:
mkuu Shaffin Simbamwene Umetumia njia gani mpa ikakataa hiyo OS Windows 8?

kwanza kabla ya yote Download hii Microsoft .NET Framework 2.0 Service Pack 2 kwenye Computer yako unatumia Windows 7 ipi? Windows 7 32 Bit au Windows 7 64 Bit ? utachaguwa wewe mwenyewe hapo chini Download Microsoft .NET Framework 2.0 Service Pack 2 Bonyeza hapa Download: .NET Framework 2.0 Service Pack 2 - Microsoft Download Center - Download Details


kisha Download EasyBCD is the ultimate bootloader modification tool created to give end users complete control over everything from that happens before and during Windows startup. With EasyBCD, adding Windows 8/7/Vista entries, legacy Windows entries, Linux, Mac OS X, BSD, and more to the boot menu is truly a one-click experience. It gives you the power to easily create and manage bootable USB devices, boot from ISO images or virtual hard disks, boot from network paths and usb devices, and much, much more. With EasyBCD, users can make and restore backups of BCD settings, set up the MBR, repair boot files, change the boot drive, diagnose system boot problems, disable driver verification, create safe mode entries, limit CPU and memory usage, create multiple boot files and so much more in a snap. Just point, click, and watch as your bootloader automatically does magic. EasyBCD is the only bootloader on the planet that gives end users full control over anything and everything that happens before their operating system boots, and supports more operating systems than any other bootloader on the planet.What's new in this version: Support for Windows 8, EFI machines, and 13 different languages.

2230fe968f810a0e79132fc581a4f8f6c233_18023735650_6cb913875f_o_540x453.png


Ku Download Easy BCD Bonyeza hapa EasyBCD - CNET Download.com
Kisha Utaadd hiyo Windows 7 yako kwenye hiyo Easy BCd kuwa iwe ay kwanza ku bootloader.
Kisha Weka Patrition ya Windows 8 kwenye hard disk yako ya Windows 7 fanya hivi :
Create and format a hard disk partition

You must be logged on as an administrator to perform these steps.
To create a partition or volume (the two terms are often used interchangeably) on a hard disk, there must be either unallocated (empty) space on the hard disk or free space within an extended partition on the hard disk.
If there is no unallocated space, you can create some by shrinking an existing partition, deleting a partition, or by using a third-party partitioning program. For more information, see Can I repartition my hard disk? For more information about reformatting a hard disk, see the "What is reformatting?" section below.
Show all To create and format a partition (volume)

When you create partitions on a basic disk using Disk Management, the first three volumes you create will be formatted as primary partitions. Beginning with the fourth volume, each volume will be configured as a logical drive within an extended partition. For more information, see What are partitions and logical drives?


  • Open Computer Management by clicking the Start button
    4f6cbd09-148c-4dd8-b1f2-48f232a2fd33_47.png
    , clicking Control Panel, clicking System and Maintenance, clicking Administrative Tools, and then double-clicking Computer Management.
    18abb370-ac1e-4b6b-b663-e028a75bf05b_41.png
    If you are prompted for an administrator password or confirmation, type the password or provide confirmation.
  • In the Navigation pane, under Storage, click Disk Management.
  • Right-click an unallocated region on your hard disk, and then click New Simple Volume.
  • In the New Simple Volume Wizard, click Next.
  • Type the size of the volume you want to create in megabytes (MB) or accept the maximum default size, and then click Next.
  • Accept the default drive letter or choose a different drive letter to identify the partition, and then click Next.
  • In the Format Partition dialog box, do one of the following:
    • If you don't want to format the volume right now, click Do not format this volume, and then click Next.
    • To format the volume with the default settings, click Next.
  • Review your choices, and then click Finish.

    How To Create Extra Partitions In Windows Using Disk Management Console


    • [*=center]<fb:like send="false" layout="box_count" width="450" show_faces="false" font="arial" fb-xfbml-state="rendered" class="fb_edge_widget_with_comment fb_iframe_widget" style="position: relative; display: inline-block; "><iframe id="f1b7bc3aec" name="f45c15864" scrolling="no" title="Like this content on Facebook." class="fb_ltr" src="http://www.facebook.com/plugins/like.php?api_key=272706486511&channel_url=http%3A%2F%2Fstati c.ak.facebook.com%2Fconnect%2F xd_arbiter.php%3Fversion%3D11% 23cb%3Df3cdf79e9%26origin%3Dht tp%253A%252F%252Fwww.guidingte ch.com%252Ff1b10b8a24%26domain %3Dwww.guidingtech.com%26relat ion%3Dparent.parent&colorscheme=light&extended_social_context=false&font=arial&href=http%3A%2F%2Fwww.guidingt ech.com%2F681%2Fcreate-partition-windows-disk-management%2F&layout=box_count&locale=en_US&node_type=link&sdk=joey&send=false&show_faces=false&width=450" style="position: absolute; border-style: none; overflow: hidden; height: 61px; width: 45px; "></iframe></fb:like>
      [*=center]<iframe allowtransparency="true" frameborder="0" hspace="0" marginheight="0" marginwidth="0" scrolling="no" tabindex="0" vspace="0" width="100%" id="I0_1350852430257" name="I0_1350852430257" src="https://plusone.google.com/_/+1/fastbutton?bsv=m&abtk=AEIZW7TN8L0W6WYsLK3Mnh%2B npvuph8JrdjXBUxf2lbCZo/w3olmBqusEGvBd3%2BvRHcPMHHIwVu Mvi4lJEsRwU1yGNik9l3MolCJ62/dsT8NMKF4YVjPiRz8%3D&size=tall&hl=en-US&origin=http%3A%2F%2Fwww.guidin gtech.com&url=http%3A%2F%2Fwww.guidingte ch.com%2F681%2Fcreate-partition-windows-disk-management%2F&ic=1&jsh=m%3B%2F_%2Fapps-static%2F_%2Fjs%2Fgapi%2F__fea tures__%2Frt%3Dj%2Fver%3DymLRz 9R3QIo.tr.%2Fsv%3D1%2Fam%3D!vj VqvImSc8CICbuUGw%2Fd%3D1%2Frs% 3DAItRSTMkFp_tXOOBh7Z9yHTTdN58 RiHUnw#_methods=onPlusOne%2C_r eady%2C_close%2C_open%2C_resiz eMe%2C_renderstart%2Concircled&id=I0_1350852430257&parent=http%3A%2F%2Fwww.guidin gtech.com" title="+1" style="position: static; top: 0px; width: 50px; margin: 0px; border-style: none; left: 0px; visibility: visible; height: 60px; "></iframe>
      [*=center]<iframe allowtransparency="true" frameborder="0" scrolling="no" src="http://platform.twitter.com/widgets/tweet_button.1347008535.html#_ =1350852431111&count=vertical&id=twitter-widget-0&lang=en&original_referer=http%3A%2F%2F <a href=" http:="" www.guidingtech.com%2f681%2fcr"="" target="_blank">www.guidingtech.com%2F681%2Fcr</a> eate-partition-windows-disk-management%2F&amp;related=abhijeet mk%3AGuiding%2 0Tech%20Founder&amp;size=m&amp;text=Ho w%20To%20Create%20Extra %20Partitions%20In%20Windows%2 0Using%20Disk%20Management%20C onsole&amp;url=http%3A%2F%2Fwww.gu idingte ch.com%2F681%2Fcreate-partition-windows-disk-management%2F&amp;via=guidingtech" class="twitter-share-button twitter-count-vertical" title="Twitter Tweet Button" data-twttr-rendered="true" style="width: 59px; height: 62px; "></iframe>
    When you buy a branded Windows computer, usually you'll find a single partition ( the C: drive) which has the OS and other programs installed on it. Sometimes, there may be another partition for recovery purposes, but otherwise, the manufacturers do not partition the hard disk by default.
    What are disk partitions in Windows

    According to Windows:
    A partition, sometimes also called a volume, is an area on a hard disk that can be formatted with a file system and identified with a letter of the alphabet. For example, drive C on most Windows computers is a partition.
    In simple terms, if your hard disk is a bookshelf then partitions are different shelves on it which store data.
    Why you should create partitions

    Managing all the data on that single available partition or the C drive isn't prudent because C drive contains all the important Windows and programs folders. So if anything corrupts the OS then that would jeopardize your data too.
    Also, managing files and folders on one partition is cumbersome. And if it comes to formatting the computer , there is no option to move data to another partition to save it from deletion (external media is required to save all important data).
    Some recommendations before your create partitions

    1. The primary partition that contains your operating system shouldn't be used to store important data. It should be smaller in size as compared to other partitions that you create. For example, if you've got 250GB storage, allot around 40GB to the C: drive (assuming you have Vista/Windows 7&#8230;if you have XP then 20GB is enough).
    2. Create another partition that you'll use to store important files. This one could take the maximum space on the hard disk.
    3. Keep your primary partition organized and clean. Use tools like Revo Uninstaller to uninstalluseless applications and Ccleaner to clean it up.
    So now that you are convinced that you should partition your hard disk into more drives, lets check out the Windows' inbuilt Disk Management console which helps you in that task.
    How To Partition Your Hard Disk in Windows

    You can make partitions of disk with the help of Disk Management console. You can make as many partitions as you want.
    This is a step by step guide to create a partition on your computer hard disk using the Disk Management console:
    Click on Windows Start
    start5.png
    button. Type Computer Management in a search box.
    computermanagement.png

    Click Disk Management option on the left panel. It will load disk configuration information
    diskmanagement.png

    All information of partitions in your computer will be displayed on the right hand side.
    diskmanagement1.png

    Right click on the partition you want to shrink. Click on Shrink volume.
    shrinkvolume.png

    Note that you can only shrink a partition if it has enough vacant space. And you should always make sure that a partition has some space to accommodate more data. Shrinking 5GB of space means new size of partition will be 5GB less than previous size.
    shrink.png

    You can see in the image below that 5GB space is shown as unallocated space. Note the new size of D drive. It is 85.57 GB now from 90.54 GB.
    shrink1.png

    You can make a new partition of this unallocated disk space by right clicking on it and selectingNew simple Volume from the menu.
    newvolume.png

    Click on Next button.
    simplevolume.png

    Now choose the size of disk. You can allocate all the unallocated space, i.e. 5000 MB.
    simplevolume2.png

    Assign a letter to a drive from a drop down list.
    simplevolume3.png

    Format the volume using NTFS file system. Check Perform a quick format option. Click Next button.
    simplevolume4.png

    Click on Finish button. It will create a new partition of your hard disk.
    simplevolume5.png

  • How To Extend Disk Space In Windows

    You can also extend volume of any partition by right clicking on a partition and selecting Extend volume option from the menu. In the Extend Volume Window click on Next button.
    extendvolume.png

    Now you can extend your disk space by allocating unallocated disk space. In the above example we have 5000 MB unallocated space, so we can give this space to extend the disk size. After selecting amount of space click Next button.
    extendvolume1.png

    You can check that the size of D drive is again 90.45 GB. So in this way disk space will be extended.
    extendvolume2.png

    So that was how to shrink a volume, create a new volume out of the unallocated volume and add that unallocated volume to a previous volume to extend it.

    Angalia hiyo Video:
  • Ukifanikiwa nipe feedback.


Nilikuwa natumia njia ya kawaida ngoja nicheck hii in Advance
 
Last edited by a moderator:
Unayo Windows gani kwenye hiyo computer yako_ Shaffin Simbamwene
Natumia windows 7 ultimate 32bit na mashine ni desktop aina ya AsRock dual band,hdd 300Gb RAM 4Gb
windows zingine nina install fresh but hii nimekwama kaka yaani tatizo ni kwamba ukirestart na kupress any key to boot inaanza kuleta logo ya windows then inatokea hiyo error.
Nimejaribu ku install computer ikiwa on zoezi likaenda fresh tatizo kumaliza ngwe iliyobaki...........ukirestart mambo yale yale.

Ebu nipe link nipakue hiyo Zorrin
hello Shaffin Simbamwene ulicho fanya kosa wewe ni ku install hiyo Windows 8 juu ya Windows 7 pasipo na kuweka hiyo Windows 8 Hard Disk Patrititon yake fanya hivi kama unayo DVD ya Windows 7 jaribu ku install tena hiyo Windows 7 kwenye computer yako kwa sababu hiyo Windows 7 imesha Corrupt imeharibika itabidi uiweke tena fuata huu ushauri wangu

Performing a New Installation of Windows 7

So, you're ready to install Windows 7? Read on to get guidance on how to approach this installation and make sure your copy of Windows 7 is properly installed.
[h=2]Planning the Installation[/h]As with any OS installation, we must first plan the installation process. When you run the Windows 7 Setup program, you must provide information about how to install and configure the operating system. Thorough planning can make your installation of Windows 7 more efficient by helping you to avoid potential problems during installation. An understanding of the configuration options will also help to ensure that you have properly configured your system.
Here are some of the most important things you should take into consideration when planning for your Windows 7 installation:

  • Check System Requirements
  • Check Hardware and Software Compatibility
  • Determine Disk Partitioning Options
  • Complete a Pre-Installation Checklist
Microsoft states the minimum recommended specs for Windows 7:

  • 1 GHz 32-bit or 64-bit processor
  • 1 GB of system memory
  • 16 GB of available disk space
  • Support for DirectX 9 graphics with 128 MB memory (to enable the Aero theme)
  • DVD-R/W Drive
  • Internet access (to activate and get updates)
[h=2]32-bit or 64-bit Version?[/h]You need to decide whether to install the 32-bit or 64-bit version of Windows 7. The Windows 7 installation disc package includes both 32-bit and 64-bit versions of Windows 7. Basically, the 64-bit version of Windows handles large amounts of random access memory (RAM) more effectively than a 32-bit system. So if you plan on using Windows 7 on a computer with more than 3 GB or RAM, I would strongly suggest to use the 64-bit version. Most programs designed for the 32-bit version of Windows will work on the 64-bit version of Windows, and if they don't, you can always use Windows XP Mode (read my "How to Install Windows XP Mode on Windows 7" article).
Note: Either way, you cannot use an existing 32-bit version of a previous OS to perform an in-place upgrade to a 64-bit version of Windows 7, and you'll need to format and install a fresh copy. Also, you cannot use an existing 64-bit version of a previous OS to perform an in-place upgrade to a 32-bit version of Windows 7.
[h=2]Type of Installation[/h]Basically, there are 2 approaches to installing Windows 7:

  1. Upgrade (In-place upgrade) - This option replaces your current version of Windows with Windows 7, and keeps your files, settings, and programs in place on your computer.
  2. Custom ("fresh" installation) - This option replaces your current version of Windows with Windows 7, but doesn't preserve your files, settings, and programs. It's sometimes referred to as a clean installation for that reason.
As always, a fresh installation is much better and I strongly recommend taking that track. Even if you've got an existing Windows XP/Vista OS on your computer, I would strongly recommend that you format it and install a fresh copy of the OS.
This article will focus on a fresh installation of Windows 7. Please read my "How to Upgrade from Windows XP to Windows 7" and "Upgrade from Windows Vista to Windows 7" articles for more information on those paths.
[h=2]Beginning the Installation Process[/h]When installing on a physical computer insert your Windows 7 DVD media into your DVD drive and reboot your computer. If you're asked to press a key to boot from DVD or CD, press any key. A black window will appear momentarily while the DVD content is read.
install_win7_1-590x367.png

Note: These screenshots are taken from a Windows 7 Ultimate installation performed on a virtual machine running on VMware Workstation. I will be using an .ISO file mounted on the VMs CD/DVD drive.
Next, a Starting Windows screen will appear.
install_win7_2-590x367.png

Note: If the Windows installation page doesn't appear and you're not asked to press a key to start from DVD or CD, you might have to specify that your computer uses its DVD or CD drive as the startup device.
[h=2]The Installation Process[/h]Like in Windows Vista and Windows Server 2008, and unlike previous versions of Windows, Windows 7 does not have a noticeable text phase of the setup process, and it will boot directly into the Graphical User Interface (GUI) mode.
After a few moments you will see the first prompt:
install_win7_3-533x400.png

Click "Next" unless you want to change some regional settings for the installation process. Hebrew users should read my "Installing Hebrew on Windows 7" article.
install_win7_4-533x400.png

Click on the "Install now" button.
Note: If you're using the installation media to repair an existing installation of Windows 7 you should also read my latest article on the Windows Recovery Environment.
Next, accept the license terms and click on "Next".
install_win7_5-533x400.png

Next, unless you're upgrading an existing Windows installation, press the Custom (Advanced) installation type button. Note that in this case, the Upgrade button is disabled because this specific installation if performed on a new computer without any previous operating system on it.
install_win7_6-533x400.png

The next phase is to pick the installation partition. Since this computer has a new hard disk that hasn't been formatted before, you will only have the option to create a new partition on it.
If you don't want to specify a specific partition to install Windows on, or create partitions on your hard disk, click Next to begin the installation. If you already have another existing partition with enough free space and want to install the Windows 7 on that partition to create a multiboot configuration, select the partition you want to use, and then click Next to begin the installation. If you want to create, extend, delete, or format a partition, click Drive options (advanced), click the option you want, and then follow the instructions.
Since I don't need to perform any additional task I will just click on the "Next" button. The installation process will then create a partition on all the available disk space, and format it.
install_win7_7-533x400.png

The setup process will now begin to copy files from the installation DVD media to the hard disk.
install_win7_8-533x400.png

Process could take a while depending on the type of hardware your computer uses. In my VM test sample I've used for this demo, the entire process finished before I could finish writing the previous 3 paragraphs, so it could be pretty quick.
The computer will reboot, and the next thing you'll see is the prompt to set the user's and computer's name. By default, the computer's name will be username-PC, where username is the username you've entered.
Note: The user you're creating will be the only user currently available on the system. Like Vista, the built-in Administrator's account is disabled. Read my article on how to enable the Windows 7 Administrator's account article for more information.
Click on "Next".
install_win7_9-533x400.png

Enter the user's password. Remember this password, as it will be the ONLY user on the system, and unless you create an additional user or enable the built-in administrator account, if you forget this password you'll need to crack it to gain access to the system. The best option would be to choose a complex password made of at least 7 characters or more (something like Pssw0rd or MYpa$$w0rd). You must also enter a password hint.
Click on "Next".
install_win7_10-533x400.png

Next, type in your product key. If you do not have the product key at hand you can still click "Next", and proceed with the installation. You will be asked to enter the product key after Windows is installed.
install_win7_11-533x400.png

Choose what sort of protection your computer gets. The recommended settings are best for someone that doesn't plan to hide their computer behind a corporate firewall (and even then, in some cases, this would be the best option). If you plan to install a 3rd-party firewall later you can opt to be prompted later. Note that this setting will also have effect on how the computer uses the Microsoft Windows Update (Automatic Updates) features.
<center style="color: rgb(0, 0, 0); font-family: Verdana, Arial, Helvetica, sans-serif; font-size: 11px; line-height: 18.33333396911621px; "></center>
install_win7_12-533x400.png

Choose your time zone and location and click on "Next".
install_win7_13-533x400.png

Select your network location type. This setting can be changed later, but do note that choosing a profile will have effect on the Windows Firewall and sharing settings. Click on "Next".
install_win7_141-533x400.png

Windows will finalize the settings and your desktop will appear.
install_win7_15-533x400.png


This concludes the Windows 7 installation. Next, you would probably want to update your computer with the latest hotfixes and/or patches from Microsoft.

Ukimaliza niambie umefikia wapi? ukirudisha hiyo Windows 7 Ultmate driver zako zote zitarudi fanya hivyo unipe feedback.
 
Last edited by a moderator:
hello shaffin simbamwene ulicho fanya kosa wewe ni ku install hiyo windows 8 juu ya windows 7 pasipo na kuweka hiyo windows 8 hard disk patrititon yake fanya hivi kama unayo dvd ya windows 7 jaribu ku install tena hiyo windows 7 kwenye computer yako kwa sababu hiyo windows 7 imesha corrupt imeharibika itabidi uiweke tena fuata huu ushauri wangu


performing a new installation of windows 7

so, you're ready to install windows 7? Read on to get guidance on how to approach this installation and make sure your copy of windows 7 is properly installed.
planning the installation

as with any os installation, we must first plan the installation process. When you run the windows 7 setup program, you must provide information about how to install and configure the operating system. Thorough planning can make your installation of windows 7 more efficient by helping you to avoid potential problems during installation. An understanding of the configuration options will also help to ensure that you have properly configured your system.
here are some of the most important things you should take into consideration when planning for your windows 7 installation:

  • check system requirements
  • check hardware and software compatibility
  • determine disk partitioning options
  • complete a pre-installation checklist
microsoft states the minimum recommended specs for windows 7:

  • 1 ghz 32-bit or 64-bit processor
  • 1 gb of system memory
  • 16 gb of available disk space
  • support for directx 9 graphics with 128 mb memory (to enable the aero theme)
  • dvd-r/w drive
  • internet access (to activate and get updates)
32-bit or 64-bit version?

you need to decide whether to install the 32-bit or 64-bit version of windows 7. The windows 7 installation disc package includes both 32-bit and 64-bit versions of windows 7. Basically, the 64-bit version of windows handles large amounts of random access memory (ram) more effectively than a 32-bit system. So if you plan on using windows 7 on a computer with more than 3 gb or ram, i would strongly suggest to use the 64-bit version. Most programs designed for the 32-bit version of windows will work on the 64-bit version of windows, and if they don't, you can always use windows xp mode (read my "how to install windows xp mode on windows 7" article).
note: Either way, you cannot use an existing 32-bit version of a previous os to perform an in-place upgrade to a 64-bit version of windows 7, and you'll need to format and install a fresh copy. Also, you cannot use an existing 64-bit version of a previous os to perform an in-place upgrade to a 32-bit version of windows 7.
type of installation

basically, there are 2 approaches to installing windows 7:

  1. upgrade (in-place upgrade) - this option replaces your current version of windows with windows 7, and keeps your files, settings, and programs in place on your computer.
  2. custom ("fresh" installation) - this option replaces your current version of windows with windows 7, but doesn't preserve your files, settings, and programs. It's sometimes referred to as a clean installation for that reason.
as always, a fresh installation is much better and i strongly recommend taking that track. Even if you've got an existing windows xp/vista os on your computer, i would strongly recommend that you format it and install a fresh copy of the os.
this article will focus on a fresh installation of windows 7. Please read my "how to upgrade from windows xp to windows 7" and "upgrade from windows vista to windows 7" articles for more information on those paths.
beginning the installation process

when installing on a physical computer insert your windows 7 dvd media into your dvd drive and reboot your computer. If you're asked to press a key to boot from dvd or cd, press any key. A black window will appear momentarily while the dvd content is read.
install_win7_1-590x367.png

note: These screenshots are taken from a windows 7 ultimate installation performed on a virtual machine running on vmware workstation. I will be using an .iso file mounted on the vms cd/dvd drive.
next, a starting windows screen will appear.
install_win7_2-590x367.png

note: If the windows installation page doesn't appear and you're not asked to press a key to start from dvd or cd, you might have to specify that your computer uses its dvd or cd drive as the startup device.
the installation process

like in windows vista and windows server 2008, and unlike previous versions of windows, windows 7 does not have a noticeable text phase of the setup process, and it will boot directly into the graphical user interface (gui) mode.
after a few moments you will see the first prompt:
install_win7_3-533x400.png

click "next" unless you want to change some regional settings for the installation process. Hebrew users should read my "installing hebrew on windows 7" article.
install_win7_4-533x400.png

click on the "install now" button.
note: If you're using the installation media to repair an existing installation of windows 7 you should also read my latest article on the windows recovery environment.
next, accept the license terms and click on "next".
install_win7_5-533x400.png

next, unless you're upgrading an existing windows installation, press the custom (advanced) installation type button. Note that in this case, the upgrade button is disabled because this specific installation if performed on a new computer without any previous operating system on it.
install_win7_6-533x400.png

the next phase is to pick the installation partition. Since this computer has a new hard disk that hasn't been formatted before, you will only have the option to create a new partition on it.
if you don't want to specify a specific partition to install windows on, or create partitions on your hard disk, click next to begin the installation. If you already have another existing partition with enough free space and want to install the windows 7 on that partition to create a multiboot configuration, select the partition you want to use, and then click next to begin the installation. If you want to create, extend, delete, or format a partition, click drive options (advanced), click the option you want, and then follow the instructions.
since i don't need to perform any additional task i will just click on the "next" button. The installation process will then create a partition on all the available disk space, and format it.
install_win7_7-533x400.png

the setup process will now begin to copy files from the installation dvd media to the hard disk.
install_win7_8-533x400.png

process could take a while depending on the type of hardware your computer uses. In my vm test sample i've used for this demo, the entire process finished before i could finish writing the previous 3 paragraphs, so it could be pretty quick.
the computer will reboot, and the next thing you'll see is the prompt to set the user's and computer's name. By default, the computer's name will be username-pc, where username is the username you've entered.
note: The user you're creating will be the only user currently available on the system. Like vista, the built-in administrator's account is disabled. Read my article on how to enable the windows 7 administrator's account article for more information.
click on "next".
install_win7_9-533x400.png

enter the user's password. Remember this password, as it will be the only user on the system, and unless you create an additional user or enable the built-in administrator account, if you forget this password you'll need to crack it to gain access to the system. The best option would be to choose a complex password made of at least 7 characters or more (something like pssw0rd or mypa$$w0rd). You must also enter a password hint.
click on "next".
install_win7_10-533x400.png

next, type in your product key. If you do not have the product key at hand you can still click "next", and proceed with the installation. You will be asked to enter the product key after windows is installed.
install_win7_11-533x400.png

choose what sort of protection your computer gets. The recommended settings are best for someone that doesn't plan to hide their computer behind a corporate firewall (and even then, in some cases, this would be the best option). If you plan to install a 3rd-party firewall later you can opt to be prompted later. Note that this setting will also have effect on how the computer uses the microsoft windows update (automatic updates) features.
<center style="color: Rgb(0, 0, 0); font-family: Verdana, arial, helvetica, sans-serif; font-size: 11px; line-height: 18.33333396911621px; "></center>
install_win7_12-533x400.png

choose your time zone and location and click on "next".
install_win7_13-533x400.png

select your network location type. This setting can be changed later, but do note that choosing a profile will have effect on the windows firewall and sharing settings. Click on "next".
install_win7_141-533x400.png

windows will finalize the settings and your desktop will appear.
install_win7_15-533x400.png


this concludes the windows 7 installation. Next, you would probably want to update your computer with the latest hotfixes and/or patches from microsoft.

Ukimaliza niambie umefikia wapi? Ukirudisha hiyo windows 7 ultmate driver zako zote zitarudi fanya hivyo unipe feedback.
naona tunapishana mkuu!!
Tatizo si win 7 bali hiyo w8 ukishaweka dvd au flash inasoma kidogo then inaleta error anyway ngoja nicapture ndo utanielewa kaka
 
naona tunapishana mkuu!!
Tatizo si win 7 bali hiyo w8 ukishaweka dvd au flash inasoma kidogo then inaleta error anyway ngoja nicapture ndo utanielewa kaka
Kama Shaffin Simbamwene Kama hiyo DVD yako au USB flashadisk yako inasoma Error kuna makosa uliyoyafanya katka kukopi hilo file na kuweka katka DVd au katika USB Flash Disk jaribu tena kuweka katika USB Flash Disk tumia njia hii hapa na kuangalia hizo video kisha uje unipe feedback. Anza upya.

Windows 7 USB tool
http://www.avoiderrors.net/Downloads/Windows7-USB-DVD-tool.zip

Windows 8 RTM final professional x86 & x64 [ThumperDC] download

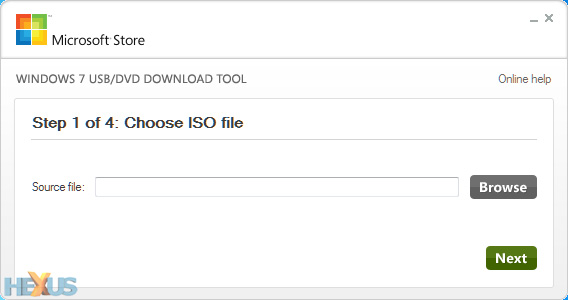
1. Install and run Microsoft's Windows 7 USB tool. In the subsequent window (pictured below), browse to the 32-bit or 64-bit Windows 8 disk image file you've already downloaded and hit next.
win8usb-1.jpg


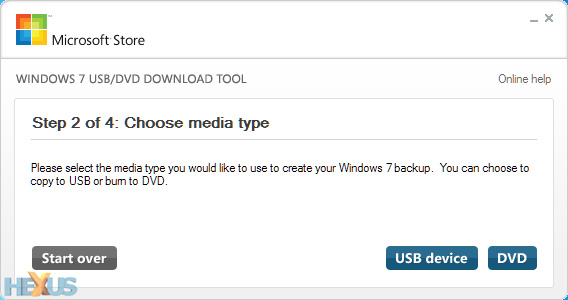
2. With your USB stick plugged in (remember, it'll need to be at least 4GB in size for a 64-bit install), choose USB device as your media type.
win8usb-2.jpg


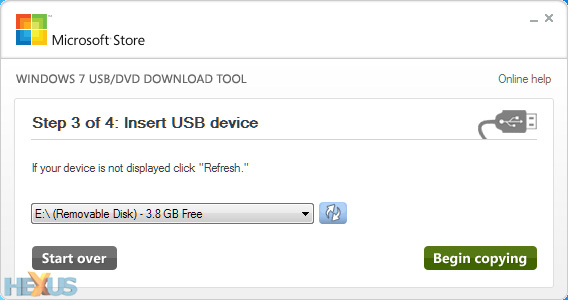
3. Select the correct removable device from the drop-down menu, then click begin copying.
win8usb-3.jpg


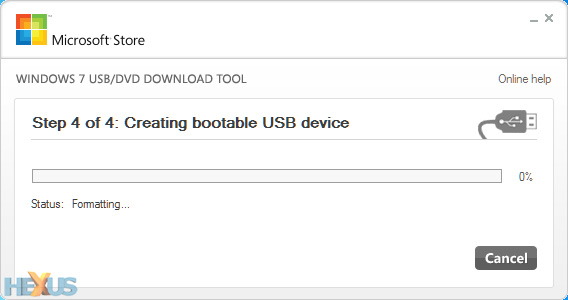
4. Sit back, relax, and make a cuppa while the USB tool formats your pen drive, makes it bootable, and copies over all of the Windows 8 files.
win8usb-4.jpg


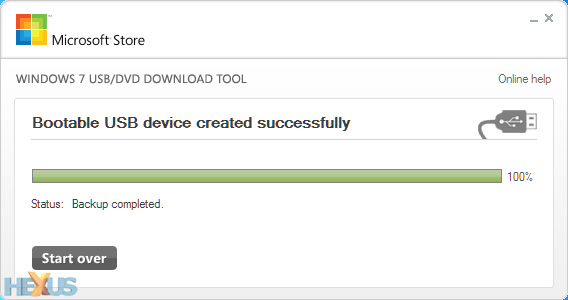
5. Once the process is complete, the USB drive can be used to boot a PC and run the Windows 8 setup process.
win8usb-5.jpg


That's all there is to it. You'll save yourself a blank DVD, the Windows 8 setup process should be quicker from flash-based media, and it's of course a must on netbooks or laptops without an optical drive.


Last edited by a moderator:
kama shaffin simbamwene kama hiyo dvd yako au usb flashadisk yako inasoma error kuna makosa uliyoyafanya katka kukopi hilo file na kuweka katka dvd au katika usb flash disk jaribu tena kuweka katika usb flash disk tumia njia hii hapa na kuangalia hizo video kisha uje unipe feedback. Anza upya.

windows 7 usb tool
http://www.avoiderrors.net/downloads/windows7-usb-dvd-tool.zip

windows 8 rtm final professional x86 & x64 [thumperdc] download

1. install and run microsoft's windows 7 usb tool. In the subsequent window (pictured below), browse to the 32-bit or 64-bit windows 8 disk image file you've already downloaded and hit next.
win8usb-1.jpg


2. with your usb stick plugged in (remember, it'll need to be at least 4gb in size for a 64-bit install), choose usb device as your media type.
win8usb-2.jpg


3. select the correct removable device from the drop-down menu, then click begin copying.
win8usb-3.jpg


4. sit back, relax, and make a cuppa while the usb tool formats your pen drive, makes it bootable, and copies over all of the windows 8 files.
win8usb-4.jpg


5. once the process is complete, the usb drive can be used to boot a pc and run the windows 8 setup process.
win8usb-5.jpg


that's all there is to it. You'll save yourself a blank dvd, the windows 8 setup process should be quicker from flash-based media, and it's of course a must on netbooks or laptops without an optical drive.


nimetumia njia hizo hizo kaka ila sasa nimegundua tatizo lipo kwenye mother board maana nimejaribu kwa desktop ya dogo dvd na usb zote zinainstall fresh tu!!!
Najaribu kucheck bios setting
 
Last edited by a moderator:
Wakuu wangu naona naaribu thread ila naombeni tena msaada nimekwama kidogo.....naomba msaada wa CCS C compiler hii software nataka kuitumia kwenye Mplab ila nimeisaka sana nimeikosa kabisaaa msaada unahitajika nikiipata nitashukuru sana wakuu MziziMkavu and Kimox Kimokole
 
Wakuu wangu naona naaribu thread ila naombeni tena msaada nimekwama kidogo.....naomba msaada wa CCS C compiler hii software nataka kuitumia kwenye Mplab ila nimeisaka sana nimeikosa kabisaaa msaada unahitajika nikiipata nitashukuru sana wakuu MziziMkavu and Kimox Kimokole
Mkulu Papizo hebu jaribu kubonyeza hapa https://rapidshare.com/#!download|5...r_CCS_PCWHD_4.093_FULL_Portable.rar|23498|0|0


Au hapa http://www.filecrop.com/20836337/index.html kisha unipe feedback.
 
Mkuu wangu MziziMkavu naona imenigomea nimedownload tayari na nimejaribu kuinstall imegoma kabisa, sijui labda wewe jaribu kuistall kama inaweza kukubali then nijulishe please,maana nina umuhimu nayo sana hii kitu.......

Picha ya kwanza nimejaribu ku istall ikagoma na picha ya pili nimejaribu kuiweka kwenye MPLAB vile vile imegoma pia.....

Msaada wowote??
 

Attachments

  • CCS C Compiler screenshot.png
    CCS C Compiler screenshot.png
    66.9 KB · Views: 28
  • PIC C compiler.png
    PIC C compiler.png
    73 KB · Views: 24
Mkuu wangu MziziMkavu naona imenigomea nimedownload tayari na nimejaribu kuinstall imegoma kabisa, sijui labda wewe jaribu kuistall kama inaweza kukubali then nijulishe please,maana nina umuhimu nayo sana hii kitu.......

Picha ya kwanza nimejaribu ku istall ikagoma na picha ya pili nimejaribu kuiweka kwenye MPLAB vile vile imegoma pia.....

Msaada wowote??
Mkulu Papizo nimejaribu kutafuta hiyo unayotaka nimekosa lakini kuna hii hapa ebu jaribu kisha unipe Feedback bonyeza hapa MikroC PRO For AVR 5.0 Download page - MikroC PRO For AVR Shareware Download

mikroC PRO for AVR is a full-featured ANSI C compiler for AVR devices from Atmel®. It is the best solution for developing code for AVR devices. It features intuitive IDE, powerful compiler with advanced SSA optimizations, lots of hardware and software libraries, and additional tools that will help you in your work. Compiler comes with comprehensive Help file and lots of ready-to-use examples designed to get you started in no time..

Pia waweza angalia hapa bonyeza
http://www.fileguru.com/apps/ccs_c_compiler_for_pic
 
Mkuu MziziMkavu nashukuru sana kwa ushirikiano wako asante sana, pia vile hizo link ulizonitumia zingesaidia sana ila sasa PIC16F877A haiingiliani nazo naona ndio maana, pia vile vile nimejaribu kuisaka hiyo software na nimeipata online ila sasa ni ya 30 days tu??na nakumbuka kuna member humu aliingiaga na kuna maelekezo alitoa kama mtu ukiwa na software ya 30 days na kuweza kuitumia permanent ila ule uzi siupata sijui ndugu yangu una maujanja yoyote yale labda?? vile nimeifanyia testing MPLAB na imekubali now sema ndani ya 30 days itagoma na mimi nahitaji kutumia kwa zaidi ya miezi 3....

Nime attach image hapo na screenshoot nyingine inaonyesha lile file la CCS Compiler
 

Attachments

  • MPLAB TESTING.png
    MPLAB TESTING.png
    71.7 KB · Views: 25
  • CCS C Compiler screenshot2.png
    CCS C Compiler screenshot2.png
    78.8 KB · Views: 25
Last edited by a moderator:
Mkuu MziziMkavu nashukuru sana kwa ushirikiano wako asante sana, pia vile hizo link ulizonitumia zingesaidia sana ila sasa PIC16F877A haiingiliani nazo naona ndio maana, pia vile vile nimejaribu kuisaka hiyo software na nimeipata online ila sasa ni ya 30 days tu??na nakumbuka kuna member humu aliingiaga na kuna maelekezo alitoa kama mtu ukiwa na software ya 30 days na kuweza kuitumia permanent ila ule uzi siupata sijui ndugu yangu una maujanja yoyote yale labda?? vile nimeifanyia testing MPLAB na imekubali now sema ndani ya 30 days itagoma na mimi nahitaji kutumia kwa zaidi ya miezi 3....

Nime attach image hapo na screenshoot nyingine inaonyesha lile file la CCS Compiler
Mkuu Papizo itabidi uwaulize akina Mkuu chief-mkwawa mkuu.@sijuwinini na wengine wanaojuwa hiyo Unlock Trial Software.
 
Back
Top Bottom